This chapter is designed for everyone getting started with LEMDO, including editors,
encoders, anthology leads, and developers. It will guide you through the tasks that
you must complete before you begin working in the LEMDO repository and will introduce
you to key concepts that you should understand before working on your LEMDO edition.
Prior Reading
This chapter presupposes that you have read the Quickstart(s) appropriate to your
role with LEMDO and that you either already know TEI-XML or have read Introduction to Markup, XML, and TEI.
Learning Outcomes
This chapter gives you all the information you need to get started on your edition.
By the time you have worked through every section of this chapter, you will:
Have affiliate status at UVic.
Have a NetLink ID and password that gives you access to your files in the LEMDO repository.
Understand enough about our platform, Subversion repository, and Jenkins build server
to be able to read and understand the rest of our documentation.
Have installed Oxygen XML Editor and Subversion.
Have checked out the LEMDO repository to your computer.
Be able to write basic Subversion commands in the command line (Terminal) of your
computer.
Be able to open and start working in Oxygen XML Editor.
Be able to validate and commit your work to the repository.
Be able to use the keyboard shortcuts we have added to Oxygen for editors.
Learn to use Oxygen’s built-in keyboard shortcuts and the additional shortcuts that
LEMDO has created for editors
Get a NetLink ID
NetLink ID versus xml:id
A NetLink ID allows you to interact with the University of Victoria and its systems.
An xml:id allows you to interact specifically with the LEMDO repository. You need both a NetLink
ID and an xml:id to work within the LEMDO platform. You will create your own NetLink
ID. The LEMDO Project Manager will give you an xml:id.
Rationale
To be able to interact with the LEMDO repository, you need a UVic NetLink ID and password. We protect the repository by restricting
write privileges so that no one can write to the repository unless they enter their NetLink ID and
password. We further protect the repository by giving you write privileges for only
specific parts of the repository, normally just the directory containing the files for your edition. When you enter your NetLink ID and password,
UVic Systems checks that your NetLink ID and password match, and then the UVic repository
will accept incoming revisions from your local computer’s copy of the repository.
Practice
If you are already a UVic student, staff member, or faculty member, you already have
a NetLink ID. You may jump to the step of sending your NetLink ID to the Project Manager.
If you do not have UVic credentials, you will first need apply for an affiliate identity.
Once granted, your affiliate identity allows you to set up a unique NetLink ID and
password. You will need to go through each of the following steps:
Apply for an affiliate identity. (Wait to hear back from the Project Manager.)
Create your NetLink ID and password.
Send your NetLink ID and bio to LEMDO’s Project Manager at lemdo@uvic.ca. (Wait to hear back about a time for a training session.)
Test write privileges during your training session.
Note for those working in French that NetLink ID is translated as “Identifiant” on the login page, as shown below.
French language NetLink login page.
There are multiple agents and dependencies in this process. We have mapped these in
the swimlane process diagram below.
Process by which NetLink IDs are requested, granted, and given write privileges.
Step-by-Step
Apply for affiliate identity by filling in the Sponsorship Request Form. You are the Affiliate. The LEMDO Project Director will be your Sponsor. Fill in
Janelle Jenstad’s name, email (jenstad@uvic.ca), and department (English) as shown
below.
Source: UVic Affiliate Identity Management System (AIMS)
The AIMS system will forward the request to Janelle Jenstad, who will then log in
to AIMS, confirm that your request is legitimate, and write a justification for you
to be given affiliate identity. Confirmation will take a day or so, depending on Janelle’s
schedule.
A human at UVic’s Help Desk reviews the justification and approves the granting of
affiliate identity. Depending on the time of year and the other demands on the Help
Desk’s staff, approval may take as little as one day or as long as a week.
Approval of affiliate identity results in the generation of a V-Number for you (i.e.,
an alphanumeric string starting with V and followed by eight digits). The Help Desk
sends it to Janelle, who in turn passes it on to the Project Manager.
The Project Manager will email your V-Number to you at the email we have on file for
you, along with further instructions about creating a NetLink ID and writing a bio-bibliographical note. When you get that V-Number, save it! All your future interactions with UVic will
require this number, including the task of choosing your own NetLink ID.
Create your own NetLink ID on this page: https://www.uvic.ca/uvicid/. Choose a recognizable combination of your initials and surname (plus a number if
necessary for disambiguation purposes): surname, forenamesurname, surname1, or forenamesurname1.
It helps us if we can connect you to your NetLink ID at a glance.
Set up a secure password for your NetLink ID. Remember this password. If you forget
it, you will need to know your V-Number in order to reset it.
Send your NetLink ID (but not your password) to the Project Manager (lemdo@uvic.ca). Send a bio-bibliographical note at the same time.
The Project Manager will ask a member of the HCMC staff to add your NetLink ID to
the list of NetLink IDs authorized to modify the LEMDO repository. You will only be
able to modify the directories and files that pertain to your edition(s).
Check out the LEMDO repository and begin working. Anyone can check out the repository. However, to commit to the LEMDO repository, you must have your NetLink ID and password at hand.
If you are unable to commit to the repository, contact Janelle Jenstad or the Project
Manager immediately.
Oxygen 19 or higher; the LEMDO team is currently using Oxygen 26 (released late 2023).
We also find that a second monitor/screen is helpful for encoders to have, though
it is optional.
NetLink ID
The repository is password-protected. You must have a NetLink ID in order to access
the repository. If you have a NetLink ID, email it to lemdo@uvic.ca in order to be given access to the repository. (Do not send us your password!) If
you do not have a NetLink ID, see the instructions in Get a NetLink ID.
Storage Space
The LEMDO repository is over 800 MB. Make sure you have enough space on your computer
to download the repository. Note that some institutions block the sending of XML files.
If your machine is owned by your institution and this is the case, contact lemdo@uvic.ca for assistance.
SVN Command-Line Client
To access data from the repository, you will need to use an SVN command-line client.
Instructions on how to download an SVN command-line client vary slightly for different
operating systems (OS). Click on the link below that pertains to your OS:
At LEMDO, we use Oxygen to edit our XML files. See Get Oxygen for instructions on how to download Oxygen and add a license key.
Second Monitor/Screen
While not a requirement, the LEMDO team strongly recommends that you have a second
screen. Dual monitors make encoding (1) more efficient and (2) more enjoyable.
Provides—via a schema and Schematron—a set of prescriptions, proscriptions, options,
and constraints for encoding documents in TEI-XML. These are LEMDO-specific requirements
that ensure that all of our thousands of TEI-XML documents are encoded consistently
in ways that we can process. The LEMDO platform validates each file against those requirements and gives the encoder or editor suggestions
and instant error messages.
Hosts multiple databases to which all editions can link.
Includes editing tools that speed up the process of encoding a text. These tools range
from keyboard shortcuts for adding anchors to texts to programmatic conversions that
can generate template files from other XML sources (such as the EEBO-TCP texts).
Offers the ability to link easily to other projects, such as MoEML, DEEP, the ESTC,
and WSB, by using those projects’ stable URIs and linked data protocols.
Generates diagnostics at the level of the file, edition, and anthology in order to
flag errors, omissions and duplications that are not otherwise governed by the LEMDO
schema.
Hosts robust and thorough documentation of LEMDO’s editorial and encoding practices,
with links to training videos.
Has multiple processing pipelines that produce various outputs:
HTML pages with no server-side dependencies.
Editions.
The lemdo-dev site that hosts all work in progress.
Multiple anthologies, including the public-facing LEMDO site, remediated anthologies
(QME, DRE, and ISE), and new anthologies (NISE, MoMS, EMEE, and others).
Various flavours of XML.
PDFs for our ePublishing and print series.
Complies with the principles of The Endings Project, meaning that all of these static, standalone outputs can be deposited and distributed
in multiple locations, thus ensuring the long-term preservability of LEMDO publications.
The LEMDO platform depends on two key technologies:
A Subversion Repository that keeps all of our documents and code under version control.
A Jenkins Continuous Integration Server that runs our diagnostics and allows us to
build and rebuild static HTML pages and websites multiple times a day. Jenkins also
allows us to package up HTML pages and XML files for easy download.
The Subversion Repository
The repository keeps a record of every copy of every file. At LEMDO, we use Subversion, an open-source version control system. Since many different people at LEMDO (editors,
research assistants, programmers) need to work on documents in the repository, we
use Subversion to keep our data safe. If someone makes a mistake, we can roll back the document to an earlier version.
The entire repository is open-access, which means that it is publicly available. While
it is not crawled by Google—you will not be able find it through a search engine—it
is viewable to those who know the link: https://hcmc.uvic.ca/svn/lemdo.
Jenkins Continuous Integration Server
For the most part, editors and anthology leads will not need to think about Jenkins.
It works away in the background building your editions and anthologies. But if you
do want to see how the build process is going, you can go directly to the LEMDO dashboard on the Jenkins server. (Note
that LEMDO shares its Jenkins server with a number of other HCMC projects, each of
which has its own dashboard.) A green checkmark means that Jenkins has successfully
rebuilt all the pages, anthologies, and diagnostics since the most recent file was
committed. When you do need to look at specific products of the Jenkins server (such
as your own anthology diagnostics or your edition diagnostics), we will give you a
direct link.
This documentation is complemented by our Repository Tour video on YouTube, which gives a detailed breakdown of the repository’s structure. You may also wish
to have the repository open in your browser while going through this documentation.
This documentation will explain the basic structure of the LEMDO repository and provide
detail about the structure of the data directory. It will not explain practice for encoding the contents of each directory.
Introduction
All LEMDO files are stored in a Subversion repository on the HCMC server. The repository
is a safe, accessible, and versioned place to keep our work. This repository maintains
a copy of every version of our files. If necessary, we can retrieve an earlier version
of a file or even of the entire project. Use of the repository also helps prevent
versioning conflicts when multiple editors need to work on the same file. To work
on LEMDO files, you must check out the repository to your local workstation (laptop,
desktop). You need to commit your changes back to the repository so that everyone
has access to your work.
You can browse the repository structure in a few different ways. This documentation
will use screenshots from a Windows file explorer. The structure is also the same
if you access the repository online and when you open it in Oxygen (the application that we use for encoding).
The LEMDO Directory
The first level of the repository is called lemdo. It contains six directories: code, data, jenkins, lib, obsolete, and tempLanding:
Note that there are a few files outside of the directories: build.xml, build_anthology.xml, build_globals_module.xml, buildOLD.xml, getSiteFromJenkins.sh, and lemdo-all.xpr. Take note of the lemdo-all.xpr file. You will need to open this file first before you start working on any aspect
of LEMDO (encoding an edition or working on processing). Learn more about the lemdo-all.xpr file in LEMDO Oxygen Project.
The Data Directory
Editors and research assistants work in the data directory. The data directory contains fourteen child directories: anthologies, BIBL1, css, documentation, facsimiles, how_to, images, policy, sch, templates, texts, texts_shared, and tools:
Note that the data directory also contains files outside of the child directories: BEED1 (an old file whose content will be moved into the BIBL1 files before it is moved into the obsolete directory), GLOSS1 (our glossary), HAND1 (our list of scribal hands), ORGS1 (our database of organizations), PERS1 (our personography of LEMDO contributors), PROD1 (our productions database), PROS1 (our prosopography), and TAXO1 (our taxonomies file). These files are the sitewide data files. For more information about these files, read Introduction to Sitewide Data Files.
The Anthologies Directory
The anthologies directory houses child directories for each anthology to be published on the LEMDO
platform (e.g., dre, emee, ise, lemdo, moms, qme). Each child directory contains files concerning the particular anthology. For more
information on our anthologies, read Introduction to Anthologies.
The Bibliography Folder
The BIBL1 folder contains the files for our sitewide bibliography. Because of its large size,
we have divided the bibliography into alphabetized files. Entries are encoded in the
file that is appropriate according to the first letter of the first significant piece
of information in them (i.e., author surname, editor surname, or title). For more
information on our siteweide bibliography, read Bibliography (BIBL1) and Introduction to Bibliographies and Citations.
The Cascading Style Sheets Folder
The css folder houses LEMDO’s top-level Cascading Style Sheets. Cascading Style Sheets (known colloquially as CSS) is a language used to describe
the presentation of a document. We use CSS to style the aesthetics of our website
(font, colour, spacing, etc.) and to describe the layout of particular documents (such
as the semi-diplomatic transcriptions).
The Documentation Folder
The documentation folder houses all of the files that make up LEMDO’s Documentation Index.
The Facsimiles Folder
The facsimiles folder houses files that contain metadata for and links to the facsimiles stored
in lemdo.uvic.ca/facsimiles/. We include links to these facsimiles from our semi-diplomatic transcription files.
The Images Folder
The images folder contains images that are likely to be used in multiple different pages, editions,
sites or projects, or in documentation.
The Policy Directory
The policy directory houses all of LEMDO’s policy files. We plan to move these files to the
LEMDO anthology and retire this directory.
The Schema Folder
The sch folder houses the schema (rule-sets that govern how we work in Oxygen) and files
like lemdo.odd. The schema and Schematron housed in this folder determine how you are supposed to
encode your play, catches your encoding mistakes, and prompts you to correct them.
The Templates Folder
The templates folder houses templates of files that you can use to create new files. Learn more
about our template files in Use LEMDO’s Oxygen Templates
The Texts Directory
The most important directory for editors and remediators is texts. This directory houses all of the editions. Each edition has its own directory. Learn more about the specific structure of edition directories in Edition Directories.
The Shared Texts Folder
The texts_shared folder contains files that are shared bewteen different editions (currently the series
statement for the LEMDO Hornbooks print series).
The Tools Directory
The tools directory houses various tools used by the programmers.
Quick definition: The command line is a text-based way of interacting with your computer (DHRI). There are lots of good reasons to learn to work in the Terminal (or command line or command-line interface) of your operating system. One is that it allows you to bypass the graphical user
interface (GUI) of your computer. Another (according to a researcher quoted in Nature 590) is that you will feel like a very competent […] cool nerd.
The main reason we require LEMDO users to work in the Terminal is that our Subversion repository can be accessed only via the Terminal. All of the Subversion (SVN) commands
are written in the Terminal. Detailed steps for key commands are in documentation
pages linked to from the Further Reading section of this page.
We recommend keeping this documentation page bookmarked until you are comfortable
working in the command line and until you understand the difference between the generic
Terminal commands (cd, mkdir, cd ../) and the specific Subversion commands.
Practice: Open Your Terminal
All operating systems have a command-line interface (Terminal). Before you can work
in it, you need to find it.
Mac: Press Cmd (⌘)+Space, then type Terminal (without quotation marks) and press Return
Windows: Press Windows key+r, then type cmd (without quotation marks) and press Enter
Linux: Press Ctrl+Alt+T
Terms and Abbreviations for Working in Terminal
If you are new to working in Terminal, it is helpful to learn some of the terms and
abbreviations that we use when talking about Terminal.
Directory: Another way to refer to folders. At LEMDO, we use directory to refer to folders that contain child folders, while we use folder to refer to folders that contain only files.
Tree: Refers to the structure of folders and files that we are working in. Folder structures
mimic trees in that there is one main folder (the trunk) that all other folders live in (branch out of). Everything in our LEMDO repository branches off from the main
lemdo directory.
Parent: A directory that contains another folder. It is one level closer to the trunk of the tree (the lemdo directory) in our LEMDO repository structure. For example, in this structure: lemdo/data/texts, data is the parent of texts.
Child: A folder immediately contained by another directory. It is one level further from
the lemdo directory in our repository structure. For example, in this structure: lemdo/data/texts, texts is the child of data.
Descendant: A folder that is contained by another, but is not its immediate child. For example,
in this structure: lemdo/data/texts, texts is the descendant of lemdo.
Up: Moving back towards the main directory (in our case, the lemdo directory) from a child or descendant folder.
Down: Moving into descendant directories from the main directory.
Highest level: The main directory of the repository. For LEMDO, the highest level is the lemdo directory.
Lowest level: The folder that is the parent of whichever file you have been working on. It is
the furthest relevant folder from the main directory. For example, if you were working
on emdH5_FM.xml, the pathway to that file is lemdo/data/texts/H5/main/emdH5_FM.xml. The highest level would be lemdo and the lowest level would be main.
mkdir: mkdir is a Terminal command that stands for “make directory.” This command is how you will
create new directories via your command line. It is functionally the same as creating
a new folder in your computer’s file explorer.
cd: cd is a Terminal command that stands for “change directory.” This command is how you
will move between levels in the lemdo tree.
Terminal Commands: Reference Table
Action
How to do it
Create a new directory
mkdir [folder name]
Move into a directory
cd [folder name]
List contents of the current directory
Linux & Mac: ls
Windows: dir
Find out where you are in your folder tree
Linux & Mac: pwd (print working directory)
Windows: cd (although the Terminal in Windows already shows you where you are)
Move back up the tree (i.e. go to the parent directory)
cd ../
Move two or more levels back up the tree
cd ../../ (add as many ../ as you need)
Move up the tree and then down into another folder
Commands in the command line must be typed precisely with the correct capitalization.
For example, MyFile.odt is a different file from myfile.odt.
You can recall previous commands, which is useful if you need to re-execute a recent
command or make a small modification to a recent command. Use the arrow keys on your
keyboard to recall previous commands. Press the up arrow key (↑) to reproduce the immediately previous command. Press the up arrow key again as many
times as you need to find an earlier command. Press the down arrow key (↓) to move forward through your previous commands.
Though earlier Mac operating systems included Subversion (SVN) command-line tools
by default, recent versions do not, and you will need to install the package management
tool HomeBrew in order to install SVN. This documentation will explain how to install both HomeBrew
and Subversion.
Practice: Install HomeBrew
Before you install HomeBrew, you must first check if you already have HomeBrew installed
on your computer. Go to Terminal, type brew doctor, then press return. If Terminal returns Your system is ready to brew,HomeBrew is installed and you can proceed to installing Subversion. If not, follow these steps
to install Brew on your machine:
In Terminal, copy and paste the following command, then press the return key: /bin/bash -c "$(curl -fsSL https://raw.githubusercontent.com/Homebrew/install/HEAD/install.sh)" (Note that you may also copy the command from the HomeBrew website.)
Wait for the installation to finish, and test whether Brew has been successfully installed
by typing brew doctor then pressing return and checking for the following message: Your system is ready to brew.
Even after a successful installation, you may need to change the path of HomeBrew.
You can find out if you need to change the path by skimming the installation output
script in Terminal. If you do need to change the path, the script will contain messages
typically beginning with: Warning: /opt/homebrew/bin is not in your PATH. If you see that warning, continue through the output script until you find Next Steps. Follow the steps outlined there. It is important to follow the messages in your own
Terminal because these will be personalized to your own machine and current path.
Practice: Install Subversion
Once you have successfully installed HomeBrew on your machine, you can install Subversion.
To do so:
Type brew install Subversion in Terminal and press the return key.
Wait for the process to complete.
Test to see whether the installation was successful by typing svn checkout into Terminal and pressing Return. If you get a message saying Not enough arguments provided, the installation was successful.
If you do not get the expected message, or if you get an error message, try restarting
Terminal (fully quitting then launching again) and start the process again—beginning
with checking whether or not Subversion then HomeBrew are installed on your machine.
If you are still running into technical difficulties, please get in touch with our
team at lemdo@uvic.ca and we will work with you on troubleshooting the issues.
Obtain a command-line client from SlikSVN. There is no cost to download the client. Make sure to download the correct version;
there are versions for 32-bit and 64-bit Windows. To find out if you have 32-bit or
64-bit Windows:
Open your Control Panel by pressing the Windows key and searching for control panel.
Select System and Security.
Select System.
You should be able to find System type, which will either read 32-bit Operating System or 64-bit Operating System.
Once the program is downloaded, install it by double-clicking the downloaded installer
and following its instructions.
For those working on Linux workstations at the Humanities Computing and Media Centre at the University of Victoria, Subversion (SVN) is already installed on your workstation.
For those editors and encoders working from their own computers, you will need to
install an SVN client. Subversion is available in all Linux distro repositiories,
so install it through using sudo apt install subversion etc.
You will regularly use both SVN and standard Terminal commands when working in your
command line. This documenatation deals only with SVN commands. We recommend that
you keep both this documentation and Work in the Command Line (Terminal) open until you are comfortable working in the command line and until you understand
both:
The difference between the generic Terminal commands (cd, mkdir, etc.) and the specific Subversion commands described in this page, and
When to use a generic Terminal command and when to use an SVN command.
Rationale
All LEMDO files are stored in a Subversion repository on an HCMC server. The repository is a safe, accessible, versioned place to keep our work. This
repository maintains a copy of every version of each file. If necessary, we can retrieve
an earlier version of a file or even of the entire project. Once you have installed
a Subversion client, you can interact with the HCMC server. You will be checking out a local copy of the repository during your first work session, updating your local
copy at the beginning of each new work session and regularly throughout those work
sessions, and committing your local changes to the HCMC server.
At the beginning of every work session, you must update your local copy of the LEMDO repository so that you
have the most recent tools and files. We sometimes make global changes across the
repo that may affect your file. Do not assume that because the file is yours that it is exactly the way you left it. Global changes that affect the files of multiple
editors are always announced by email through the lemdo_repo_users email list (usually because we have
to ask you to pause your work for an hour or so). Improvements to the schema, documentation,
and editor tools happen so regularly that we do not announce them; you will want to
have the latest tools at your disposal.
We also strongly recommend that you update periodically during long work sessions.
Relationship of HCMC Server at UVic to Your Local Workstation
Practice: Use Subversion Commands
All Subversion commands begin with the abbreviation svn followed by a space. SVN commands will do something only if you are working within
a directory that is checked out from a Subversion repository. In other words, you must have moved
(via your Terminal) into the lemdo directory where you have checked out the LEMDO repository.
You will continue to use Terminal commands during your work session. Terminal commands
enable you to move up and down the folder hierarchy in your lemdo directory. SVN commands enable you to change things in that directory.
SVN Commands: Reference Table
The following is a table of common commands used when working with SVN. Each command
should be followed by pressing the Enter/Return key. For more detailed instructions
for using common SVN commands, see the documentation linked to from Further Reading.
Action
How to do it
Create a lemdo directory and check out the repository
svn checkout https://hcmc.uvic.ca/svn/lemdo
Find out about the repo
svn info
Find out the history
svn log
Get detailed history
svn log -v
Get history of one file (in this example, stuff/poem.txt)
svn log -v stuff/poem.txt
Path completion
svn log -v stuff/p then press Tab
Examine changes (in this example, from revision 3 to revision 4)
svn diff -r 3:4 stuff/poem.txt
Determine responsibility (note that both of these commands will return the exact same
result: who committed the most recent change to the specified file)
svn blame stuff/poem.txt or svn praise stuff/poem.txt
Check the status of your repository (what you have changed, what has yet to be added,
etc.)
svn status
Add a new file (in this example, located at stuff/myfile.txt)
svn add stuff/myfile.txt
Commit all modified files
svn commit -m "Adding my poem"
Commit just one file
svn commit stuff/mypoem.txt -m "Adding @rhyme to all linegroup elements"
Commit a sequence of files
svn commit myFile.txt stuff/mypoem.txt bibliography.xml -m "Fixing references in myFile
                                                and mypoem and adding citations to the bibliography."
Best Practices for working in Subversion
Always do an svn up at the beginning of and during each work session.
Make sure your local file is valid before you commit. See Validate Files.
Always do an svn status before you commit.
Change into the directory containing the file you want to commit using the command
cdbefore you commit the file.
Write detailed commit messages.
For your own peace of mind, you might want to make a note of the revision number when
you check out and again when you commit. Every time you or someone else commits a
change to the repository, the revision number increases by 1. If you need us to roll back to an earlier version of your file, it is helpful to have the revision number.
Before you can begin working on your LEMDO edition, you must first check out the LEMDO repository to your machine using a Subversion (SVN) command. This will allow you to make changes
to your files from your computer and send them back to the repository. This documentation
will guide you through the steps for checking out the repo.
Practice: Check Out the Repository
First, you must determine where you want to save the LEMDO repository. Usually, you
will want to keep it at a high level in the hierarchy of your computer file system.
For Windows and Linux users, we recommend saving it to your local disk one step below
your user file (e.g., C:\Users\Jenstad\lemdo). If you are a Mac user, we recommend saving it to your Documents folder so that it is easy to navigate to in Finder. We strongly advise against checking
the repo out to Dropbox, Sharepoint, or a OneNote drive.
Next, open your Terminal. Terminal will automatically open to your user directory. If you are working on a
Windows or Linux machine and want to save the repo one step below your user file as
recommended, you do not need to change directory. If you are on a Mac and want to
save the repo to your Documents folder, you will change directory by typing cd Documents and pressing the Return key.
You can now check out the repo by either typing or copying svn checkout https://hcmc.uvic.ca/svn/lemdo into your Terminal and then pressing the Enter/Return key. This command will both
create a new directory called lemdo and download the repo into it. All of the LEMDO file names will scroll by as they
download. This may take a couple of minutes.
The checkout will finish with the message Checked out revision followed by the revision number. The revision number indicates the state of the repository by showing how many changes
have been committed to the repository since it was set up. Every time a new change
is committed to the repository, the revision number will increase by one.
There is now a complete copy of LEMDO’s files on your hard drive. You can verify this
by opening your File Explorer (on Windows and Linux) or Finder (on Mac) and navigating
to the location where you checked out the repo.
Always open Oxygen and the LEMDO project (.xpr) file before opening any .xml documents.
Do not open them by clicking on them in your file finder window.
Step-by-Step: Check Out the Repository
Determine where you want to save the entire LEMDO SVN repository (typically one step
below your user profile on Windows and Linux or in your Documents folder for Mac).
Open your Terminal. If you are on a Mac, navigate to the directory that you want to
check out in by using the command cd (i.e., cd Documents).
Once you are in the correct directory, type the SVN command svn checkout https://hcmc.uvic.ca/svn/lemdo and press Enter/Return. This command will create a lemdo directory and check the repo out into that directory.
You now have a minute or so to grab a cup of tea. While you sip your tea, you can
watch the many files scrolling by in Terminal and be impressed with the amount of
work LEMDO editors have done.
At the end of the list of files, the command line will show which revision was checked
out.
Since we sometimes make global changes that can impact your files and the tools that
you have available in Oxygen and there are multiple users that add, update, and sometimes
delete LEMDO files from different locations, you must update your local copy of the
repository at the start of every work session. You should also regularly update your
local copy during long work sessions. Doing this will ensure that you have access
to the most recent files and tools. This documentation will explain the steps for
doing an update using Subversion (SVN).
Practice: Update Your Local Copy
First, open your Terminal. Terminal will automatically open to your user directory. You will need to change
directory into lemdo using the standard command cd. If you downloaded the LEMDO repository one step below your user file (typically
the case for Windows and Linux users), you will type cd lemdo. If you downloaded the LEMDO repo elsewhere (e.g., in the Documents folder for many Mac users), you will need to type out the full path to get to your
lemdo directory (e.g., cd Documents/lemdo). Press the Enter/Return key.
Next, type the command svn up and press Enter/Return. You should always do this step at the lemdo level to ensure that you get all of the global changes that LEMDO makes. Once you
have done this, you will see a list of the files that other people have made changes
in. When your local copy is done updating, you will see a message that reads Updated to revision followed by the revision number. You are now ready to do your work in Oxygen.
Step-by-Step: Update Your Repository
Open your Terminal.
Navigate to your lemdo directory using the command cd.
Type the SVN command svn up and press Enter/Return.
Once you see the message Updated to revision followed by the revision number, you are ready to do your work in Oxygen.
Special Case: Updating Your Local Copy After Committing
We recommend committing and updating your local copy of the repo regularly during
long work sessions. You should always update your local copy from the highest level
of the repo (i.e., from the lemdo directory) and commit from the lowest level (i.e., your edition’s directory). When
you do an SVN update after committing, you will first need to navigate back to the
lemdo level. To do so, type cd ../ until you get to the correct level.
When you make changes to files in your local copy of the LEMDO repository, you must
also send them back to the centralized Subversion repository by committing. This allows you to see your changes on the LEMDO development site and ensures that
all versions of your file are saved. You must commit at the end of every work session
and should also commit regularly during long work sessions. There are three steps
to committing: 1) Validating your files in Oxygen, 2) Checking the status of your
local copy, and 3) Using the SVN command to commit your files to the central LEMDO
repository. This documentation will explain the practice for each step.
Practice: Validate Your Files in Oxygen
Before committing any files to the central LEMDO repository, you must validate and save them in Oxygen. To validate your file, click on the button that
resembles a piece of paper with a checkmark on it at the top of your Oxygen window:
If your file is valid, you will see a green square followed by the message Validation successful at the bottom of your Oxygen window.
If your file is valid, you may now save your file and move on to checking the status of your local copy.
If your file is invalid, you will see a red square followed by an error message at
the bottom of your Oxygen window. Follow the steps given at the bottom of the window
and then validate your file again. For more detailed instructions on validating files,
go to Validate Files.
Practice: Check the Status of Your Local Copy
At any point, you can check the status of your local copy compared to the centralized
repository. When you check the status of your local copy, you are checking to see
if your local files differ from the files in the repository. This is useful for a
few reasons:
You can check that you have made changes in the files that you expected to and not
in those that you had not expected to.
You can see the pathway to the lowest level of the repo before the file that you have
changed. You should change directory down that pathway into the lowest level before
you commit.
To check the status of your local copy, type svn status and then press the Enter/Return key. You will see a list of files that you have made
changes in preceded by the path to get to those files from your current location.
If you have made changes in files, you will also see the following characters on the
left side of your command line window:
Character
Meaning
M
Modified: You have modified the following file in some way.
?
You have created a new file, but you have not yet run the svn add command to add it to the repo.
A
Added: You have created a new file and you have queued it up to be added to the repo
by running the svn add command.
D
Deleted: You have removed a file and queued it up to be deleted from the repo.
Practice: Commit
Once you have checked the status of your local copy, you are ready to commit your
files to the centralized LEMDO repository.
We give people write privileges to commit only to the directories that they are expected to work on. You will likely
have been given permissions to commit only to your edition’s directory and lower.
This means that you must navigate to at least your edition directory level (e.g.,
data/texts/FV for Famous Victories of Henry V) before you commit. Best practice is to commit from the lowest level before the file
that you have made changes in, as doing this ensures that you commit only what you
mean to (e.g., data/texts/FV/main to commit the file data/texts/FV/main/emdFV_M.xml). To navigate down the folder tree, use the Terminal command cd followed by a space and then the pathway to the folder that you are navigating to
(e.g., cd data/texts/FV/main) and then press the Enter/Return key.
Once you are in the lowest folder, you will commit your file. Type the command svn commit -m followed by a space and a brief message about what you did in the file. For example,
if you had numbered all of the speeches in emdFV_Q1, you might put svn commit -m "numbered speeches". If you are committing just one file, it is unnecessary to specify the file in your
message. If you are committing multiple files at once, it is helpful to specify what
you did in which file.
If SVN asks you for a password, check that the username is your NetLink ID (not your
computer username). If it is not, press Enter/Return and then, when prompted, type
in your NetLink ID. Once the username is your NetLink ID, type your NetLink password.
If your commit is successful, you will see a message reading Committed revision followed by the new revision number.
If the commit fails and you are uncertain why, email lemdo@uvic.ca for support.
Step-by-Step: Commit
Validate and save your file in Oxygen. Your file must be valid before you commit.
In Terminal, run svn status from the lemdo level.
Navigate to the lowest level before your file using the command cd (change directory). E.g., cd data/texts/FV/main.
Use the command svn commit -m "message about what you did", replacing the text in the quotation marks with a short message about what changes
you made in your file.
Special Case: Committing Only Some Files
If you have made changes in several files in a single folder and only want to commit
certain ones, follow these steps:
Validate and save your file in Oxygen.
In Terminal, run svn status from the lemdo level.
Navigate to the lowest level before your file using the command cd (change directory).
Type svn commit followed by a space, the full name of the file(s) that you wish to commit (including
the file extension, which will normally by .xml) followed by a space, -m and then a brief message about the changes that you made in each file. If you are
committing more than one file, separate each file with a single space. E.g., svn commit emdFV_GenIntro.xml emdPerfIntro.xml -m "added xml:ids in emdFV_GenIntro,
numbered paragraphs in emdPerfIntro".
Workflow for Working in the Command Line (Terminal)
Prior Reading
This documentation presupposes that you understand the basics of working in the command
line, are familiar with the repository structure, and have downloaded a Subversion
client:
It is important that you follow a standard workflow when working in Terminal. Following
the workflow outlined in this documentation will help prevent conflicts when you commit
your work and will ensure that you always have the most recent schema and Schematron
when you are working in Oxygen.
Workflow
This will be your workflow for each work session:
Open Terminal.
cd lemdo: This brings you into the lemdo directory; cd stands for “change directory.”
svn up: This updates your local copy of the LEMDO repository. Doing this regularly ensures
that you are always working with the most recent version of the LEMDO Schema and that
you have access to any new tools and keyboard shortcuts that we have added.
Do your work in Oxygen.
Save and validate your work in Oxygen. We never commit files that are not valid.
Go back into Terminal.
svn up: It is best practice to do this regularly, including before you commit a file.
svn status: This lists the files in which you have made changes (indicated by an “M” for “modified”
on the left side of the window) and shows the pathway to that file. You should still
be in the lemdo directory when you do this.
cd into the lowest level before your file. To do so, type cd followed by the pathway to that level. You may also choose to copy-and-paste the
pathway generated by the svn status above. E.g., if you had modified emdH5_FM.xml, you would run cd data/texts/H5/main.
svn commit -m "message about what you did": This commits your changes. Include a brief message about what you did to your files
inside of the quotation marks.
cd back to the lemdo level. To do so, type cd ../ until you get to the correct level.
If you are continuing you work session, return to Step 2.
We recommend that you svn up and svn commit frequently.
Tips
Always svn up from the lemdo directory.
Always svn commit from the lowest possible folder.
We recommend doing an svn status at the lemdo level to ensure that you see all changes that you have made in your local copy of
the LEMDO repository. You may also choose to do a subsequent svn status at a lower level to check the files that you have made changes in at that level.
There are some Subversion and Terminal commands that those working in the LEMDO repository
may occasionally use. They are more advanced commands, meaning that they should only
be done by those who are very comfortable working in the command line and who have
consulted with the LEMDO Team, as there is some risk associated with them. This documentation will explain the
practice for adding, deleting, and moving files in the Subversion repository as well
as for showing the commit log for the Subversion repository and comparing versions
of a file in Terminal.
Practice: Add Files to the Repository
To add a file to the centralized LEMDO repository, you must first create and save
it in the correct folder. For example, if you wanted to create an annotations file
for the Merchant of Venice edition, you would need to first create the file in Oxygen, validate it, and save
it in the data/texts/MV/app folder. For best practices around naming files, read Name Files Following LEMDO Naming Conventions.
In Terminal, run an svn status to ensure that you have created the file in the correct place. You should see a question
mark (?) on the left side of the window followed by the pathway to your new file and the
file name. This indicates that you have created a file, but you have not yet saved
it to the centralized repository.
Navigate down the pathway to the lowest possible folder using the command cd. If you were adding the annotations file as described above, the command would be
cd data/texts/MV/app. Once you are there, run svn add followed by a space and the full name of the file that you wish to add (including
the file extension). Using the same example as above, your command would be svn add emdMV_M_annotation.xml. The question mark on the left side of the Terminal window should now be an upper-case
“A.” This queues the file to be added when you commit, but it does not send it to
the centralized repository.
You can now svn commit as normal.
Note: you will add folders to the repository in the same way. To create a folder,
right-click on its containing directory, select New, then click Folder….
Step-by-Step: Add Files to the Repository
Validate your file in Oxygen and save it in the correct folder.
In Terminal, run svn status.
cd to the lowest level before your file.
svn add [filename].xml
svn commit as usual.
Practice: Move a File
If you have a file that is saved in the wrong folder (for example, if you saved your
edition bibliography in the app folder when you should have saved it in the crit folder) you will use the command svn mv in the Terminal to move it.
The first step to moving your file is to determine where it is currently located and
where you want it to be located. You will need to have the full pathway for both folders
(the one that it is currently in and the one that you wish for it to be in).
In Terminal, navigate to the lowest shared ancestor directory of both folders (i.e.,
the level before the pathways diverge). For example, if you wanted to move the file
emdFV_bibliography.xml from lemdo/data/texts/FV/app to lemdo/data/texts/FV/crit, the lowest shared ancestor is the FV directory.
You will then need to use the SVN command svn mv to move your file. There are three parts to this command:
The preface svn mv.
The file’s current URL (the pathway to where the file is currently located and the
full file name, including the extension).
The file’s desired URL (the pathway to where you want the file to be located and the
full file name, including the extension).
Using the same example as before, to move the emdFV_bibliography.xml file from app to crit, you would type the command svn mv app/emdFV_bibliography.xml crit/emdFV_bibliography.xml. Once you have typed in the full command, press the Enter/Return key.
When we move a file, we are deleting it from one location and adding it to another,
so you will get the messages for both of those actions. The first message will have
a “D” on the left side followed by the old pathway (including the full file name).
The second message will have an “A” on the left followed by the new pathway. This
means that you have queued the file to be moved, but have not yet sent the change
to the centralized repository.
You can now svn commit as normal, noting in your message that you moved a file.
Step-by-Step: Move a File
cd into the lemdo directory.
Type svn mv followed by the current url of the file and the new desired file url (e.g., svn mv app/emdMV_Bibliography.xml crit/emdMV_Bibliography.xml) and press Enter/Return.
Commit your files to the LEMDO repository (e.g., svn commit -m "Moved FV bibliography from the app folder to the crit folder.").
Practice: Delete Files from the Repository
Use caution when you delete files from Subversion; deleted files can be recovered,
but recovering files is a time-consuming process. You should consult with the LEMDO team before deleting a file from the LEMDO repository. If you do delete a file, you will
first open Terminal and navigate to the lowest level using the command cd.
Once you are in the lowest possible folder, type the command svn del followed by a space and then the full name of the file that you wish to delete (including
the extension). For example, to delete the file testFile.xml, you would run svn del testFile.xml. You will get a message in Terminal with a “D” on the left followed by the name of
the file that you are deleting. This indicates that you have queued the file to be
deleted when you commit, but that you have not yet deleted it from the centralized
repository.
Commit your change as usual.
Step-by-Step: Delete Files from the Repository
cd into the lowest possible level.
svn del [filename].xml
svn commit with a message that you have deleted a file.
Practice: Open Commit Logs
The svn log command makes it possible to read SVN logs from recent commits, thereby enabling
users to track each other’s work. To see recent commits, follow these steps:
Enter svn log -l followed by a space and the number of logs you wish to see. For example, if you wanted
to see 20 logs, you would type svn log -l 20. Note that the character after the dash is a lower-case “L.”
To see the very latest log entry, enter svn log -r HEAD.
To see the log entry for a specific revision, enter the number of the revision after
-r. For example, svn log -r 1259 will return revision number 1259.
To see the log entries for a specific date range, type svn log -v -r {yyyy-mm-dd}:{yyyy-mm-dd} (where the first yyyy-mm-dd is replaced by the start of the date range that you are interested and the second
is replaced by the end of the date range). For example, svn log -v -r {2024-01-01}:{2024-01-14} will return all commits made between January 1 and January 14, 2024.
The command line will respond to these commands with a log entry or a series of log
entries that look(s) like this:
r10098 | mrothwell | 2022-08-04 15:44:25 -0700 (Thu, 04 Aug 2022) | 1 line adding MoMS sources from MoEML to LEMDO BIBL.
Each individual log entry corresponds with a commit submitted to SVN. A log entry
provides the revision number, the person who did the commit, the exact date and time
of the commit, and the comment they provided. The information provided by log entries
can be very helpful when attempting to solve mistakes and errors.
Practice: Compare Versions of a File
The svn diff command allows you to compare two versions of the same file. It will show you the
exact changes that were made between one revision and another in a particular file.
This command is useful if you accidentally overwrite some work in a file and need
to consult an earlier version of the file to recover what you deleted.
To use this command, type svn diff -r followed by the a space, the revision number of the first revision that you want
to compare, a colon, the revision number of the other revision that you want to compare,
and finally a space and the full file name of the file that you want to compare versions
of. For example, svn diff -r 1276:1279 PERS1.xml will return log entries for revisions to PERS1.xml numbered 1276 through to 1279.
You are able to open and view your local copy of the repository in your file browser,
but you will need an XML editing application to edit the files. We recommend and support
Oxygen XML Editor (from Syncrosoft). All of our documentation assumes that you are
working in Oxygen. Oxygen is the industry-standard application for XML editing. While
there are other XML editors available, there are many reasons to use Oxygen. Oxygen
is:
Cross-platform (Windows, Mac, and Linux).
Mature.
Involved with the TEI community.
More fully-featured than any other editor.
Used by virtually all digital humanists.
Installed in many labs at UVic.
Cheap if you have to buy it.
Get Oxygen
Your institution may have a site license for Oxygen. If it does not, you can download
and use Oxygen for 30 days on a trial basis. Oxygen is not expensive for academic
use. An individual license is about $90 USD, and you can use the application indefinitely
once you’ve downloaded it. We do recommend paying for the additional maintenance pack
and the periodic new versions. Research assistants at UVic will be provided with an
Oxygen license key for their own computers.
HCMC Encoders: Oxygen is installed on all machines in HCMC. If you are working on
your own computer, you will need to download Oxygen by following the steps outlined
on the Oxygen website. (Editors: you will need to purchase Oxygen for your RA and/or Editorial Assistant
if your campus does not have a site license that covers your RA and their computer.)
You want to get either of the following (with 2022 prices listed):
Oxygen is designed to work through projects. A project (XPR) file contains important scripts that control the behaviour of Oxygen
and give you access to project-specific tools. The LEMDO project file (lemdo-all.xpr) also ensures that you are validating your XML files against the LEMDO customization
of TEI and that you are following all the rules that govern how you are supposed to
encode your play. When you open the XPR file, Oxygen knows to check your files against
the LEMDO schema and Schematron. In other words, Oxygen will catch your mistakes and
prompt you to correct them. The XPR file also preloads into Oxygen all the custom
scripts and character mappings that we have made for you.
It is imperative that you always have the lemdo-all.xpr project file open when you are working on LEMDO.
Practice: Open the XPR file for the LEMDO Project
Open your Oxygen application.
Navigate to Project in the menu bar and click it.
Click on Open Project.
Open the lemdo directory on your computer and click lemdo-all.xpr. The full path will depend on where you have chosen to put the lemdo directory on your computer. Once you navigate to your checked-out copy of the LEMDO
repository (your local lemdo directory), you will find the XPR file at ../lemdo/lemdo-all.xpr.
Now that you have opened the project, you can find the XML files in the edition of
your play by following these steps:
Make sure that you can see the Project pane in Oxygen. If it doesn’t open automatically,
you can open the Project pane by going to the Window menu at the top of your Oxygen window. Go to Show View and select Project.
In the Project window, expand the lemdo directory. The folder expander arrows work in intuitive ways to expand and collapse
folders.
Open the data directory. Inside of data is a directory called texts. All of the individual edition directories are in this texts directory.
Find the edition directory with the abbreviated title of your play. If you are unsure
what your edition directory has been named, go to DRE Play IDs.
It is very important that the lemdo-all.xpr file is open when you work. This file contains the schema that your files will be validated against.
Put simply, the schema is the rule-set that catches your mistakes and makes sure you
do not commit broken files to the repository. See LEMDO Oxygen Project.
In the top left corner of your Oxygen window, there is an icon that looks like a blue
floppy disk. This is the save button. Click it to save your work.
Select File → Save.
Practice: Validate your File in Oxygen
Validating your file against the LEMDO schema determines whether your file has any
errors that need to be corrected before you commit the file to the repository. If Oxygen shows that your file has errors, you must fix them before committing the
file. There are three ways to validate your file:
In the Oxygen toolbar, there is an icon that looks like a piece of paper with a red
check mark on it. This the validate button. Click it to validate your file.
Use the Ctrl+Shift+Alt+V (Cmd+Option+Shift+V on Mac) keyboard shortcut.
Select Document → Validate → Validate
You must always save and validate the file you are working on before committing to
the centralized repository.
XML comments are how we add notes to ourselves or to other encoders in our files.
Everything written inside of an XML comment is ignored by the processor. Note that
XML comments are green and begin with an angle bracket, exclamation mark, two hyphens,
and a space:
<p><!-- This is a comment. --></p>
There are three ways to add XML comments to your file:
Type an angle bracket and an exclamation mark. Oxygen will create the rest of the
comment for you automatically.
Highlight text that you would like to turn into an XML comment and use the keyboard
shortcut Ctrl+Shift+, (Cmd+Shift+M on Mac).
Highlight text that you would like to turn into an XML comment, navigate to Document in the Oxygen toolbar, click Edit, and select Toggle Comment (Ctrl+Shift+Comma).
Practice: Use the Character Map
Oxygen comes with a built-in character map, giving you full access to most of the
symbols and characters in the Unicode database. You can access the character map by
navigating to Edit in the toolbar and clicking Insert from Character Map:
Once you have opened the character map, you can search for the special character you
want and press Insert:
The character map is a simple way to insert vowel digraphs (i.e, æ, œ), nasal tildes
over vowels (i.e., ã, ẽ, ĩ, õ, ũ), macrons over vowels (i.e., ā, ē, ī, ō, ū), and
more. See Special Characters: Encode Characters from the Character Map for more information.
Practice: Use the Find/Replace Box
One of the most helpful features of Oxygen is Find All. Use the shortcut Ctrl+F (Cmd+F on Mac) or navigate to Find in the toolbar and click Find Replace to see the find/replace box:
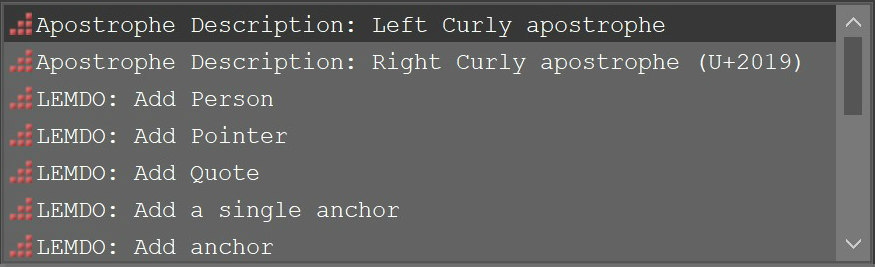
Use the find/replace box to find words or pieces of encoding in your document. Clicking
Find All in the find/replace box will generate a list of hits in a window at the bottom of
your screen:
Clicking on a hit will take you to the place in the document where it appears.
If you would like to replace all of the hits with something else, type what you want
to replace the original text with in the Replace with box. Be careful using the Replace All button. Only use it when you are positive that it will not create any errors in your
file.
Special Case: Find and Replace in Multiple Files
You can search through multiple files at once by right clicking on the folder you
want to search in the Project panel and clicking Find/Replace in Files:
You will see a find/replace box for cross-file searching:
This find/replace box allows you to search entire folders. It also generates list
of hits, but groups them by file:
Double-click on a hit to open the file and jump to the location of that hit in the
file.
Exercises
Now that you have an idea of how to use Oxygen, it is time to try some encoding. See
Introduction to Markup, XML, and TEI if you need a refresher on elements, attributes, and values.
Open Oxygen and follow these steps:
Click File in the toolbar and click New
Choose XML Document and click Create
Now you should have an empty XML document. The first thing you will need to do is
create a root element, the element that all the content of your file will be nested within. At LEMDO, we
often use
<TEI>
as the root element for our files. In your empty document, type
<TEI>
. Notice that once you type the opening tag, Oxygen will automatically supply the
closing tag:
<TEI/>
Now nest a
<name>
element in the
<TEI>
element:
<TEI> <name/> </TEI>
Notice that when you delete the closing
<name>
element, the squiggly red line tells you that there is an error in your encoding.
Oxygen also shows you an error message: element type
<name>
must be terminated by the matching end-tag </name>
.
Once you add back the closing </name> element, type your full name within the
<name>
element:
<TEI> <name>Kathryn Reese LeBere</name> </TEI>
You can also tag each part of your name separately. If you highlight your first name
and press Ctrl+E, a textbox will appear. Type the
<firstName>
element in the text field and click Ok or press Enter and Oxygen will wrap your name in the
<firstName>
element. You can do the same with the other parts of your name and the relevant elements:
Most people working on the LEMDO project in Oxygen prefer to have their texts formatted
so that they are contained within the editing window rather than running off the side
of their screen (i.e., they prefer to have lines wrap). There are three ways to make
lines wrap in Oxygen XML editor: 1) Use the keyboard shortcut Ctrl+Shift+Y (or Cmd+Shift+Y
on Mac); 2) Navigate to the Document tab in the toolbar, select Edit, and click Toggle Line Wrap (Ctrl+Shift+Y); or 3) Set a permanent preference for line wrap in Oxygen’s settings following these
instructions:
Go to Options at the top of your Oxygen window, then Preferences.
In the window that pops up, select Appearance.
Click Text.
Check the box next to Line wrap.
Click OK.
For example, see the General Introduction of Friar Bacon and Friar Bungay:
If you click Toggle Line Wrap (or Ctrl+Shift+Y), the texts formats itself so you can read it without scrolling
to the right:
Practice: Alter Layout
Oxygen is highly configurable; you can easily change the layout to suit your working
methods and preferences. It also means it is very complicated and full of features
and panels whose purpose is not obvious.
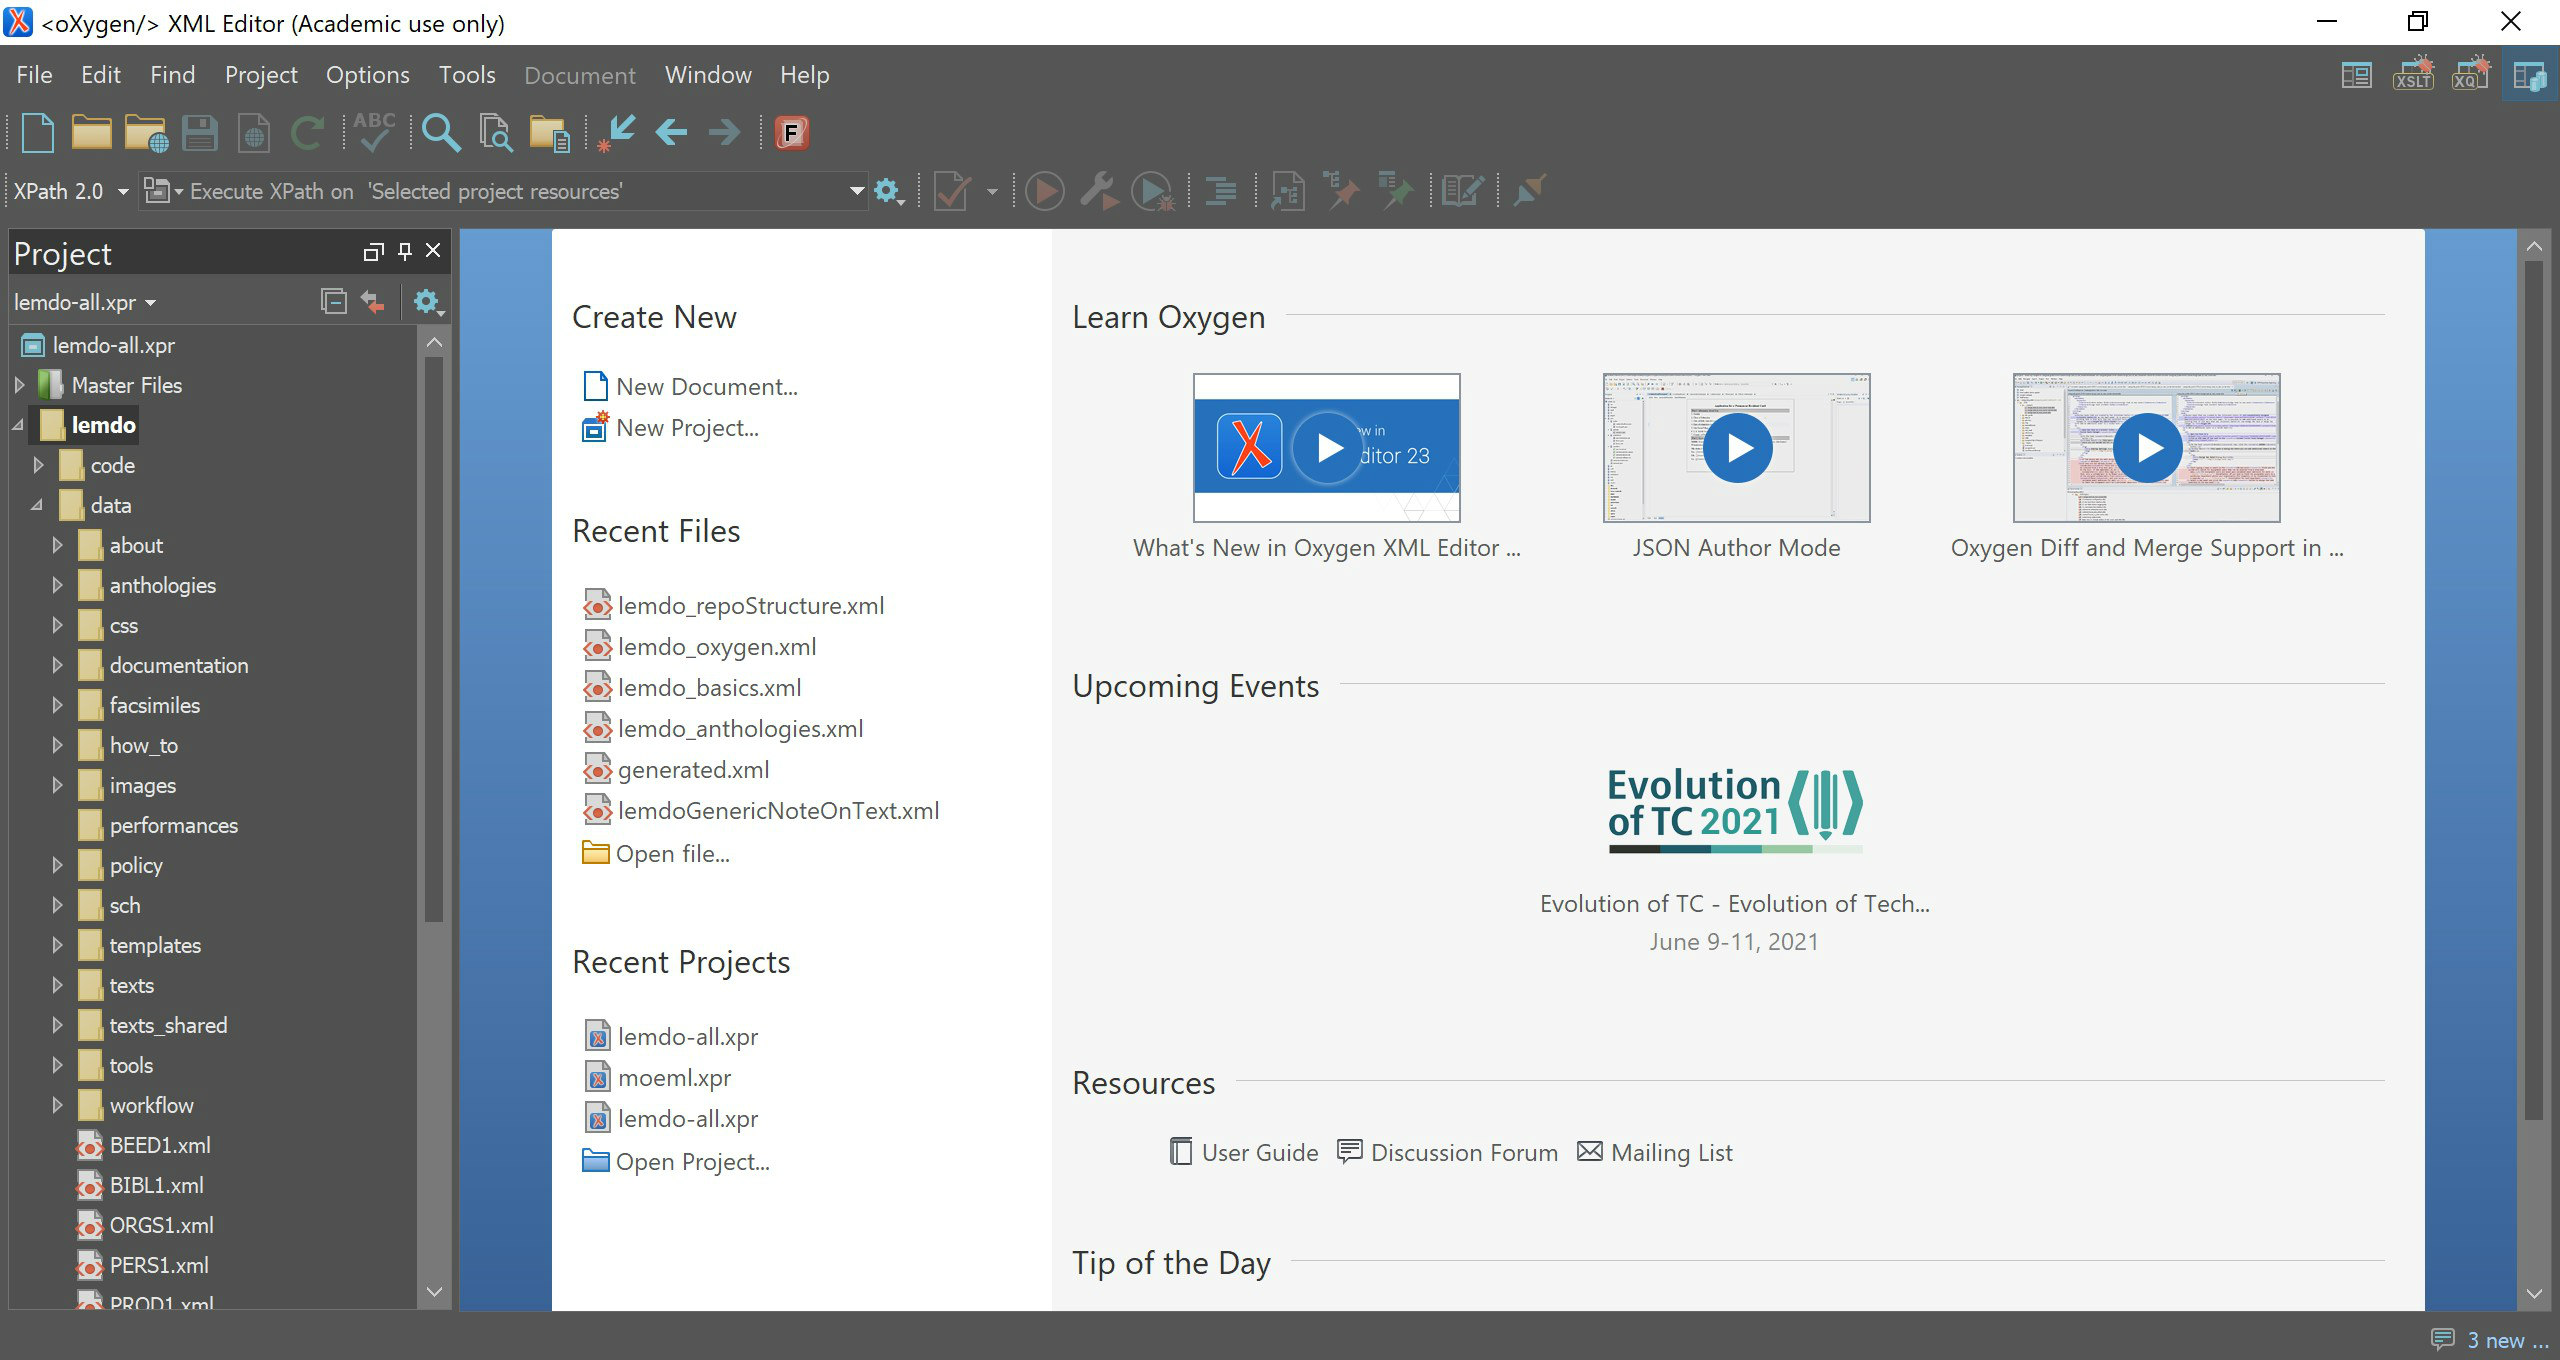
If you have a big screen, you can use the default Oxygen layout, which looks like
this:
The Project panel shows all of the files in lemdo-all.xpr. If you accidentally close this panel
and want it back, navigate to Project in the toolbar and click Show Project View. You can pin the Project panel by clicking the small pin icon on Windows and Linux computers or the yellow
minimize button on Mac computers.
Beside the Project panel is the Outline panel, which shows the file that you are currently editing as a tree, expanding downwards
and to the right, like a traditional file manager.
In the middle is the editing area. This screenshot shows one file open (learn_oxygen.xml, the file you are currently reading), but you can have multiple files open at the
same time.
On the right are the Attributes and Elements panels. Like the Outline panel, these are dynamic; they will change as you move your cursor from one place
to another in the document. The Attributes panel shows you the list of attributes which are available for the element where
your cursor is currently located. Similarly, the Elements panel shows you the list of elements which are allowed in the current cursor position.
Generally, new encoders to not need either of these two panels to be open.
If you are working on a smaller screen, the default layout for Oxygen can often be
too much—you end up with not enough space to actually work on your files. Feel free
to close the panels you do not need to see at the moment:
Note that you can re-open panels by navigating to Window in the toolbar and clicking Show View.
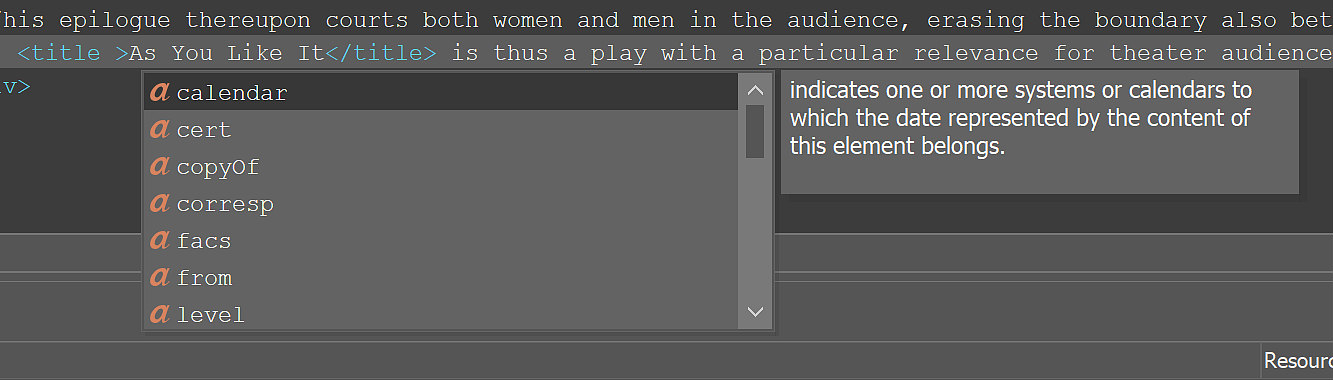
Also note that even without the Attributes and Elements panels, you can still see information about elements and attributes while you are
editing. If you type an open bracket in your document, Oxygen recognizes that you
have started to type an element. It will show you a list of all the elements available
at that position:
Similarly, if you put your cursor inside an opening tag, after the end of the element
name, and type a space, Oxygen will give you information about all the attributes
available:
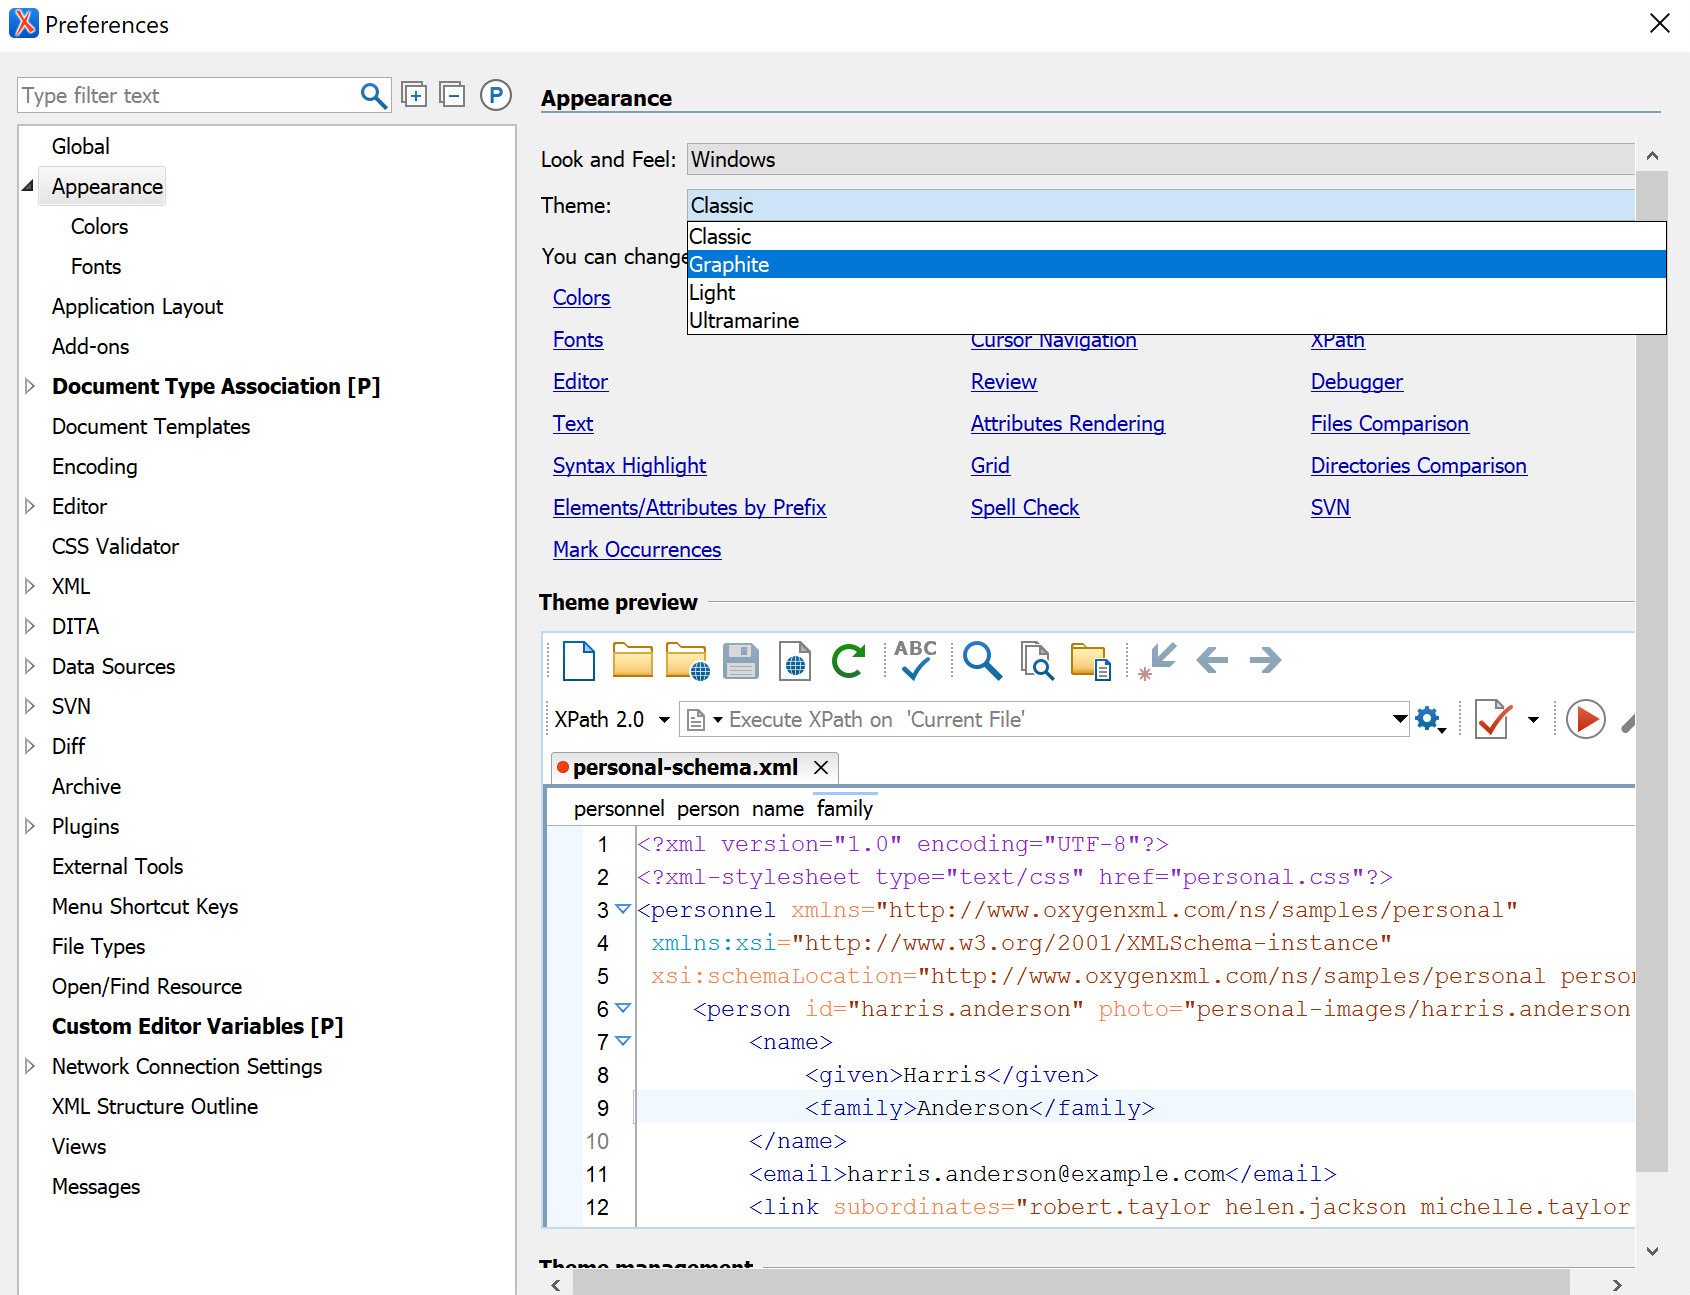
Practice: Alter Appearance
You can alter the appearance of Oxygen by navigating to Options in the toolbar and clicking on Preferences. From here, navigate to Appearance to change Oxygen’s theme:
Those spending a lot of time editing files in Oxygen may prefer the Graphite theme to reduce eye strain:
The TEI standard contains far more elements, attributes, and suggested values than
any one project needs. LEMDO has constrained the tagset by choosing only the elements and attributes that we need for encoding
the types of texts within the LEMDO project and answering the research questions that
LEMDO aims to enable. We are fully compliant with TEI in that we have not introduced
any boutique elements.
All of our current elements are in the TEI namespace. If we need other elements, we
will draw from other standards. For example, if we need to encode music in our editions,
we will draw elements from the Music Encoding Initiative; MEI elements belong to the MEI namespace. Should our project needs not be met by
the TEI or a cognate XML standard with a declarable namespace, we will work with the
TEI to introduce new elements to the entire community rather than deviate from community
practice.
Practice
We draw our tagset from the following chapters (also known as modules) of the TEI Guidelines:
The elements, attributes, and allowed values for LEMDO are captured in the LEMDO RelaxiNG
schema (lemdo.rng). If you are able to read the XML schema, you are welcome to download it and have
a look. The link will always point to the most recent version of our schema.
We have further constrained our schema by limiting the use of some elements to particular
types of documents. For example, the
<pb>
element that captures page beginnings is allowed only in texts that have been given
the semi-diplomatic editorial treatment (i.e., files that have an
@target value of cat:letSemiDiplomatic on a
<catDesc>
element).
Feature Requests
If you would like to suggest that we introduce a TEI element or attribute that is
currently not in the LEMDO schema, you may send a feature request to lemdo@uvic.ca. We will not add non-TEI elements or attributes. We can add project-specific values
for some attributes, provided they will be useful to a sufficient number of editions
to justify writing the necessary processing.
A valid file is one that conforms to all the rules set out in the LEMDO schema. Our processors are expecting specific elements, attributes, and values in specific
contexts. They also expect xml:ids to be unique, all elements to have opening and
closing tags, and all elements to be hierarchically nested. If your file is not valid when you commit it to the repository, our processors will not be able to generate
a stable build of the LEMDO development site (lemdo-dev). Sorting out a build break
takes time. While the UVic team is fixing the break, people can commit to the repository
but will not be able to see updated versions of their files on the lemdo-dev site.
The error messages that pop up when you make an encoding error are designed to help
you encode your work correctly. The error messages are written by the LEMDO team and
are designed to guide you as you encode. When you validate a file, Oxygen will give
you a list of all the errors in the file along with error messages. The list will help you see if there
is a pattern to the errors, or if all the errors stem from a single error high up
in the document hierarchy.
Good Practice
Validate often! You want to validate your file frequently while you work and fix any encoding errors as they arise. If
you carry on working in an invalid file, you will compound errors to the point where
it can be very difficult to identify and repair the original error.
Save before you validate! You will validate many times as you work. It’s always good practice to save then
validate but it’s especially important to follow this order when you are getting ready
to commit a file. Validation should be the last thing you do before your commit a
file. If you save after validating, you run the risk of introducing an error as you
save. It’s easy to accidentally type a stray bit of text or delete a tag if you are
using keyboard shortcuts (i.e., Ctrl+s) to save. “Save then validate” should be your
mantra.
Benefits of validating often:
You will make fewer minor errors.
You will almost always avoid major errors.
You will spend less time correcting the mistakes you do make.
You will get lots of validation.
If you accidentally commit an invalid file, you can prevent or remedy a build break
by fixing your file right away and then committing the valid version of your file.
Step-by-Step
To validate your file, save first and then click on the button that resembles a piece
of paper with a checkmark on it (or Ctrl+Alt+Shift+V):
If your file is valid, you will see a reassuring validation message like this at the
bottom of your window:
If you see something like this message instead, stop editing immediately and fix the errors in your file:
When validation fails, you will see a report in a new panel at the bottom of Oxygen.
Each error is listed on a separate line in the report, along with an error message.
To go directly to the point in the file where Oxygen has identified an error, click
on the item in the list of errors. You will see text and/or markup flagged with a
squiggly red line. In most cases, the squiggly red line is the point in the file where
you need to make your fix.
However, the error report will not always point to the spot where you need to implement
a correction. For instance, you may see something like this message:
In this case, the schema is telling you that you have added an opening
<ref>
element somewhere in your file but have failed to add the corresponding closing </ref> tag. Oxygen cannot tell you where you need to put the closing
<ref>
tag because it has no way of knowing the end point of the passage from which you
want to link.
Tips
Here are some strategies for finding errors in invalid files:
Undo recent changes by typing Ctrl+Z. Oxygen’s undo history is typically set to remember
the last 200 changes, so you can look back through many changes to find when and where
the error was introduced.
Cut out sections of your file, paste each of them in a separate temporary file, and
validate each temporary file to find the section that is making your file invalid.
Above all, do not start editing again until you have a valid document.
Further Reading
Once you have a valid file, you will be able to commit the file to the repository.
The next logical piece of documentation to read is therefore Commit Changes to the LEMDO Repository.
If two or more people are working on the same file, you will need to establish a workflow
that prevents file conflicts. File conflicts are usually resolvable, but they are
frustrating and can take quite a bit of your time and LEMDO’s time to resolve.
Here are a few scenarios that can lead to file conflicts:
Person A does an SVN update and starts working on File X. Person B does an SVN update
and also starts working on File X. Person A commits first, and is able to commit,
but when Person B commits they get an error message; Person B’s copy is out of date
because it does not include the changes made by Person A.
Person A does not do an SVN update before they begin working and their local copy
of a file does not include Person B’s most recent work.
Person A doesn’t commit their work regularly. While they are working on their local
copy over a period of days or weeks, the LEMDO team makes a change across the repository
or someone fixes an error in Person A’s most recently committed file, or Person B
assumes it’s okay to dive into the file. When Person A finally commits, their local
copy is several revisions behind the repository copy.
Sometimes, the Subversion client is able to merge the changes made by both people, especially if the two people were working in different
parts of the file (Person A in Act 1 and Person B in Act 2, for example). But if both
people are working on the same section of the text, Subversion has no way of knowing
whose revisions to accept. There are mechanisms for diffing the two versions of the file, but going change by change through a long file and
deciding which version is better takes a lot of time. In the meantime, you and your
team members are unable to work on the file.
It is much better to avoid conflicts than to try to resolve them. You will want to
decide with your team on a workflow that prevents you from being in files at the same
time. You will also want to be disciplined about communicating with team members.
Practice
Here are four strategies for helping you avoid conflicts:
Practice good research hygiene. Always begin your work session by updating your local
copy of the lemdo project (i.e., run svn up in your command line). Save, validate, and commit your file regularly during your
work session (svn commit).
Communicate frequently with your team members. Send an email or message indicating
that you are about to start working on a shared file. Send an email or message when
you have finished working on the file and have made your final commit for the day.
If you are communicating via email, be sure to include everyone on your team who might
be working on the file.2 If you have an application like Teams or Slack, you can ping your whole team at once.
If you have each other’s phone numbers, you can set up a group chat on your phone.
Keep emails and messages short and simple; for example, the LEMDO Team’s email subect
lines might read Heading into qme_bibliography—no message, with a later email reading Out of qme_bibliography—no message. This method works if you all agree to send and check emails/messages before you open
a file.
If you are separated by time zones, you and your team might agree that Person A will
work on the file from 9 to noon Eastern Standard Time and Person B will work on the
file from 9 to noon Pacific Standard Time.
If you and your team work in the same time zone, you might agree to divide the day
into morning and afternoon, or divide the week into days. Person A works Monday, Wednesday,
Friday and Person B works Tuesday and Thursday, for example
Whatever strategy you adopt as a team, remember to:
LEMDO has prepared templates for most of the documents that you will need to make
for a complete edition. Each template has the basic encoding already in place as well
as XML comments to guide you in completing the document.
Open a Template and Save the File
To open a template, follow these steps:
Go to the File menu in Oxygen.
Click on New.... You will see a pop-up box of options.
Scroll down to Framework templates.
Click on the LEMDO folder.
Select and click on the template you need from the list.
The template will open with the name untitled.xml (sometimes with a number if you have already opened other templates in your current
work session).
You will now want to save this file to your local copy of the repository. Follow these
steps:
Go to the File menu in Oxygen.
Click on Save as....
In the pop-up box, navigate to the right folder in your edition directory in your
local copy of the repository. Example: if you are creating a new critical paratext
for your edition, you will want to save it in the crit folder of your edition directory.
Save the file. Note that if you save the file locally before you change the xml:id
of the file, you will get one or more error messages. Do not worry. You simply need
to change the xml:id of the file after you save the file locally but before you commit
it to the shared repository at UVic.
Once you have a valid file saved in the right location in your local copy of the repo,
and once you have added enough basic information that you are ready to commit your
file to the shared repo at UVic, you will need to add it to the shared repo. Your
local files are not automatically added and committed to the shared repo. You have
to create a placeholder at UVic for your file. (This is a useful security measure that means you have control
over what is sent from your computer to UVic.) Follow these steps to add and commit
your new file:
In your Terminal (i.e., command line), cd into the folder to which you want to add the file.
Type svn add followed by the full name of your file, including the .xml extension. Press enter.
The Terminal should now show the name of your file on the next line with a capital
letter A to the left of the file name. This letter A means that a placeholder for
that file name has been added to the UVic repo.
Now run your usual svn commit followed by -m "Added {file name}" (where you replace {file name} with the name of your file). This indicates via your
commit message that you have added a new file to the repository.
Keep working on your new file and committing to the shared repo at regular intervals.
Annotations for a modernized text (or, in rare cases, annotations for a semi-diplomatic
transcription).
collation_template
Collation for a modernized text.
critParatext_template
Critical paratext for an edition (e.g., General Introduction, Textual Essay, Stage
History).
documentation_template
Documentation section or chapter introduction. This template is for LEMDO internal
use. Editors: do not use this template.
editionBibliography_template
Bibliography for an edition.
editionBibliography_trainingTemplate
Bibliography template used for training new RAs only. Editors: Do not use this template.
EMDParatext_template
Proposed template for early modern dramatic paratexts being encoded by the EMDP anthology.
Editors and RAs outside of the EMDP anthology: do not use this template.
facsCollection_template
Metadata for a collection of playbook facsimile images. Editors will need this file
if they have been able to secure the right to add open-access digital surrogates (i.e.,
facsimiles) to the LEMDO facsimile collection.
facsPrintPlaybook_template
Metadata for the facsimile images from a single printed playbook. Editors will need
this file if they have been able to secure the right to add open-access digital surrogates
(i.e., facsimiles) to the LEMDO facsimile collection.
semiDipPrint_template
Semi-diplomatic transcription of a printed playbook. Use this template if you need
or want to transcribe and encode a playbook yourself. (If the playbook has been transcribed
for the Text Creation Partnership, LEMDO can transform that transcription into LEMDO
TEI for you to use as a starting point instead of using this template.)
userGuide_template
User guide for anthologies.
generated
This template is maintained by LEMDO developers and used in the Jenkins build process
to create HTML pages from datasets. Editors and RAs: Do not use this template.
Fill in the Template
The templates are full of XML comments. In the default Oxygen interface, they will
display in green thus:
<!-- XML comments offer guidance and instructions. -->
Follow the instructions in the XML comments. Once you have done so, you may delete
the XML comments. Note that you may also leave XML comments for yourself, your Anthology
Lead, or the LEMDO Team in your file.
The XML comments sometimes contain URIs to relevant sections of the documentation.
The URIs are not hyperlinks. Copy and paste them into your browser window to go to
the LEMDO documentation.
If the instructions in the XML comments or the documentation are not clear, the LEMDO
Team welcomes feedback. Please let us know how to make these templates maximally useful
to editors and RAs by emailing us at lemdo@uvic.ca.
Keyboard Shortcuts and Special Characters
Rationale
There are a number of actions that you are likely to do and special characters that
you are likely to use when encoding your edition. To make encoding easier, we have
created a number of keyboard shortcuts that will insert pieces of encoding and special
characters into your file. In addition to these project-specific shortcuts, there
are some generic shortcuts that are built into Oxygen XML Editor. This documentation
will guide you through the practice of using the shortcuts available to you along
with how to find special characters that we have not created keyboard shortcuts for.
Oxygen’s Keyboard Shortcuts
Oxygen has dozens of keyboard shortcuts. Navigate to Options in your Oxygen application and click Menu Shortcut Keys to see them all. Some of the most useful ones are listed below:
Add tags around text: Highlight text you want to tag and press Ctrl+E (Cmd+E on Mac). You will be able to choose an element to put around the text.
Remove tags around text: Put your cursor in an element, and press Ctrl+Alt+X (Cmd+Alt+X on Mac). The tag will disappear, leaving its contents.
Validate your file: Press Ctrl+Shift+V (Cmd+Shift+V on Mac) to validate your file.
Check well-formedness: Press Ctrl+Shift+W (Cmd:Shift+W on Mac) to check well-formedness.
Comment out text: Press Ctrl+Shift+, (Cmd+Shift+M on Mac) machines to turn highlighted text into a comment. This keyboard shortcut
will change the encoding of comments nested within the highlighted text so the encoding
does not become invalid due to nested comments. To undo the action of turning the
highlighted text into a comment, place your cursor anywhere within the comment you
have just created and press Ctrl+Shift+comma or Cmd+Shift+M again.
LEMDO’s Keyboard Shortcuts
We created our LEMDO-specific keyboard shortcuts to help you encode editions within
the LEMDO project.
Practice: Bring Up a List of Special Characters
Ctrl+Shift+Space (same command on Mac): This shortcut allows you to bring up a dropdown menu of special
characters at any point. Click where you want to insert a character and type Ctrl+Shift+Space. This will generate a list of all special characters that we have added to the lemdo-all.xpr file. This is available to you because you will always have begun your work by opening
the lemdo-all.xpr
Note that all of the characters that you can add directly using specific keyboard
shortcuts can also be added using this dropdown menu.
Practice: Insert a Right Curly Apostrophe
Ctrl+Shift+' (Cmd+Shift+' on Mac): This shortcut will add a right curly apostrophe. We do not allow straight
apostrophes in text within the LEMDO project. If you add a straight apostrophe to
your text, you will receive an error message in Oxygen prompting you to use this command
to replace straight apostrophes with curly apostrophes.
Practice: Insert an Ellipsis Character
Use the ellipsis character (…) from your character map instead of typing three spaced
periods (. . .) in files. We never want three spaced periods to be used as ellipses.
We use the ellipsis character because it is unambiguous, it ensures that our ellipses
are standardized across the project, and it allows us to easily change the rendering
of ellipses if we choose.
Ctrl+Shift+. (Cmd+Shift+. on Mac): This shortcut will add an ellipsis character. Ensure that you have typed
a space on either side of your ellipsis character.
Special Case: Remediate Ellipses
If you are remediating a file, see Replace Ellipses for instructions on encoding editorial elisions indicated by ellipses in annotations.
Practice: Insert an Anchor
Ctrl+Shift+A (Cmd+Shift+A on Mac): This shortcut will add two
<anchor>
elements to your text. To add anchors on either side of a selection of text:
Highlight the text that you want to add anchors around.
Type Ctrl+Shift+A.
If you only want to add one
<anchor>
element:
Click where you want to add your anchor.
Type Ctrl+Shift+A.
Delete the second anchor.
For more information on the
<anchor>
element, see Create Anchors.
Practice: Insert a Pointer
Ctrl+Shift+P (Cmd+Shift+P on Mac): This shortcut will add a
<ptr>
element with @type="localCit" and an empty
@target attribute to your text. You may use this shortcut when you want to point to the text
in the modern or semi-diplomatic files of your edition; if you choose to use this
shortcut. You must add a value to the
@target attribute for your
<ptr>
to be valid.
Note that if you are not linking to an act, scene, or speech in your own edition,
you should not have a
@type attribute with the value localCit. If you use this shortcut to link to something else (i.e., a
<div>
element in your edition), remove the
@type attribute. For more information about encoding the
<ptr>
element, see Encode Pointer Links.
Practice: Insert a Person Entry
Ctrl+Shift+C (Cmd+Shift+C on Mac): This shortcut will add an empty
<person>
element. You may use it when you are encoding the character list in the
<teiHeader>
of your modernized text and if you are encoding entries in the sitewide Personography
or Prosopography. This shortcut will provide you with this frame:
You will add the relevant information to the text node of the
<name>
element, the
<reg>
, and, if applicable, the
<note>
element. For more information on encoding character lists, see Encode Character Lists in Modernized Texts. For more information on encoding entries in our sitewide Personography and Prosopography,
see Personography (PERS1) and Prosopography (PROS1).
Practice: Insert a Split Quotation
Ctrl+Shift+K (Cmd+Shift+K on Mac): This shortcut will add a
<quote>
element with the attributes you need to encode a quotation spanning multiple lines:
There are some symbols that you must sometimes escape in XML. Because these symbols are part of the code, you must differentiate them from
code when you are using them for another purpose. Read about escaped characters in
The World Wide Web Consortium. These include the ampersand and the greater than and less than signs. The table
below shows how to escape these characters.
Description
Original Character
Escaped Character
Ampersand
&
&
Greater Than
>
>
Less than
<
<
Example of an ampersand in a quotation within an annotation note:
<quote>Euery valley shall be exalted, and euery mountaine and hill shall be made lowe: and
the crooked shalbe streight, & the rough places plaine</quote>
Example of an ampersand in the title of a work in the bibliography:
<title level="m">Comedies, Histories, Tragedies & Poems of William Shakespeare</title>
Special Characters: Encode Characters from the Character Map
If a word has an accented character (as opposed to a stress mark over a syllable),
find it in the character map. Every computer operating system now has a character
map built into it, giving you full access to most of the symbols and characters in
the Unicode database. There is no need to tag the character, just copy it from your
character map. If necessary, you can search the character map by keyword or by Unicode
number.
You may also use Insert from Character Map in Oxygen which can be found under Edit in the main toolbar:
Once in you have opened the character map, you can search for the special character
you need and press Insert:
You may also copy and paste commonly used special characters from this table:
Symbol
Description
Unicode Number
Ã
Latin Capital Letter A With Tilde
U+00C3
ã
Latin Small Letter A With Tilde
U+00E3
Ā
Latin Capital Letter A With Macron
U+0100
ā
Latin Small Letter A With Macron
U+0101
Ẽ
Latin Capital Letter E with Tilde
U+1EBC
ẽ
Latin Small Letter E With Tilde
U+1EBD
Ē
Latin Capital Letter E with Macron
U+0112
ē
Latin Small Letter E With Macron
U+0113
è
Latin Small Letter E With Grave
U+00E8
ê
Latin Small Letter E With Circumflex
U+00EA
é
Latin Small Letter E With Acute
U+00E9
Ĩ
Latin Capital Letter I With Tilde
U+0128
ĩ
Latin Small Letter I With Tilde
U+0129
Ī
Latin Capital Letter I With Macron
U+012A
ī
Latin Small Letter I With Macron
U+012B
Õ
Latin Capital Letter O With Tilde
U+00D5
õ
Latin Small Letter O With Tilde
U+00F5
Ō
Latin Capital Letter O With Macron
U+014C
ō
Latin Small Letter O With Macron
U+014D
Ũ
Latin Capital Letter U With Tilde
U+0168
ũ
Latin Small Letter U With Tilde
U+0169
Ū
Latin Capital Letter U With Macron
U+016A
ū
Latin Small Letter U With Macron
U+016B
Ỹ
Latin Capital Letter Y With Tilde
U+1EF8
ỹ
Latin Small Letter Y With Tilde
U+1EF9
Ȳ
Latin Capital Letter Y With Macron
U+0232
ȳ
Latin Small Letter Y With Macron
U+0233
ð
Latin Small Letter Eth
U+00F0
ƿ
Latin Letter Wynn
U+01BF
If you need to use a non-Latin character in your modernized text, search for it in
your character map and copy it into your document. Not all non-Latin characters will
display equally well on all computers; e.g., older operating systems will often substitute
a rectangle or a question mark for characters that they cannot render. You will also
want to add a comment to your file giving the Unicode number so that the LEMDO team
can help you with the encoding.
1.For example, if you are in lemdo/data/texts/FV and you want to go to another play, you would type cd ../FBFB.↑
2.If you are in the pre-release period of your anthology, your team members will include
LEMDO team members; we will be in and out of your files in the lead-up to a release,
especially during the pre-freeze period and the freeze.↑
Prosopography
Illya
Illya has a BA in English and Sociocultural Anthropology and an MA in English. Prior
to joining the HCMC, he was a PhD candidate in English and Book History at the University
of Toronto and worked on Records of Early English Drama and on the Modernist Archives Publishing Project. His work at the HCMC focuses on creating web-based applications for research projects
led by members of the faculty of Humanities at the University of Victoria. This involves
creating schemas for new and existing datasets, writing XSLT and build files to transform
datasets into structured TEI and HTML formats, implementing staticSearch, and ensuring
that new projects are Endings Principles compliant.
Isabella Seales
Isabella Seales is a fourth year undergraduate completing her Bachelor of Arts in
English at the University of Victoria. She has a special interest in Renaissance and
Metaphysical Literature. She is assisting Dr. Jenstad with the MoEML Mayoral Shows
anthology as part of the Undergraduate Student Research Award program.
Janelle Jenstad
Janelle Jenstad is a Professor of English at the University of Victoria, Director
of The Map of Early Modern London, and Director of Linked Early Modern Drama Online. With Jennifer Roberts-Smith and Mark Beatrice Kaethler, she co-edited Shakespeare’s Language in Digital Media: Old Words, New Tools (Routledge). She has edited John Stow’s A Survey of London (1598 text) for MoEML and is currently editing The Merchant of Venice (with Stephen Wittek) and Heywood’s 2 If You Know Not Me You Know Nobody for DRE. Her articles have appeared in Digital Humanities Quarterly, Elizabethan Theatre, Early Modern Literary Studies, Shakespeare Bulletin, Renaissance and Reformation, and The Journal of Medieval and Early Modern Studies. She contributed chapters to Approaches to Teaching Othello (MLA); Teaching Early Modern Literature from the Archives (MLA); Institutional Culture in Early Modern England (Brill); Shakespeare, Language, and the Stage (Arden); Performing Maternity in Early Modern England (Ashgate); New Directions in the Geohumanities (Routledge); Early Modern Studies and the Digital Turn (Iter); Placing Names: Enriching and Integrating Gazetteers (Indiana); Making Things and Drawing Boundaries (Minnesota); Rethinking Shakespeare Source Study: Audiences, Authors, and Digital Technologies (Routledge); and Civic Performance: Pageantry and Entertainments in Early Modern London (Routledge). For more details, see janellejenstad.com.
Joey Takeda
Joey Takeda is LEMDO’s Consulting Programmer and Designer, a role he assumed in 2020
after three years as the Lead Developer on LEMDO.
Kate LeBere
Project Manager, 2020–2021. Assistant Project Manager, 2019–2020. Textual Remediator
and Encoder, 2019–2021. Kate LeBere completed her BA (Hons.) in History and English
at the University of Victoria in 2020. During her degree she published papers in The Corvette (2018), The Albatross (2019), and PLVS VLTRA (2020) and presented at the English Undergraduate Conference (2019), Qualicum History
Conference (2020), and the Digital Humanities Summer Institute’s Project Management
in the Humanities Conference (2021). While her primary research focus was sixteenth
and seventeenth century England, she completed her honours thesis on Soviet ballet
during the Russian Cultural Revolution. She is currently a student at the University
of British Columbia’s iSchool, working on her masters in library and information science.
Kim Shortreed
Kim is a PhD Candidate in Media Studies and Digital Humanities, through UVic’s English
Department. Kim has worked for years in TEI and XML, mostly through the Colonial Despatches
website, and in a number of roles, including technical editor, research and markup,
writing and editing, documentation, and project management. Recently, Kim worked with
a team of Indigenous students to find ways to decolonize the Despatches project’s content and encoding practices. Part of Kim’s dissertation
project, Contracolonial Practices in Salish Sea Namescapes, is to prototype a haptic map, a motion-activated topography installation that plays audio clips of spoken toponyms,
in SENĆOŦEN and English, of the W̱SÁNEĆ Territory/Saanich Peninsula, respectively.
Mahayla Galliford
Project Manager, 2025-present; Assistant Project Manager, 2024-2025; Research Assistant,
2021-present. Mahayla Galliford (she/her) graduated from the University of Victoria
with a BA (honours with distinction) in 2024, and an MA English in 2026. Mahayla’s
undergraduate research explored early modern stage directions and civic water pageantry.
Her SSHRC-funded MA thesis project focuses on transcribing, editing, and encoding
early modern girls’ manuscripts, specifically Lady Rachel Fane’s May Masque in collaboration with LEMDO.
Martin Holmes
Martin Holmes has worked as a developer in the UVic’s Humanities Computing and Media
Centre for over two decades, and has been involved with dozens of Digital Humanities
projects. He has served on the TEI Technical Council and as Managing Editor of the
Journal of the TEI. He took over from Joey Takeda as lead developer on LEMDO in 2020.
He is a collaborator on the SSHRC Partnership Grant led by Janelle Jenstad.
Navarra Houldin
Training and Documentation Lead 2025–present. LEMDO project manager 2022–2025. Textual
remediator 2021–present. Navarra Houldin (they/them) completed their BA with a major
in history and minor in Spanish at the University of Victoria in 2022. Their primary
research was on gender and sexuality in early modern Europe and Latin America. They
are continuing their education through an MA program in Gender and Social Justice
Studies at the University of Alberta where they will specialize in Digital Humanities.
Nicole Vatcher
Technical Documentation Writer, 2020–2022. Nicole Vatcher completed her BA (Hons.)
in English at the University of Victoria in 2021. Her primary research focus was women’s
writing in the modernist period.
Rylyn Christensen
Rylyn Christensen is an English major at the University of Victoria.
Samuel Seaberg
Samuel Seaberg, a University of Victoria English undergrad, enjoys riding his bike.
During the summer of 2025, he began working with LEMDO as a recipient of the Valerie
Kuehne Undergraduate Research Award (VKURA). Unfortunately, due to his summer being
spent primarily in working to establish an edition of Thomas Heywood’s If You Know Not Me, You Know Nobody, Part 2 and consequently working out how to represent multi-text works in a digital space,
his bike has suffered severely of sheltered seclusion from the sun. Note: Samuel now
works for LEMDO as the Assistant Project Manager, much to his bike’s chagrin.
Tracey El Hajj
Junior Programmer 2019–2020. Research Associate 2020–2021. Tracey received her PhD
from the Department of English at the University of Victoria in the field of Science
and Technology Studies. Her research focuses on the algorhythmics of networked communications. She was a 2019–2020 President’s Fellow in Research-Enriched
Teaching at UVic, where she taught an advanced course on Artificial Intelligence and Everyday Life. Tracey was also a member of the Map of Early Modern London team, between 2018 and 2021. Between 2020 and 2021, she was a fellow in residence
at the Praxis Studio for Comparative Media Studies, where she investigated the relationships
between artificial intelligence, creativity, health, and justice. As of July 2021,
Tracey has moved into the alt-ac world for a term position, while also teaching in
the English Department at the University of Victoria.
Glossary
bio-bibliographical note
“A paragraph listing your institutional affilation, academic credentials, research
interests, and publications.”
directory
“Another word for folder.”
Edition directory
“A directory (i.e., folder) in the LEMDO repository containing all the files for an
edition. The name of each edition directory is the abbreviation for the edition, such
as AYL for As You Like It.”
Humanities and Computing Media Centre (HCMC)
“”
lemdo.odd or emODDern
“
lemdo.odd is the TEI file that LEMDO uses to capture our documentation and publish it on the
site. The .odd file extension stands for “one document does it all” or “
ODD file
.” We call our ODD file emODDern. We use an ODD processor to generate a RelaxNG schema, against which editors and encoders
validate their XML files. Many projects are entirely documented in their ODD file.
Because LEMDO has so much documentation that is written by editors, encoders, and
technical writers, we write a lot of our documentation in discrete .xml files that
are later included in the ODD file. You can find the ODD file in the repository (lemdo/data/sch/lemdo.odd) and see how documentation files are organized there, but only certain members of
the LEMDO team have permission to commit changes to this file. The LEMDO schema and
all of our editorial and encoding documentation HTML pages are generated from the
ODD file. (Read more about ODD files in the TEI Guidelines.)”
Oxygen
“The application that we use to encode and edit LEMDO’s XML files.”
repository or repo
“The repository contains all the files in the LEMDO project. The LEMDO repository
is saved to a server in the basement of the Clearihue Building at UVic. All LEMDO
files are under version control through Subversion, a repository maintenance tool
that keeps a complete history of every change ever made to every LEMDO file.”
revision number
“A number that indicates the most recent version of the repository. The revision number
goes up by 1 with every SVN commit.”
schema
“A schema is a set of rules governing the use of TEI elements in a particular project.
XML languages are all governed by a small set of shared principles; any document that
follows these principles, even if it makes up its own elements, is well-formed XML.
TEI is a formal language that is designed to comply with the principles of XML. TEI
offers many elements and attributes in its XML-compliant language. But most projects
still need to customize the TEI for their own purposes, by prescribing how and where TEI elements and attributes
are to be used, precluding some elements and attributes, making other elements and
attributes optional, making child elements required or optional, and defining allowed
and required values for attributes. The schema captures the project’s requirements,
prohibitions, and standards. We use a RelaxiNG schema at LEMDO. The main schema for
LEMDO is lemdo-all.rng (where the .rng file extension indicates the schema type).
The schema is responsible for generating the error messages in Oxygen when encoders
break one or more of the rules associated with it. (Read more about schemas in the
TEI Guidelines.)”
Subversion
“An open-source version control system that allows us to keep, track, and restore
every version of every file in the repository.”
svn checkout
“A Terminal command used to download a copy of the entire LEMDO repository to your
local computer.”
svn commit
“A Terminal command used to push any local-copy changed files to the LEMDO repository.”
Terminal or command line
“The program on your computer that allows you to navigate through your directories
and make changes to the files therein.”
validate
“The process you run in Oxygen to check files for errors.”
write privileges
“the ability to commit new and revised files to the repository”
xml:id
“A unique value that we use to tag an entity. Strictly speaking,
@xml:id is an attribute that can be added to any XML element. We use it as a shorthand for
“value of the xml:id.” Every person, role, glyph, ligature, bibliographical entry,
act, scene, speech, paragraph, page beginning, XML file, division within XML files,
and anchor has a unique xml:id value, some of which are assigned automatically during
the processing of our XML files.”


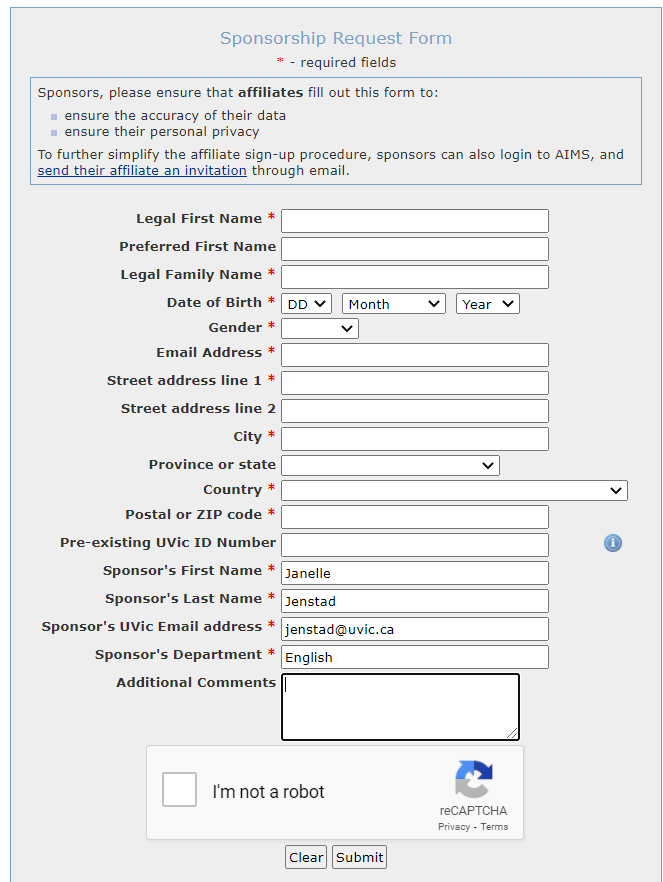
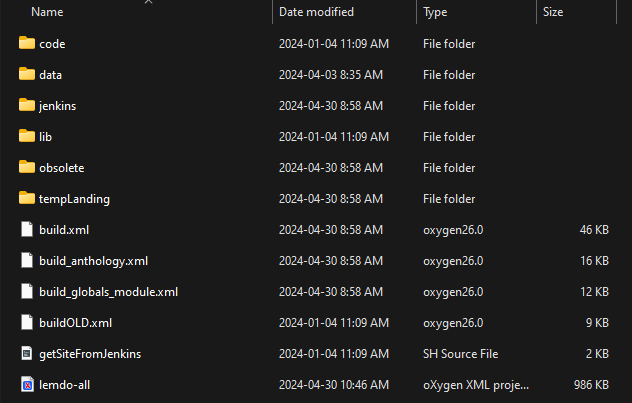
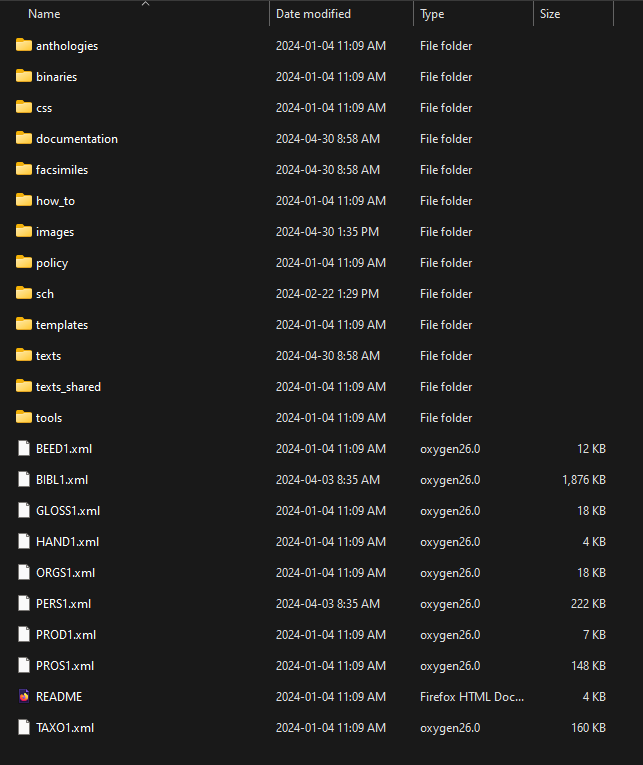


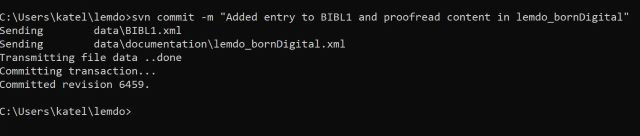
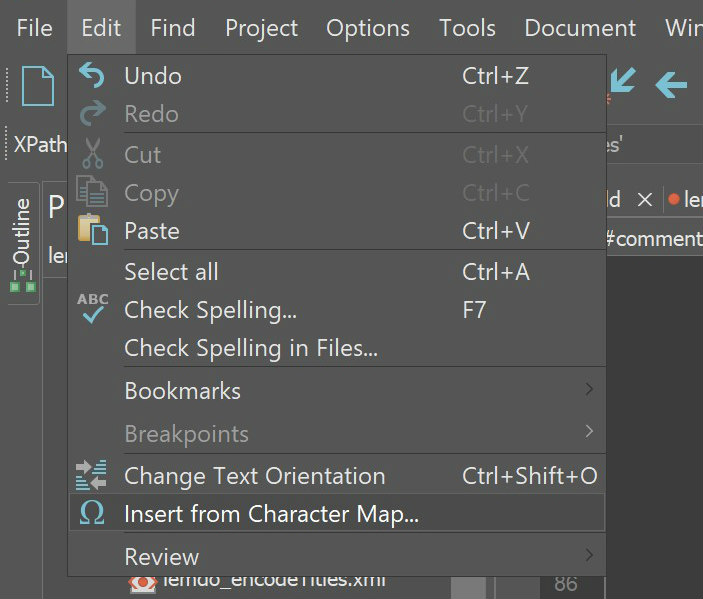
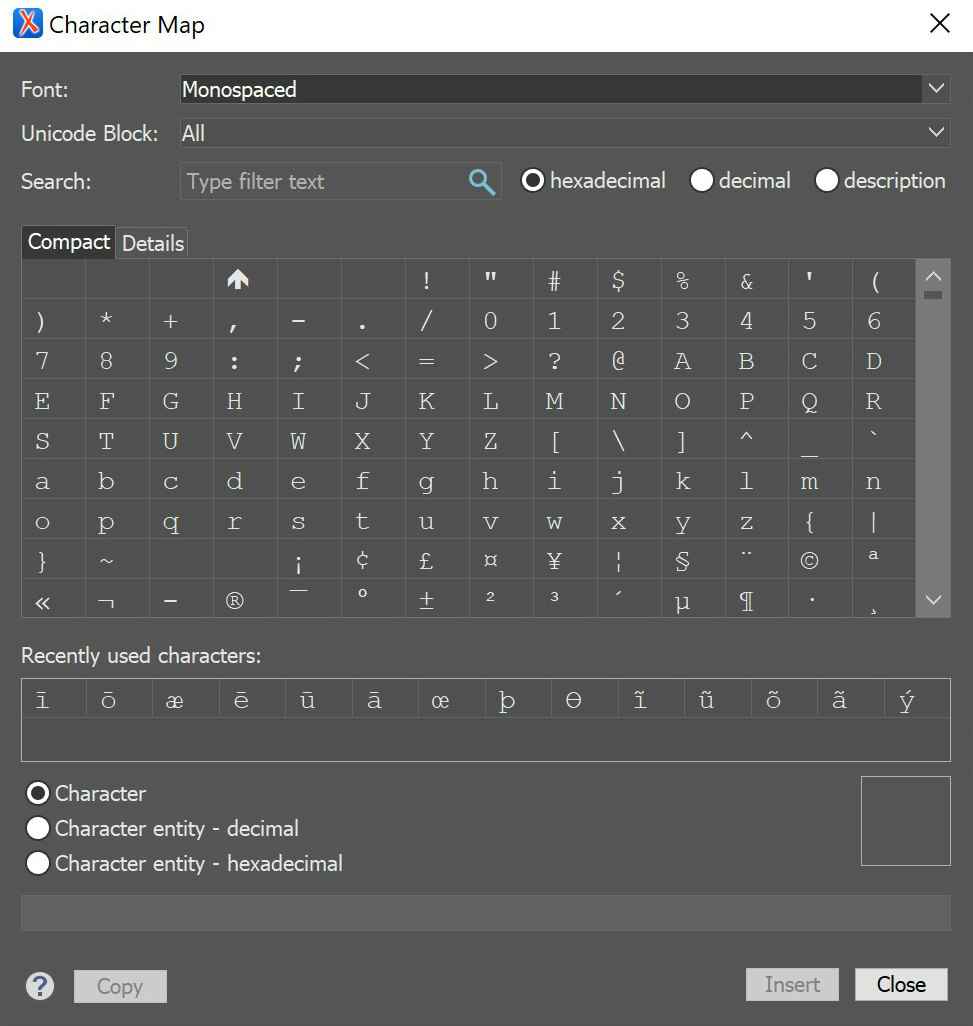
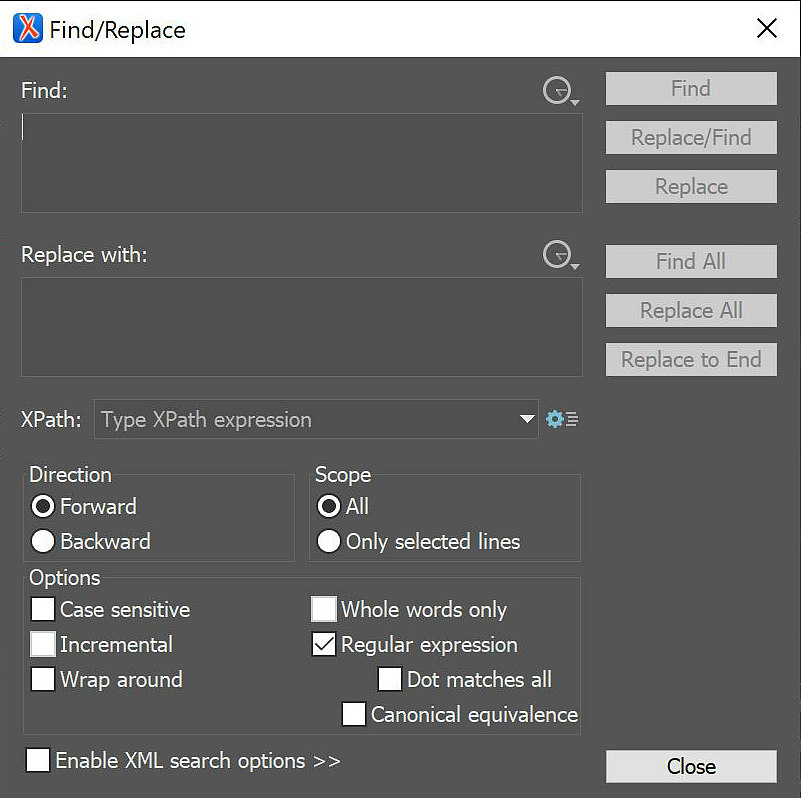
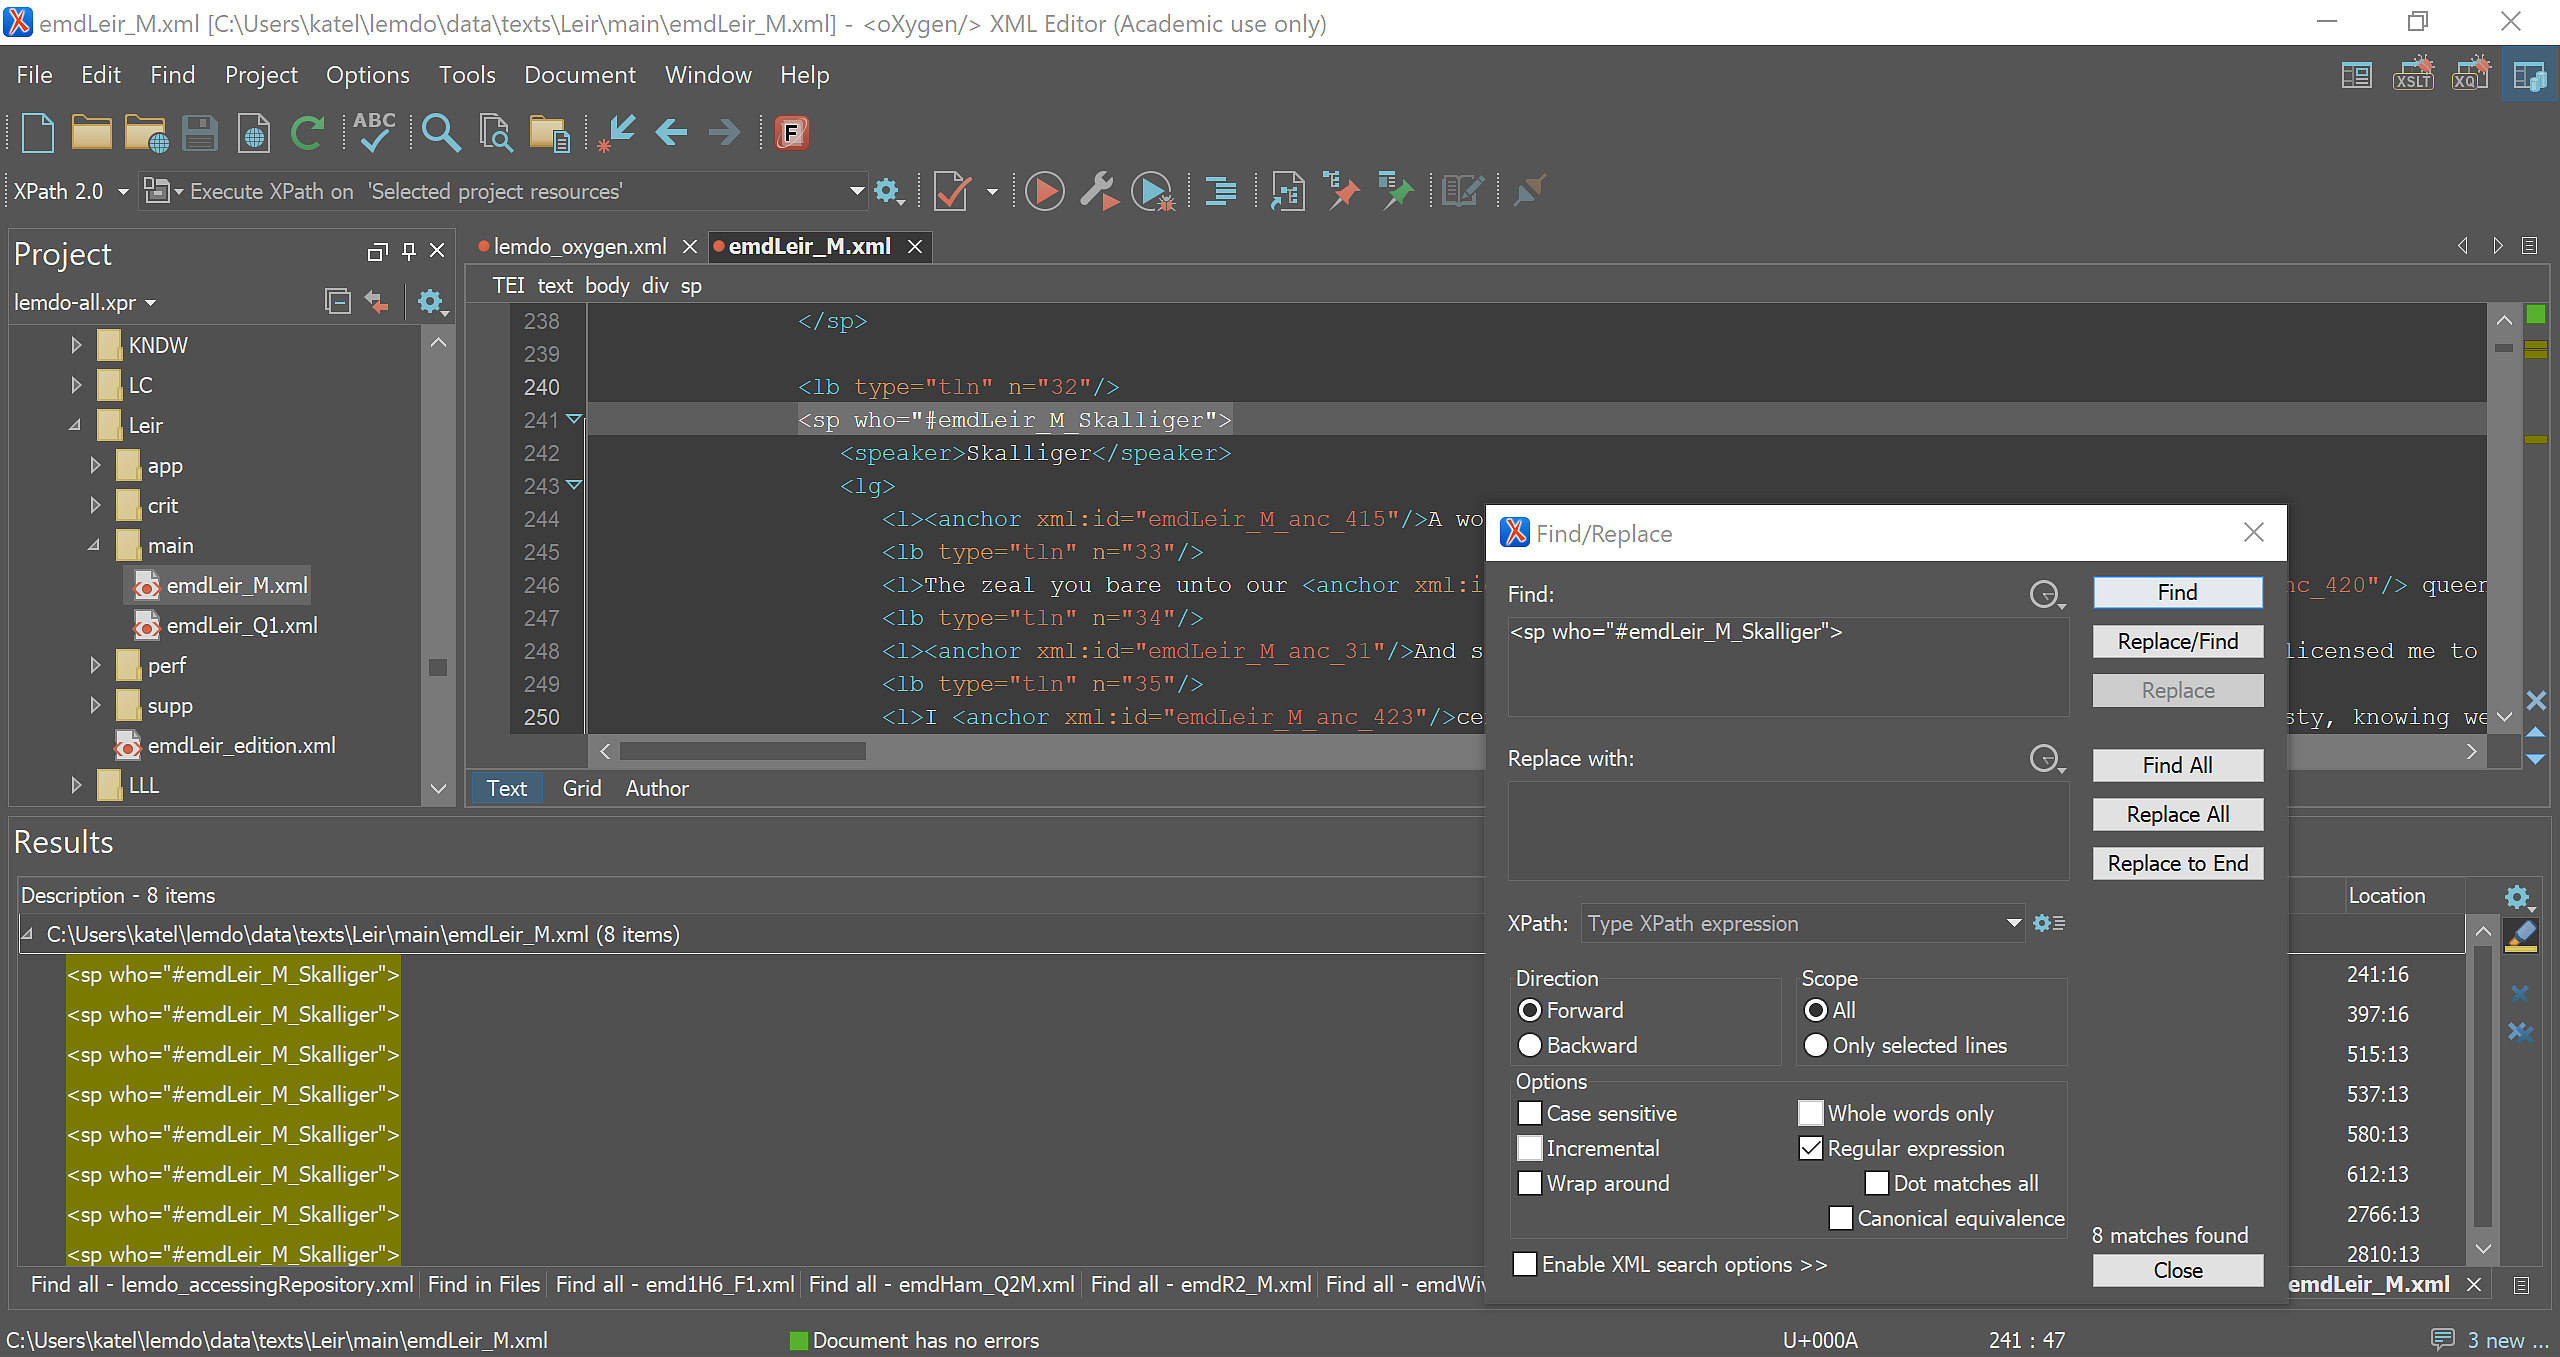

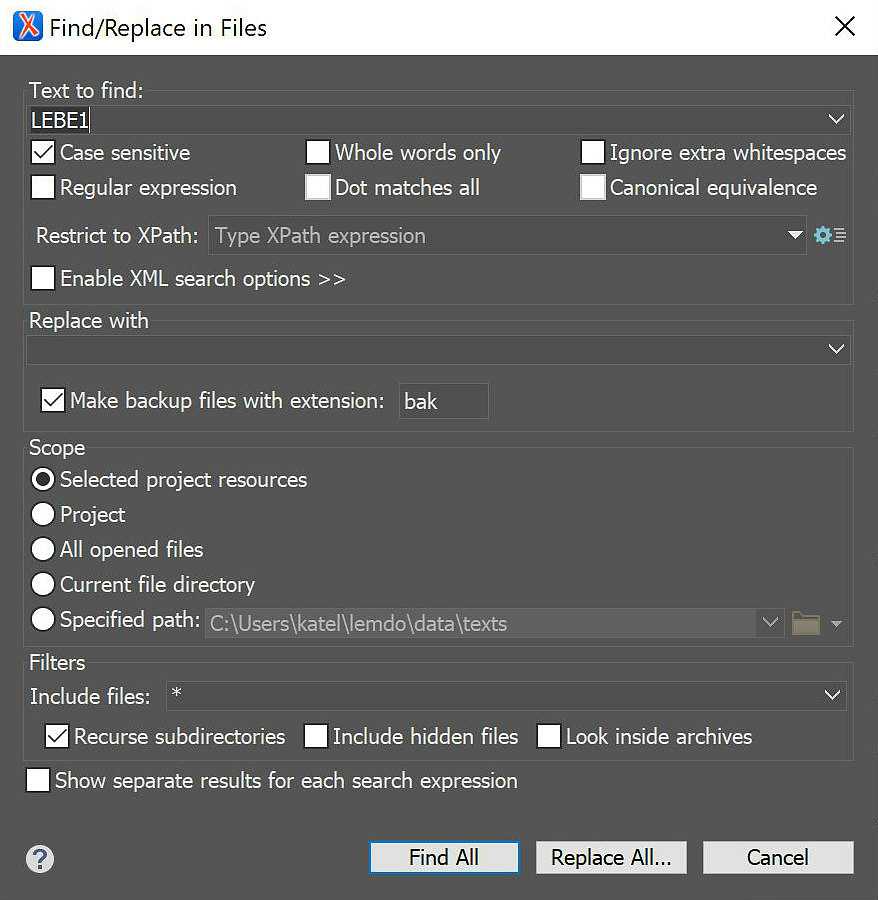
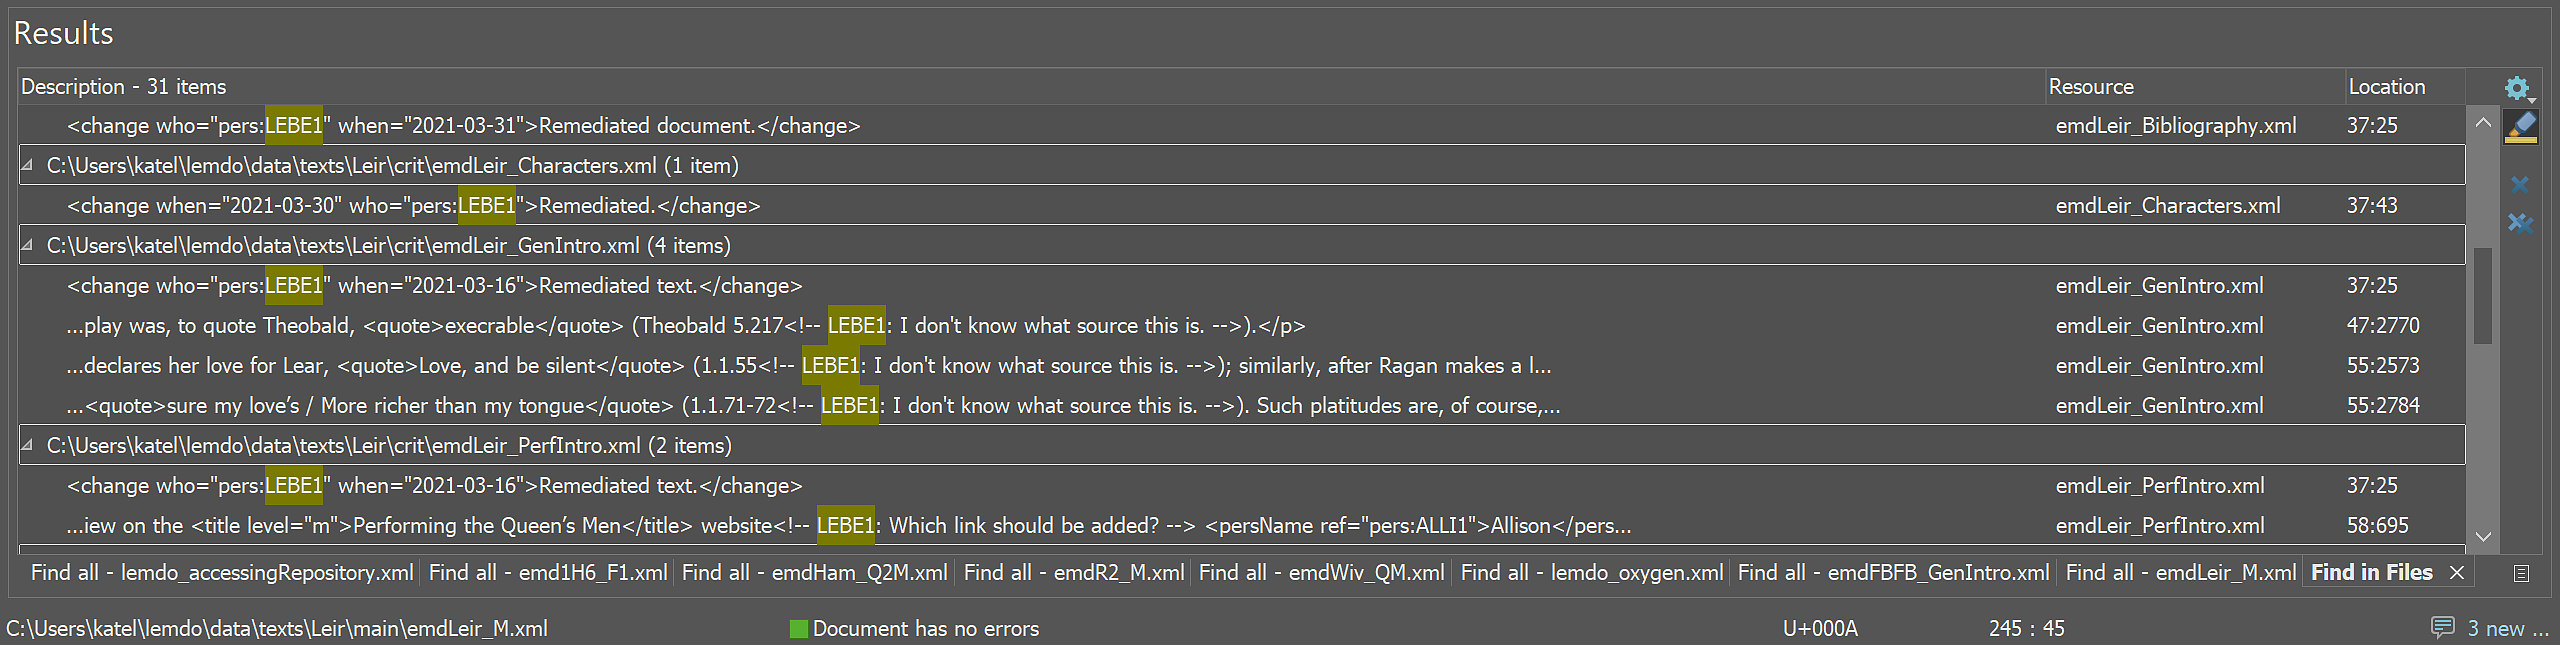

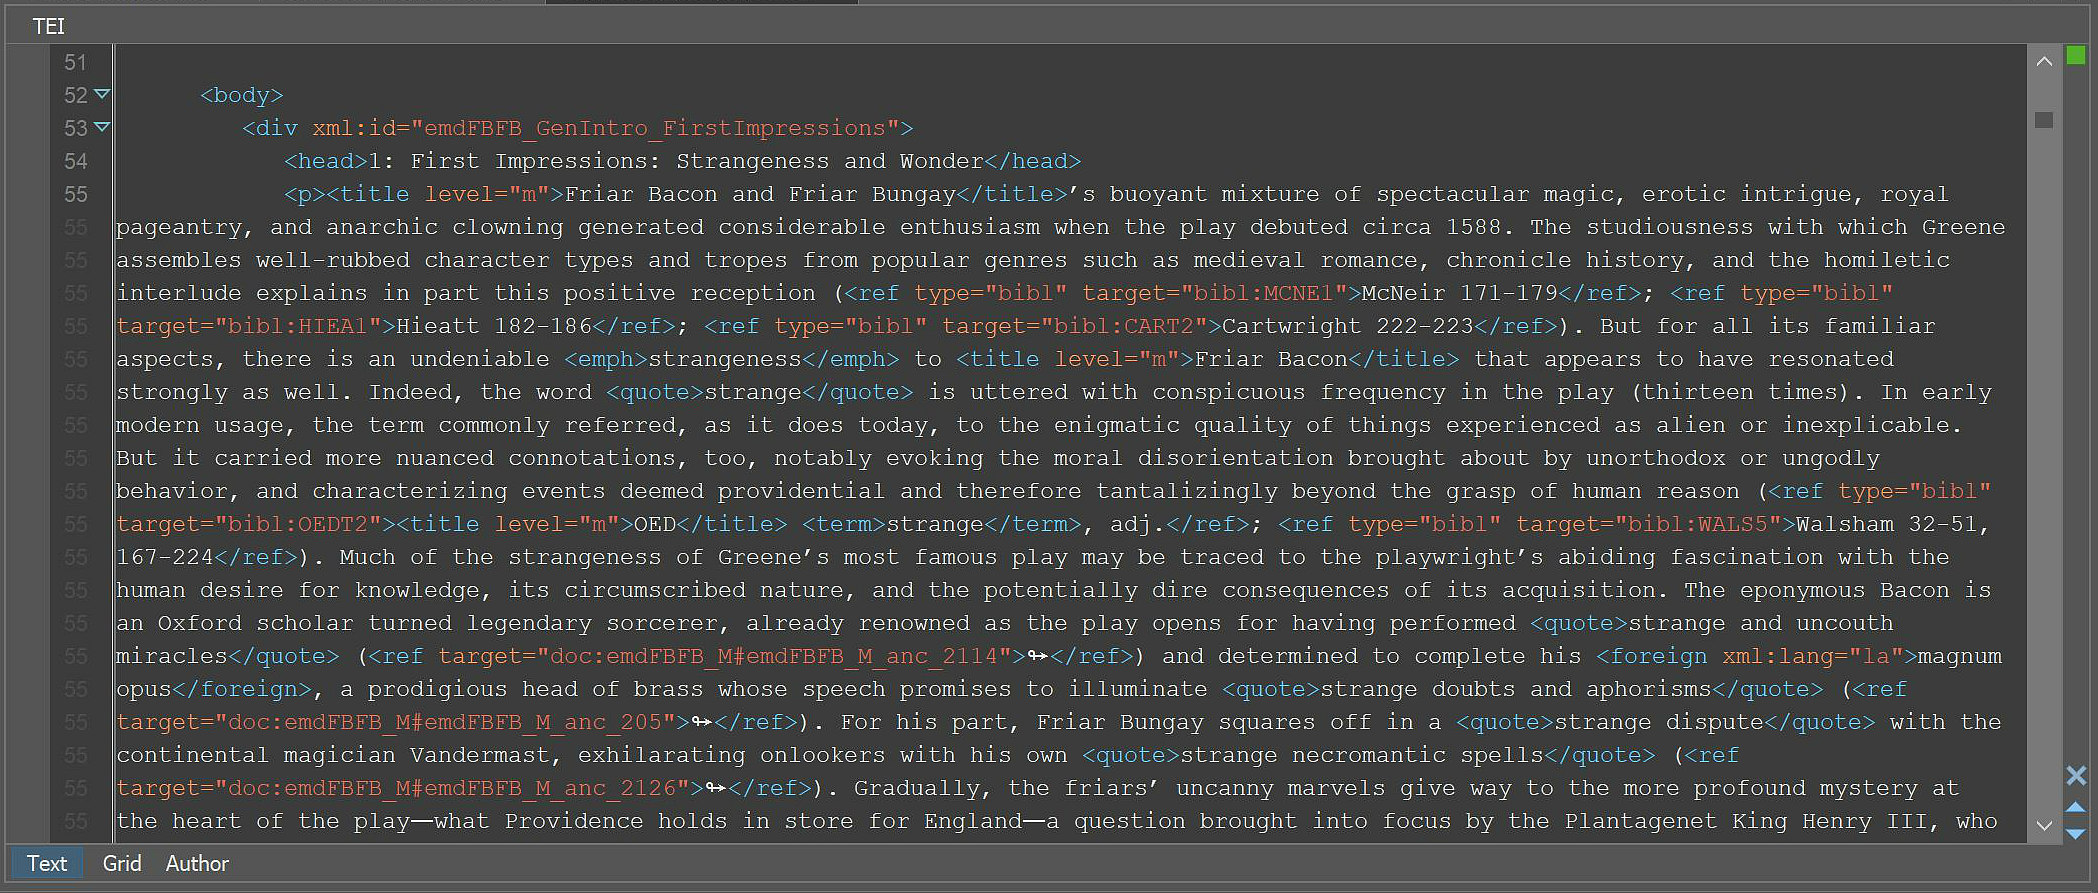
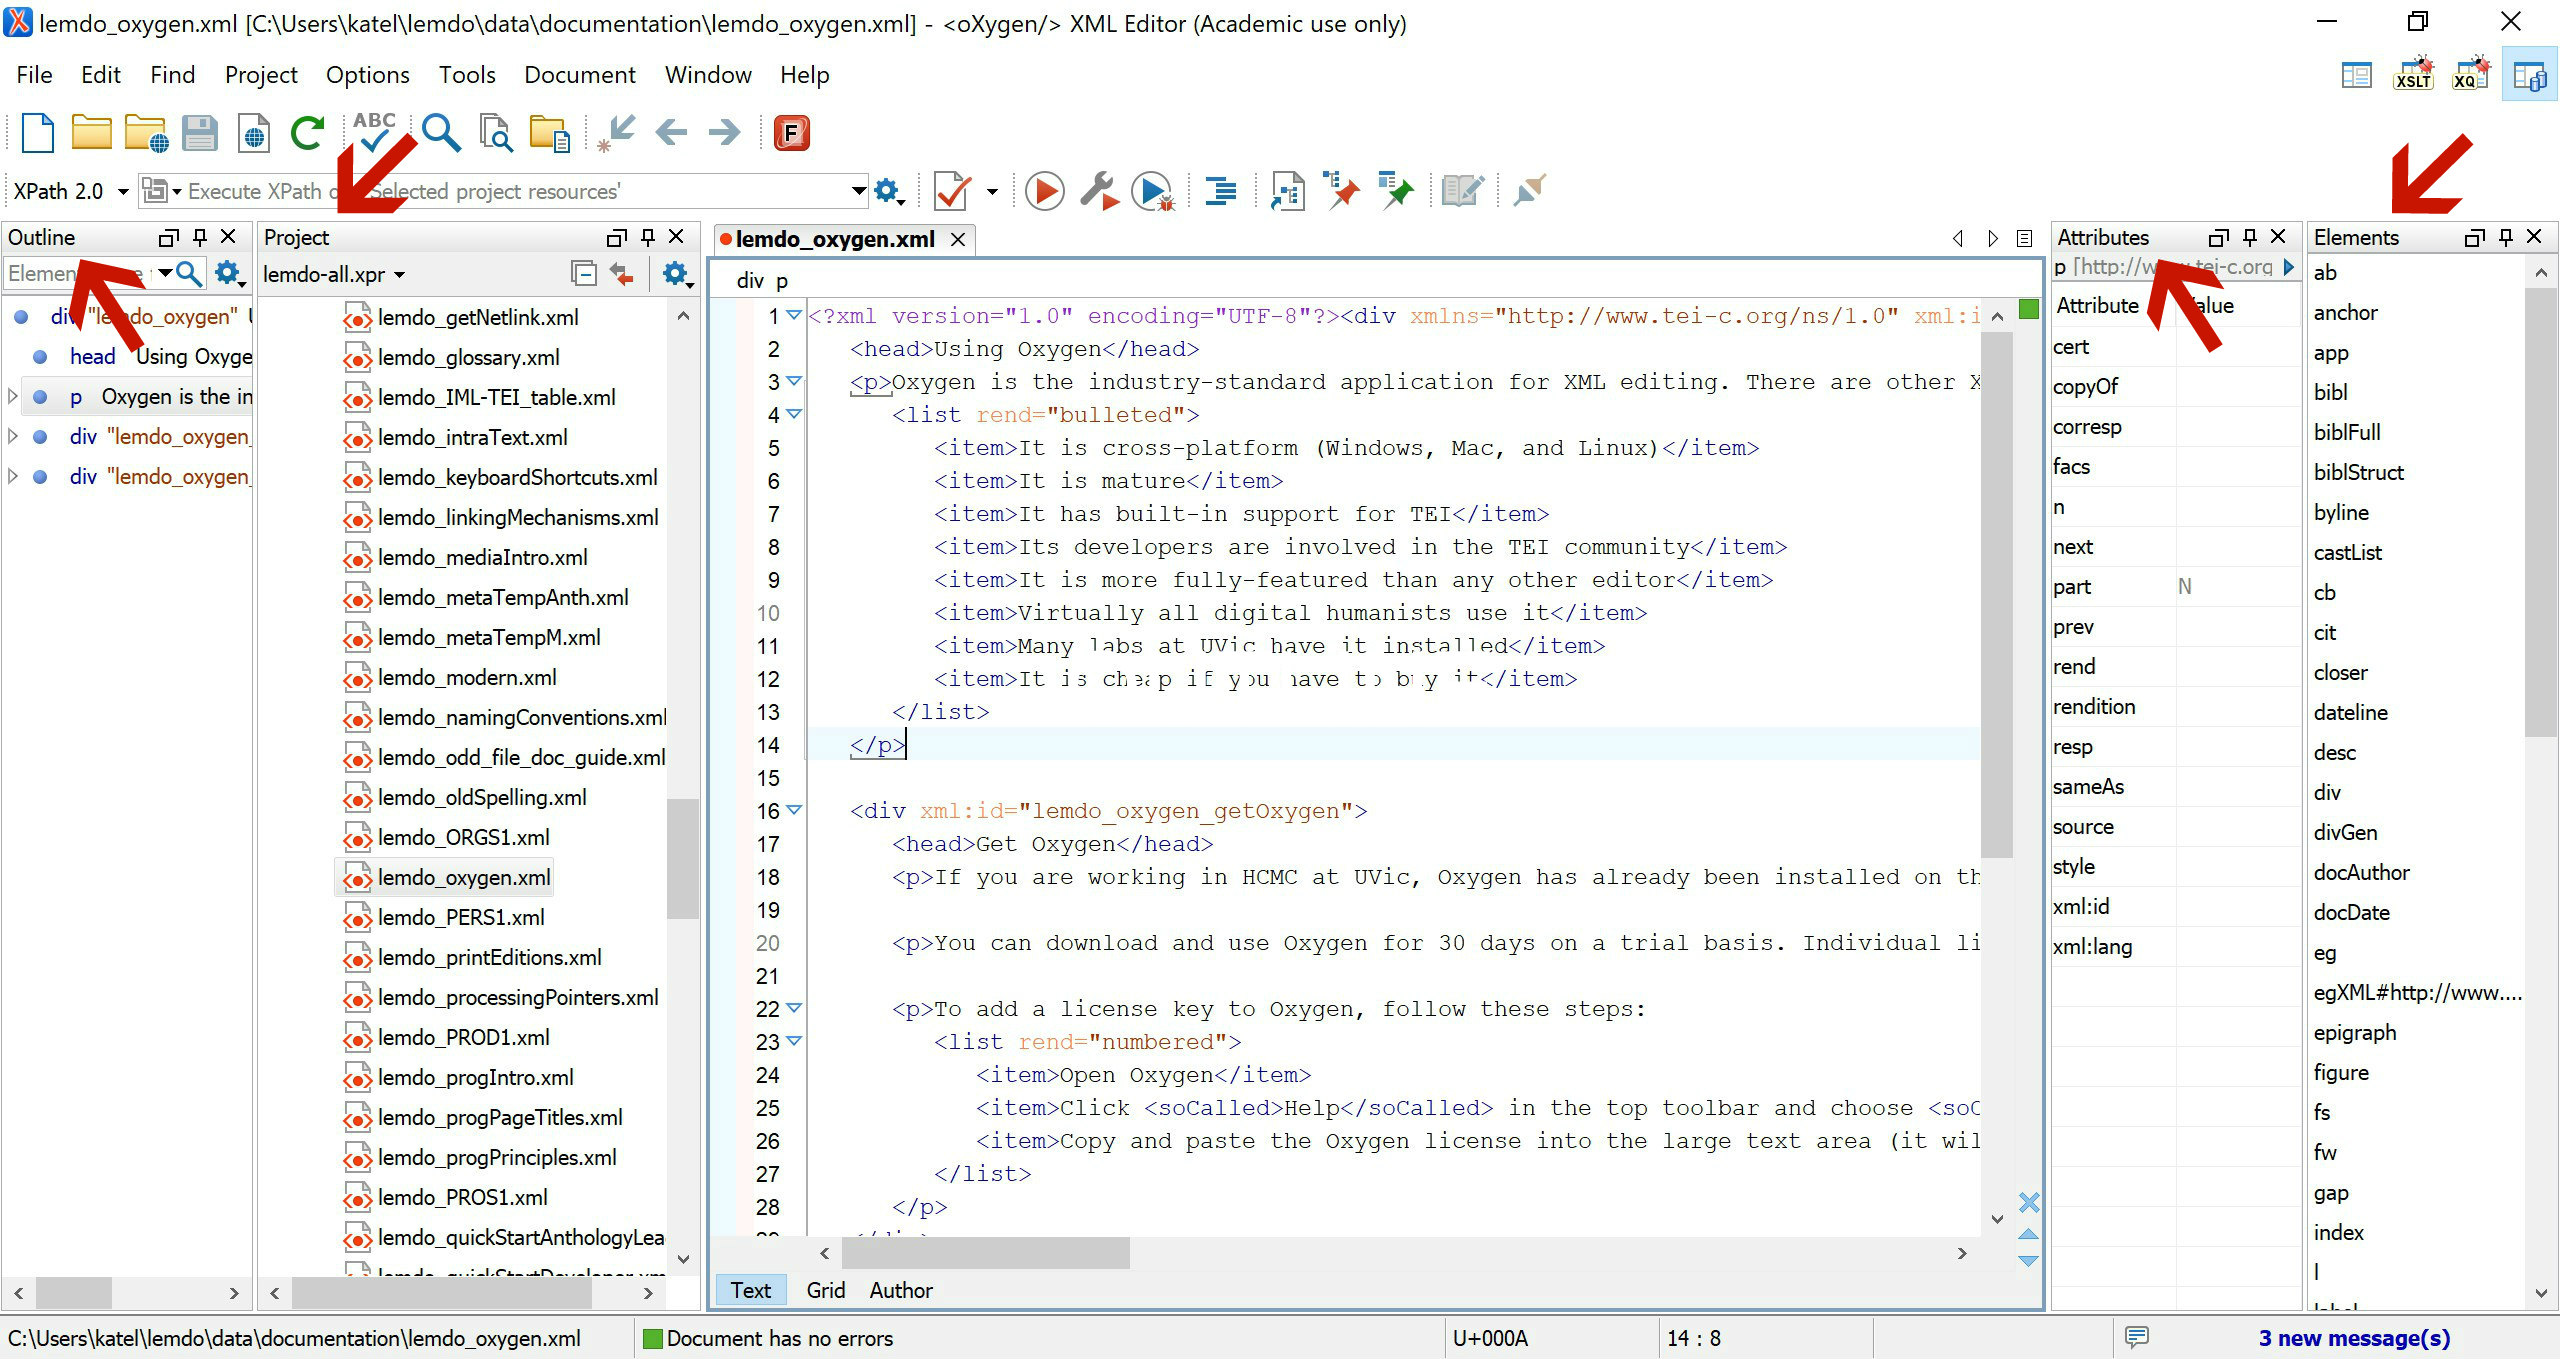
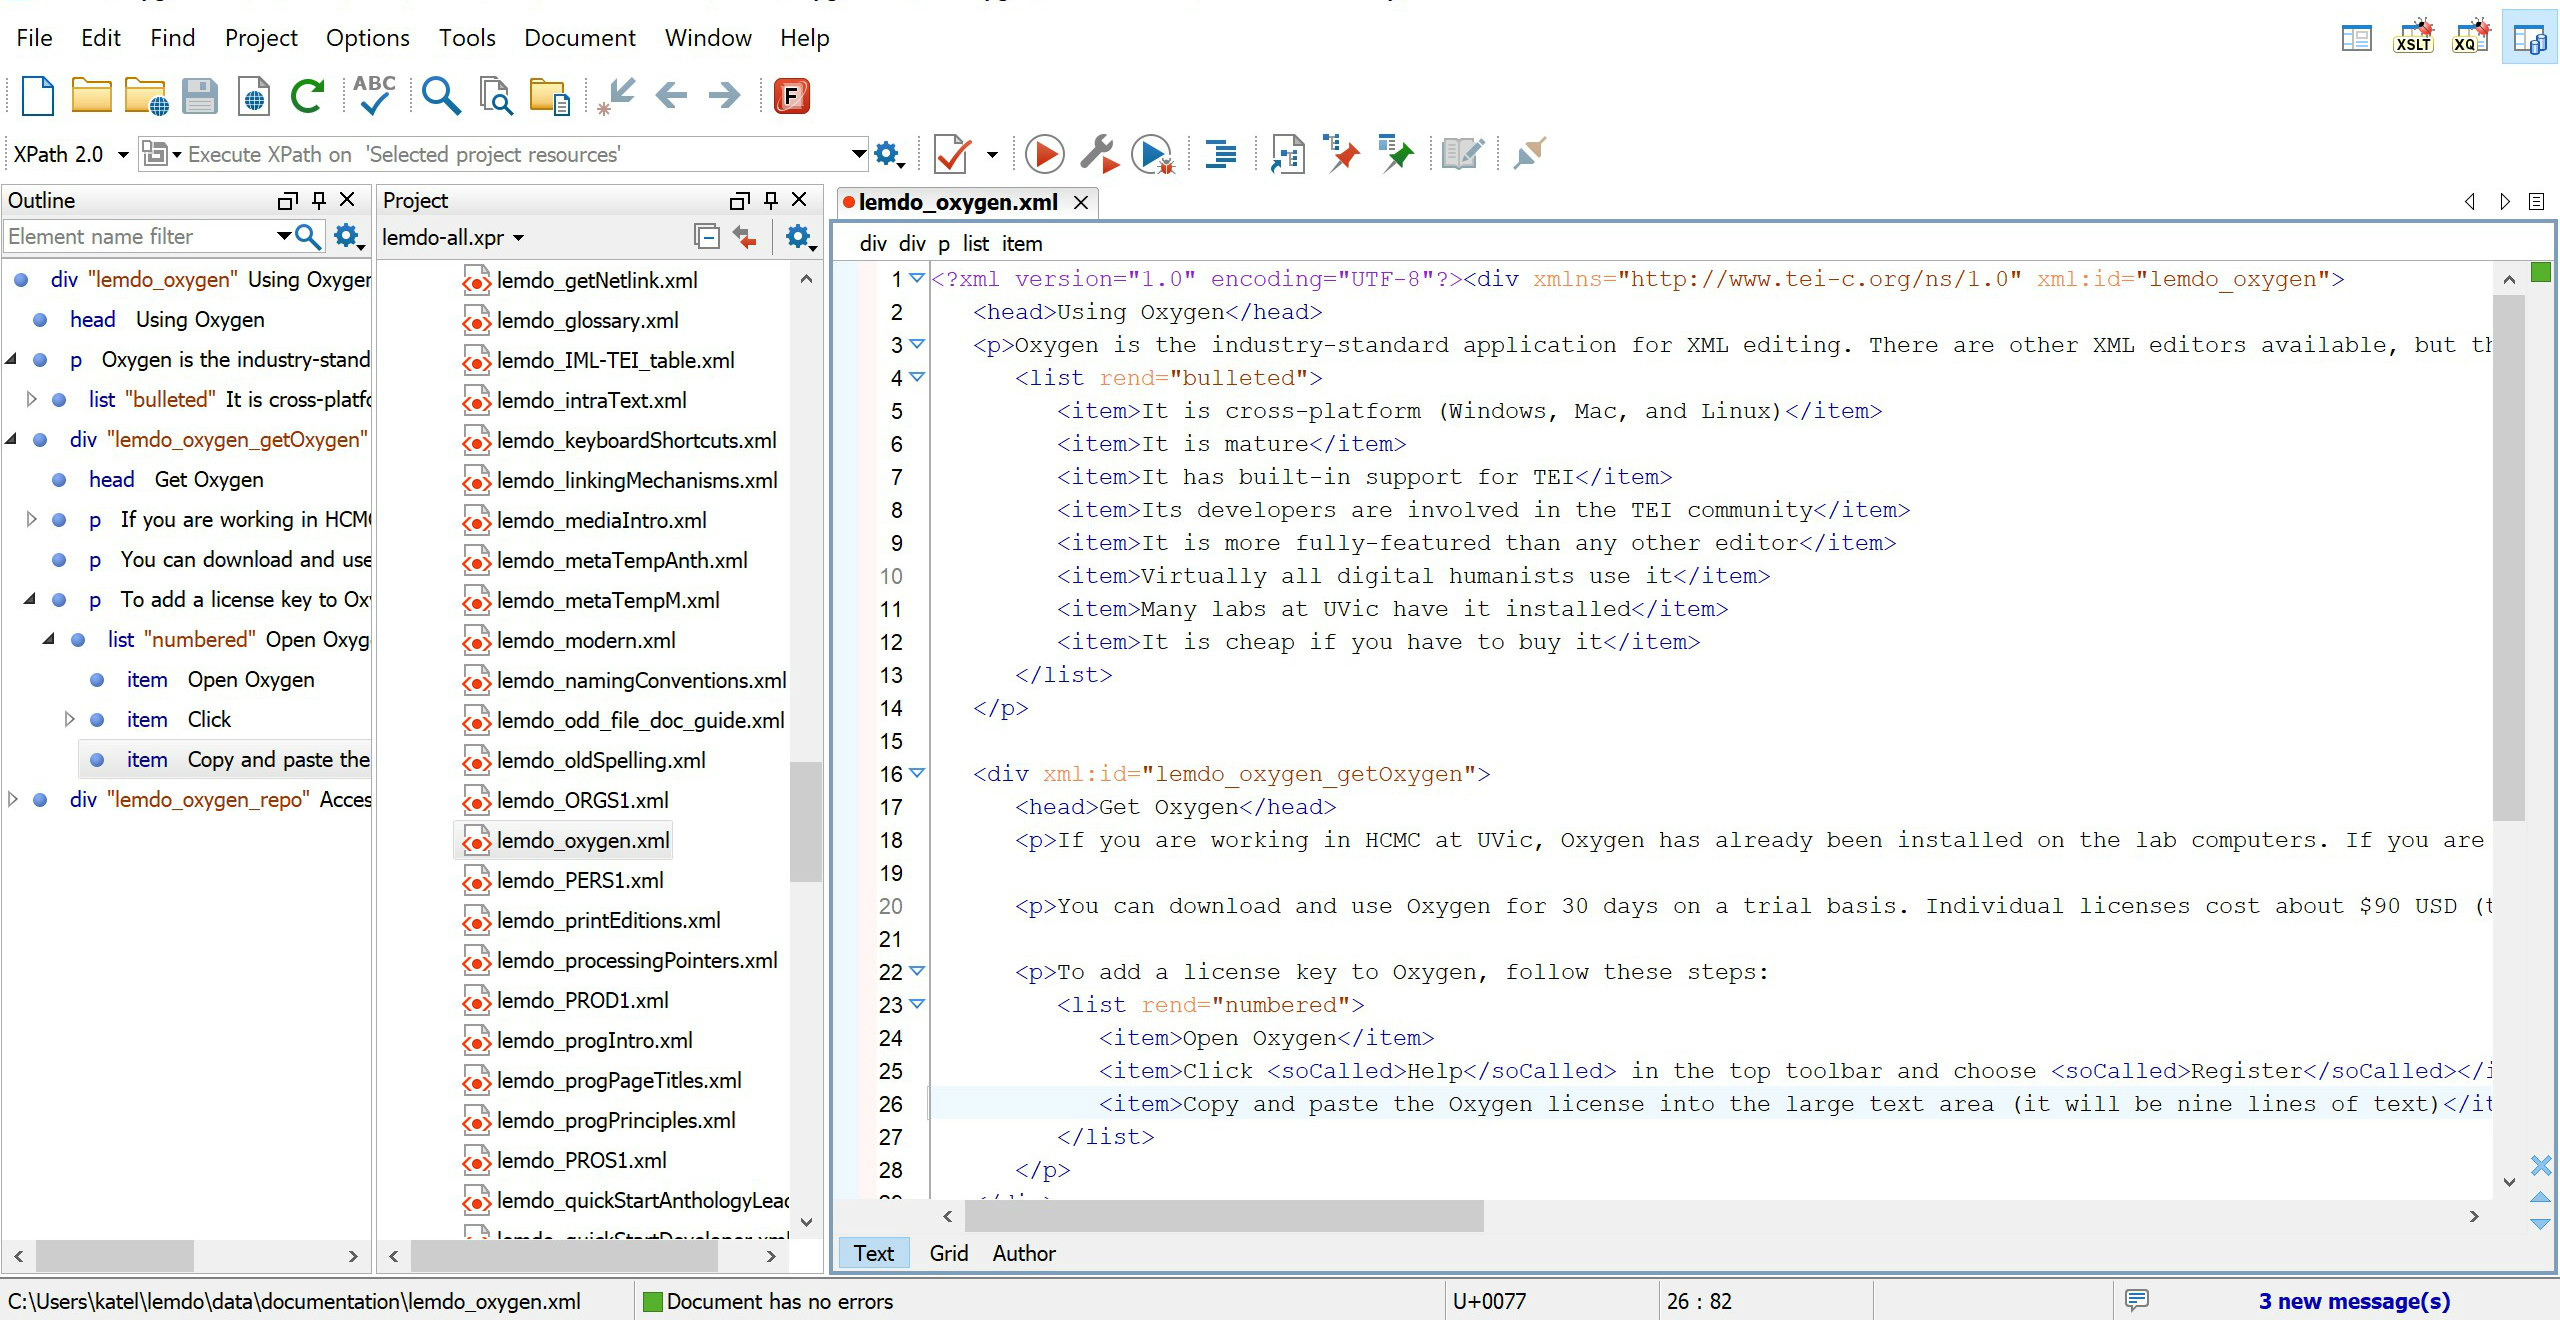
![Screenshot of a less-than angle bracket with a scrollable dropdown menu that reads: ab; anchor; app; bibl; biblFull; biblStruct; byline. ab is selected. A pop-up window beside it reads: (anonymous block) contains any arbitrary component-level unit of text, acting as an anonymous container for phrase or inter level elements analogous to, but without the semantic baggage of, a paragraph. [16.3. Blocks, Segments, and Anchors]](images/lemdo_oxygen_element.jpg)