
Chapter 24. Programming
This chapter of our documentation is still in beta. We welcome feedback, corrections,
and questions while we finalize the page in our 2024–2025 work cycle.
Programming Principles
This document lays out basic programming practices, style rules, and naming conventions
for programmers working on the XSLT, HTML, JavaScript, and CSS in the LEMDO project.
We do not yet conform to these principles, but we are committed to doing so in time.
Names for Variables, Classes, and Other Identifiers
All LEMDO programming code identifiers and file names should be constrained to the
ASCII range.
All LEMDO identifiers should be as long as necessary to describe their meaning/function
unambiguously, with information going from general to specific. Examples: note-editorial, title-monograph. This enables easier sorting, searching for, and comparing items which belong in
groups.
Generally speaking, the following should all be lower-case with components separated
by dashes:
Note that HTML data-* attribute values will often be derived from TEI element names and other similar constructs, so these
may take whatever form is dictated by their source:
CSS filenames (including SCSS source files).
JavaScript filenames.
Image filenames (for site chrome etc.; facsimiles etc. have their own naming conventions).
HTML custom attribute names (data-*).
<div data-el="persName">.ECMAScript practices are different:
ECMAScript variable and function names should be lower camelCase (function getSomething()).
ECMAScript constants should be UPPERCASE_WITH_UNDERSCORES.
ECMAScript class names should be upper CamelCase (class NotePopup {...}).
Identifiers should be as descriptive as possible, with information going from general
to specific, so: noteEditorial, titleMonograph.
Principles for HTML
Wherever possible, prefer HTML5 Semantic Elements over generic elements. Examples would be nav, section, main, article, header, footer.
The only elements requiring id attributes are those which need to be pointed at, linked to, or manipulated by ECMAScript.
To identify a category of element that needs to be styled (for example), prefer the
use of data-* attributes derived from the source TEI wherever possible. So:
This provides a solid link between the underlying TEI code and the HTML which then
propagates easily into the CSS, making maintenance and debugging easier.
<span data-el="persName">
<span data-el="speaker">
<div data-el="ab">
Reserve the use of style and class attributes for the propagation of primary source style description from the source TEI into the HTML. Examples:
Here the source element name is identified using the data-el attribute, so default house styling can be applied uniformly if necessary, but the
appearance from the original source text is captured in a local style attribute or a class.
<span data-el="stage" style="font-size: 80%;">
<span data-el="speaker" class="rnd_gothic">
Principles for CSS
Following on from the principles above, site-level CSS (as opposed to text-level CSS
derived from the TEI encoding of primary source features) should avoid the use of
class attributes wherever possible. To select an element for styling:
First prefer its semantic tag name (header, footer, aside).
Next, use TEI-derived data-* attributes (
<span data-el="fw" data-type="catch">).If that is not enough, fall back on a selector based on position in the hierarchy
or a semantic feature of an ancestor (
q q{...}, div[data-el="speech"] aside).Resort to classes only as a desperate measure.
Principles for XSLT
XSLT files are named in lower-case with underscores, and use the extension .xsl.
All root (master) XSLT file names end in _master.xsl.
All modules which are included or imported into master files have names ending in
_module.xsl, and are stored in a modules subfolder alongside the master file(s) that use them.
XSLT files are documented using elements in the XSLT Stylesheet Documentation Namespace, as supported by the Oxygen XML Editor. They are also validated using project-specific
custom Schematron in Oxygen, ensuring adherence to basic good practices and style
rules.
Variable and function names should use lower camelCase.
Building the LEMDO Schemas
What and where are the LEMDO schemas?
When someone is editing a LEMDO text, they’re making use of two different schemas,
which Oxygen is aware of in the background; these include a RELAX NG schema (lemdo.rng) and a Schematron schema (lemdo.sch). If you’re a programmer creating e.g. XSLT code for the project, there is another
schema which helps to standardize the codebase: technical.sch. Finally, when the various TEI versions of each XML file are created at build time,
they are also validated against a second pair of schemas, tei_all_LEMDO.rng and tei_all_LEMDO.sch.
All of these schemas are found in the data/sch folder, alongside the files from which they are generated: lemdo.odd, technical.odd, and tei_all_LEMDO.odd. You will also see three matching XSLT files, lemdo.xsl, technical.xsl, and tei_all_LEMDO.xsl. These are the pre-processed versions of the Schematron (*.sch) files used to do Schematron validation. The Schematron language is transformed into
XSLT before being applied to a document for validation purposes, and these XSLT files
are pre-generated so that this process only has to be done once.
Schemas and their associated sources are only usually edited by senior editors, project
managers, or programmers. Anyone else who would like to see a change to the schema
should make a suggestion to the project leaders, or raise an issue on GitHub.
How to build the schemas
Whenever a change is made to a LEMDO schema, it is usually done in the appropriate
ODD file (although not always: see below). If, for example, a new Schematron rule
is added (in the form of a TEI
<constraintSpec>
to the lemdo.odd file, the schemas will have to be rebuilt before that rule can take effect. The schema
build process is handled by an Ant file, code/schema/buildBaseOdd.xml. This file builds all three ODD files to generate all their outputs, and handles
all complexity automatically. We recommend that you run this every time you make any
changes to any of the ODD files or related files, even if it seems that some rebuilds
may not be required. It doesn’t take long to run.To build the schemas from the ODD files, you need to be on a Linux or Mac computer;
Windows will not work. You can run the build process in two different ways:
With the lemdo_all.xpr project open in Oxygen, open the data/sch/lemdo.odd file, and press the red triangle. This will run the entire process.
At the command line, go to code/schema, and run:
ant -f buildBaseOdd.xml
The results should be exactly the same: all the associated files will be refreshed,
and changes can be committed if they are as expected. Before committing changes, though, we recommend that you validate all the existing
files as follows: Navigate to the lemdo root folder, and run:
This will take some time to run, but it will validate all the existing XML files in the project with the rebuilt schemas. If the change you made has caused any of these files to become invalid, you will need to figure out what the problem is.
svn update && ant quickValidateSource
This will take some time to run, but it will validate all the existing XML files in the project with the rebuilt schemas. If the change you made has caused any of these files to become invalid, you will need to figure out what the problem is.
Complexities to be aware of
The lemdo.odd file in particular is large and complicated, and if you look through it, you will
see some sections that have comments like this:
<!-- DO NOT EDIT: These values are generated from the taxonomies document. --><!-- Any changes made will have no effect. -->
These comments appear in locations where the ODD content is not constructed by hand,
but is generated as part of the schema build process, taking XML structures from the
TAXO1.xml document (typically taxonomies/categories) and generating from them (for example)
<valList> elements in the ODD file, which are then processed into attribute values in the RELAX
NG schema. We do things this way because it’s easier for senior editors to maintain
taxonomies in the form of TEI
<taxonomy>
elements than to hand-edit the ODD file elements, but also because we use the
<taxonomy>
elements in other ways, such as rendering them into documentation tables. A
<taxonomy>
’s descendant
<category>
elements can be usefully organized into a nested hierarchy, whereas a <valList> has to be flat.This means that when you need to make a change to some component in the RELAX NG file,
you should first check to see if it is encoded directly in the ODD file, or whether
the content in the ODD file has a comment telling you that it is generated from somewhere
else; if the latter is true, you will need to make the change in the other location
before regenerating the schemas.
TEI sources and requirements for building schemas
In the lemdo root directory you will see a directory called Stylesheets-local. This contains a local copy of the parts of the TEI Stylesheets collection which
are required to build ODD files into schemas, along with a file called p5subset.xml, which is a complete copy of all the TEI element and attribute definitions from the
TEI standard. We use static copies of these files rather than reaching out to the
TEI website to get the latest fresh copies of them for two reasons:
The TEI site is sometimes unavailable, so we don’t want to be dependent on it to build
our schemas.
The TEI source code and Stylesheets are updated at least twice a year, and each new
release may introduce changes which result in some of our documents being invalid
in some way.
Generally, we like to stay up to date with the latest versions of the TEI and Stylesheets,
but because updates may result in problems, we need to stage them carefully. When
a new version of TEI is released, we recommend that a programmer on the project approach
the update as follows:
Make sure you have plenty of time available to devote to any emergent issues.
Run
svn update in the LEMDO root folder.Make sure the TEI website is available and working.
Run this command to update the local copies of the Stylesheets:
This command should retrieve new copies of the Stylesheets and p5subset.xml, and copy the relevant files from the download location (a folder called Stylesheets) into the Stylesheets-local folder, overwriting the existing ones.
ant globals.getTeiSchemaBuildRequirements
This command should retrieve new copies of the Stylesheets and p5subset.xml, and copy the relevant files from the download location (a folder called Stylesheets) into the Stylesheets-local folder, overwriting the existing ones.
Move to the code/schema folder, and run:
ant -f buildBaseOdd.xml
If that succeeds in building all the schemas, then go back to the LEMDO root folder
and run:
Wait until all the validation has completed (it takes a while).
ant quickValidateSource
Wait until all the validation has completed (it takes a while).
If everything succeeded—in other words, if the schemas all built successfully, and
all the LEMDO documents were valid—then you can commit all the changes. However, if
anything did not work, you will need to figure out and solve the problem, or roll
back all the changes:
svn revert --recursive .
Static Build
What is a Static Build?
A
static buildis a process which takes a stack of input documents such as TEI files, along with related resources such as images, and creates a website from them. It does this in such a way that the resulting website has no dependency or requirement for any back-end engine such as a database or a PHP processor; all the content consists of static HTML and related files, and the site can be hosted on any webserver just by copying the files up to the server. This process, championed by UVic’s Project Endings, is described in detail in the many presentations and publications of the Endings team. The great value of a static site is that it requires no ongoing maintenance, is easy to replicate and archive, and has a good chance of surviving for decades without much attention.
What Other Projects Use Static Builds?
Some of the other projects using this approach to building sites include:
Digital Victorian Periodical Poetry (site still under development).
Practice: Run a Static Build
The LEMDO project and its related sites are all built using a Jenkins Continuous Integration
Server run by HCMC at the University of Victoria, so unless you are a project administrator
or programmer, you should never need to run a build yourself. However, if you are
writing or editing code for the project, you can consult the documentation on running builds to get detailed information on how to run complete builds on your computer, and also
how to run partial, rapid builds to test specific processes or outcomes.
Running Builds
Introduction
The LEMDO repository has a complex build process that can be difficult to understand;
it also takes quite a long time to do a complete builds, so when developers or designers
are working on the site, they need to be able to do rapid partial builds to see the
results of their work. This documentation describes the build requirements for running
builds, and outlines some of the strategies for rapid test-builds that are available.
Software Requirements
This is a list of software that is required for running the various build processes.
Some of it is actually stored in the repository, and some must be installed on the
machine doing the build.
Software Included in the Repository
The following software is stored in the SVN repository, so does not need to be installed
locally:
Saxon XSLT processor (saxon-he-10.jar).
Schematron library for Ant (ant-schematron-2010-04-14.jar).
The W3C HTML validator (vnu.jar).
The Jing RELAXNG validator (jing.jar).
Software to be Installed Locally
To run the various LEMDO build processes, you will need the following software to
be installed on your machine. At present most of the build processes have to be run
on *NIX systems because they depend on command-line utilities. If you are forced to
use Windows, you’ll probably have to install the Windows Subsystem for Linux. For
running specific components of the build, you may not need all of these applications
or libs.
Java.
Ant.
ant-contrib.
svn.
git.
zip.
dart-sass for building CSS (https://sass-lang.com/install).
texlive-full (a complete LaTeX install, needed for building PDF for print).
LEMDO’s Build Processes
The LEMDO build processes are controlled by two Ant files, build.xml and build_globals_module.xml in the project root folder.
You run a complete build by running this at the command line, in the project root
folder:
ant.A Quick Way to Validate All the XML
As part of a full build process, the XML documents from the data folder are copied over to an output folder (products/lemdo-dev/site/xml/source) and validated there, with RNG and Schematron. You can invoke this process without
having to run the rest of the build by running:
ant quickValidateSource.This is a useful way to check that you haven’t broken anything while doing a multiple-file
search-and-replace or a similar global operation.
Practice: Run Partial Builds
The complete static build process takes a long time. If you’re working on fixing a
build problem and you need to test your changes, it is obviously not practical to
run the entire build process and wait to see the results. However, in most cases,
you don’t need to. Here are a number of examples of how you can run only a small component
of the build process to test specific changes.
Important note: In most cases, you must have an existing completed build in place before you can
successfully run partial builds. That means that once in a while, you will need to
run a complete local build for yourself. You can, of course, do that over lunch or
overnight.
Once you have a full completed build available locally, you can start running only
the part of the build that you are interested in. For example, if you are trying to
work on a problem that relates to the generation of the
Original XML,you might do this:
ant createOriginalXml validateOriginalXml.This will perform only those two steps, and you can then examine the results in the
products/lemdo-dev/site/xml/original folder.
Similarly, if you are working on the XHTML generation, you could run:
ant createXhtml.To see a full list of the subtasks available, type
ant and press the tab key twice. To see more info, including descriptions of each of
the tasks, type: ant -p.If you’re working on something more substantial that requires several steps, you can
just chain them together as appropriate. Make sure you run them in the order they
would normally run, because each process may depend on the output from a preceding
process. You can discover the order by looking at the
@depends attribute on the target named all.
Practice: Process a Subset of Documents
Another useful approach to rapid building is to process only a specific subset of
documents. For example, imagine that you are dealing with an HTML problem that affects
lots of documents, but you know that one particular document (emdH5_F1.xml) exemplifies the issue, and can be used as a test. You can run this:
ant createXhtml -DdocsToBuild=emdH5_F1.This will run the part of the build that transforms the
Standalone XMLinto HTML files, but it will only process a single document, making it very fast indeed; you can then inspect the changes to that specific document. To process more than one document, separate them with commas:
ant createStandaloneXml -DdocsToBuild=emdH5_F1,emdH5_Q1.You can even use a regular expression, so you could build all of the Henry V documents
by running this:
ant createStandaloneXml -DdocsToBuild=emdH5_.*.Finally, there is a specific target named
quick,which is designed to do the minimum processing to get from the source XML to the XHTML output (in other words, the most important stages in the build process). If you run:
ant quick -DdocsToBuild=emdH5_F1,emdH5_Q1, you’ll pass those two documents through the entire process from source to HTML output,
but the process should be relatively fast. Again, it’s important to remember that
you must have a complete set of build products in place in your products/lemdo-dev/site folder before this will work properly.Strategies for Building and Testing
The various strategies described above provide the basis for a programmer to work
efficiently on solving a specific problem or adding a specific feature without having
to wait for long periods to see the results of changes. If you triage the issue you’re
working on carefully, you’ll be able to break it down into small steps, and identify
a specific subset of documents which can be used for testing, then develop and test
your changes carefully, so that when you do commit changes to the repository, it’s
much less likely that the full build will fail because of something you did.
LEMDO’s Build Process
In the LEMDO universe, an anthology is a collection of texts along with supporting
information and documentation. It is presented through a web interface which is based
on a set of defaults and customized through CSS styling, menu configuration, and so
on.
The lemdo-dev
Anthology
The
lemdo-devanthology is special because it includes all the texts that exist in the repository, whatever their state of development. It is never published at any formal URL, but is available through a continuous integration build server which enables everyone working on any LEMDO project to see the latest state of their own data. The process of building
lemdo-devalso detects and reports errors, invalidities and other problems related to any texts in the collection.
Other Anthologies
All other anthologies exist as subfolders of the data/anthologies directory in the LEMDO repository. Each anthology is based primarily on these features:
A subfolder in data/anthologies named for the ID of the anthology (for example qme or dre).
A TEI Corpus file (a TEI file whose root element is
<teiCorpus>
rather than
<TEI>
), with an
@xml:id attribute identical to the anthology id. This file contains several key components:
A
<teiHeader>
element which holds the anthology-level metadata (the anthology editor(s), publication
statements, etc.).A hard-coded
<TEI>
element with
@xml:id={anthId}_index. This file contains the content for the anthology home page. The presence of this
<TEI>
element makes the anthology’s
<teiCorpus>
valid.A sequence of import instructions in the form of Processing Instructions, looking
like this:
<?lemdo-import ref="emdFV_edition"?>. Each one of these points to the ID of an edition file, whose contents are to be
published in the anthology.A collection of other XML files populating folders within the anthology directory,
each of which consists of a TEI document that is to be turned into a web page in the
rendered anthology site. These are all in the category
ldtBornDigital, and they have filenames and IDs beginning with the anthology ID followed by an underscore.
All such files found in the anthology directory will be converted into web pages.
Note that these files are also transformed as part of the regular lemdo-dev build,
so you can see them in their default state in that build; when the anthology itself
is built, those files will be converted to the anthology rendering style, and will
have their prefixes removed (so qme_index.html will become simply index.html in the products/qme/site output folder).A site folder containing all the site-level customizations which apply to the anthology
output, including template/sitePage.html, which will form the basic template for all pages in the site. This is where the
banner, menu, footer and other standard site components are defined. Other folders
include images, for images needed on the site; fonts, for any specialized fonts that need to be included; and css, which contains one or more SCSS files which will be transformed to CSS using SASS,
and added to the output pages after the standard CSS inherited from the main lemdo-dev
project, enabling a designer to override any display defaults. There should be one
main SCSS file named {anthId}.scss which imports any other files and that will be built into {anthId}.css and linked into all the output files.
Build Process
The build process for anthologies is quite complex:
Before anything else happens, the main lemdo-dev build process must run. This processes
all the texts and identifies problems that might need to be rectified before an anthology
build can proceed.
Next, the main build process runs a diagnostic for each anthology that is in the repository,
checking to see whether it is in a state where it can be successfully built. That
process produces two outputs: an HTML file (products/{anthId}/anthologyStatus.html) which lists problems found, and a text file (products/{anthId}/anthologyStatus.txt) which simply says "OK" or "FAIL". The checking process is described below.
The anthology file itself is then checked for two things: the
<revisionDesc>
/
@status for the anthology itself must be set to published, and so must the
<revisionDesc>
/
@status attribute in the first embedded
<TEI>
element which contains the home page content. If either of these is not published,
the build does not proceed.The anthology home page, which is the TEI element embedded in the anthology configuration
corpus file, is processed into a page in a temporary folder.
Each item in the collection of site-page XML documents located in the anthology directory
is first checked to make sure its
<revisionDesc>
/
@status value is published.Each LEMDO edition which is claimed by the anthology (using a lemdo-import processing
instruction, as described above) is processed as follows:
The edition file itself is checked to ensure that it has a
<licence>
element which permits the inclusion of the edition file itself in the anthology.
This is an example of such a
<licence>
element:
<licence resp="pers:JENS1" from="2020-10-21" corresp="anth:dre">
This content is licensed for inclusion in the DRE anthology.
</licence>
The text inside the
<licence>
element is informational and not required; the key components are a person taking
responsibility for the licence, a starting date for it, and a pointer to the target
anthology using the
@corresp attribute and the anth prefix. The build process checks only that there is at least one valid
@resp value in the attribute. It does not have any way to know whether the person concerned
actually has the right to make such a declaration; this check is the responsibility
of the anthology lead.The
<revisionDesc>
/
@status value for the edition file is checked to make sure it is set to published.If the edition is allowed for inclusion and is published, it is then parsed, and each
text linked from it is checked for the same licence permission and publication status.
At this point, we have a complete list of all the documents needed for the anthology,
but they are all in the
vanillalemdo-dev style etc. These documents are then processed into the output directory. During this process, all boilerplate components such as banners, menus, footers and so on are replaced with those from the anthology’s sitePage.html template file, and the anthology’s CSS and JS files are added into the headers of the files.
A post-build diagnostics process is now run on the built site to check that every
link points to something which is where it is expected to be, and every file is valid.
(Not yet implemented.)
Introduction to LEMDO’s SCSS
This documentation is for people who will be customizing an anthology’s style. Anthology
leads who are hiring a web designer to customize their anthology’s style should see
Customize Your Anthology.
Rationale
Anthologies may customize their style by overriding the LEMDO default styling. Before
you customize your anthology’s style, you should have a general understanding of how
LEMDO’s .scss files are organized and what each contains. This documentation will
provide a brief overview of LEMDO’s css folder and the .scss files within.
LEMDO Styling’s Folder Structure
The base styling for all LEMDO anthologies is housed in the data/anthologies/lemdo-dev/site/css folder. LEMDO’s default style is split into nine .scss files in order to organize and simplify our complex styling. It is all imported into
the lemdo-dev.scss during processing. Our style files are used as follows:
_break-point.scss: Defines break points for different screen sizes.
_egxml.scss: Contains style for sample code.
_fonts.scss: Contains LEMDO’s standard font families (Alegreya and Alegreya Sans).
_mixin.scss: Contains all LEMDO SCSS mixins.
_modernized.scss: Contains all style specific to modernized texts.
_reset.scss: Contains a standard CSS reset for setting defaults and removing browser styles.
_semi-dip.scss: Contains the specialized styling for semi-diplomatic transcriptions.
_variables.scss: Contains variables used in various places across the LEMDO platform such as colours,
fonts, and margins.
In addition to the files that are imported into lemdo-dev.scss, renditions are styled in the TAXO1.xml file, which is housed in the data directory. These renditions are primarily used by encoders to provide inline style
in semi-diplomatic transcriptions.
The LEMDO-Dev SCSS File
The lemdo-dev.scss file is our main file for styling LEMDO. It defines the style for the base template
of all LEMDO websites, including the top navigation bars, footers, and side panels;
applies variables from the _variables.scss to the appropriate HTML elements; and imports the style from all of the other .scss files so that they can be transformed together into the lemdo-dev.css file during processing.
Customize Your Anthology’s CSS
Rationale
There are three aspects of an anthology that can be customized:
Some components of the basic HTML framework used to create pages.
The CSS styling of the site.
Site functionality (via JavaScript).
This documentation will explain which pieces of the CSS you may modify and offer a
suggested workflow for doing so. In this documentation, {anthId} means the id of the target anthology, such as dre or qme.
Where to Customize Your Anthology’s CSS
You can customize your anthology’s styling by overriding LEMDO’s standard SCSS. You
will do so in your {anthId}.scss file, which is housed in the lemdo/data/anthologies/{anthId}/site/css folder. Your anthology .scss file is compiled at build time to create {anthId}.css, which is then placed in the css folder in the anthology build output, and linked into the HTML files after the default lemdo-dev.css file. Doing so ensures that your anthology styling overrides LEMDO’s standard styling
in all of your HTML files. Important: Do not
svn add your {anthID}.css or {anthId}.map.css files. These are generated files, created from the .scss file in that folder, and should never be tracked by svn.You need to become familiar with LEMDO’s standard styling and how it is organized
before you begin work on your anthology’s .scss file. For information on LEMDO’s standard style, see
Introduction to LEMDO’s SCSS.
What to Customize in Your Anthology’s CSS
LEMDO has some expectations for what anthologies customize in their .scss files. You must customize your anthology’s:
Logo
Favicon
You may customize your anthology’s:
Banner/header
Top navigation bar appearance
Colour palette
Footer appearance
Side panels (i.e., hamburger menu, metadata pane, and annotation/collation pane)
Font family
Splash image
We strongly recommend that you do not customize styling in either modernized or semi-diplomatic
texts.
You may not make any CSS customizations that remove accessibility functions from your
anthology website.
Create Custom Styling
LEMDO uses many different CSS selectors. Some are global, like
var(--highlightColor), but others appear only in certain zones of the site, like side menus or top navigation
components. Where possible, CSS variables have been organized in the ._variables.scss file used by LEMDO into five different regions: Left Panel, Top Navigation, Main
Content, Popup, and Footer.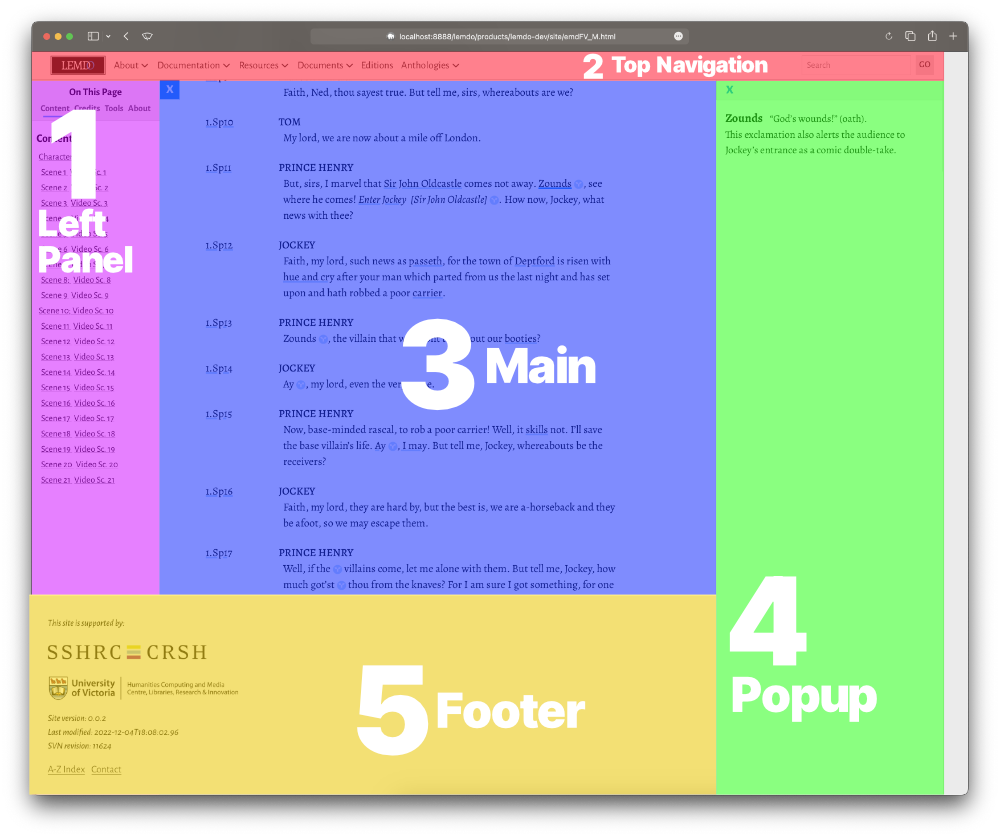
Overriding highlight colours, fonts, and typography can be done using the SCSS variables,
allowing for a change done once in the .scss file to appear everywhere the variable is applied, but it is not a requirement. Sometimes
it will be more efficient to use an inspector to locate the element that you wish
to change and add that element directly to your site’s .scss file in order to make the change.
Recommended Workflow for CSS Customization
We recommend that developers working on CSS customization download a local copy of
their anthology website from our Jenkins server, make and test their changes locally,
and then commit their changes to the shared LEMDO repository. You must commit at the
end of each work session, though you are welcome to commit more often; frequent commits
make it easier to check for bugs and make necessary fixes.
To follow our recommended workflow:
It will take a few hours for the Jenkins site to rebuild your anthology with your
customizations.
Run
./getSiteFromJenkins.sh {anthId} (replacing {anthId} with your anthology’s ID) from the lemdo directory in your command line. Doing so will download a complete copy of the latest
build of your anthology from our Jenkins server and place it in the products directory inside your local copy of the LEMDO repository.Open your local copy of the main anthology site by navigating into the products/{anthId}/site directory and opening any of the .html files therein.
Make your changes in the data/anthologies/{anthId}/site/css/{anthId}.scss file.
At the command line, test your changes by running
ant -f build_anthology.xml updateAnthology -Danthology.id={anthId}. Doing so will copy all JS, images, and font files over to the locally built site,
and run SASS to build the .scss file to create a .css file in the css folder.Super reload your local copy of the site to check if your changes achieved the desired
outcome.
Commit your changes, ensuring you
svn add any new images or font files before committing.Example: Font-Style Changes
If you wanted to change to change the sans-serif style font from Alegreya (the default)
to Arial you could change the css variable
--primarySans from:
--primarySans: "Alegreya Sans", "Helvetica Neue", Arial, sans-serif;
to:
--primarySans: Arial, sans-serif;
Doing so will change the font-face across your anthology’s entire site.
You can also use a developer tool to locate the HTML element being styled, recreate
it in your .scss file, and override the style that way. You may want to do this if the element you
are changing does not have a variable applied to it, or if you do not wish an existing
variable to be applied.
Customize Your Anthology’s HTML Template
Rationale
There are three aspects of an anthology that can be customized:
Some components of the basic HTML framework used to create pages.
The CSS styling of the site.
Site functionality via JavaScript.
This documentation will explain which pieces of the HTML you may modify and offers
a suggested workflow for doing so. For information on customizing CSS, see
Customize Your Anthology’s CSS.For information on customizing JavaScript, see
Customize Your Anthology’s JavaScript.
Introduction to LEMDO HTML Templates
Your anthology’s HTML template is in the sitePage.html file which is housed in the data/anthologies/{anthID}/template folder. It contains a banner/header, a site menu, and a footer. These are used to
replace the generic versions that come from the lemdo-dev build pages. You will customize
your anthology’s HTML in this file.
Recommended Workflow for HTML Customization
We recommend that developers working on HTML customization download a local copy of
the full lemdo-dev website from our Jenkins server, make and test their changes locally,
and then commit their changes to the shared LEMDO repository. You must commit at least
at the end of each work session, though you are welcome to commit more often; frequent
commits make it easier to check for bugs and make necessary fixes.
To follow our recommended workflow:
It will take a few hours for the Jenkins site to rebuild your anthology with your
customizations.
Run
./getSiteFromJenkins.sh from the lemdo directory in your command line. This will download a complete copy of the latest
build of our base lemdo-dev site from our Jenkins server and place it in the products directory inside your local copy of the LEMDO repository.Make your changes in the data/anthologies/{anthId}/site/template/sitePage.html file.
At the command line, rebuild your entire anthology by running
ant -f build_anthology.xml -Danthology.id={anthId} -DbuildFailedAnthologyAnyway=true
                                             buildAnthologies
(replacing {anthId} with your anthology’s ID).Open your local copy of your anthology site by navigating to lemdo/products/{anthID} and opening any .html page to check if your changes did what you need.
Commit your changes, ensuring you
svn add any new images or font files before committing.Customize Your Anthology’s JavaScript
Rationale
There are three aspects of an anthology that can be customized:
Some components of the basic HTML framework used to create pages.
The CSS styling of the site.
Site functionality via JavaScript.
This documentation will explain which pieces of the JavaScript you may modify and
offers a suggested workflow for doing so. For information on customizing CSS, see
Customize Your Anthology’s CSS.For information on customizing HTML, see
Customize Your Anthology’s HTML Template.
Introduction to LEMDO Anthologies’ JavaScript
Your anthology’s JavaScript is in the {anthID}.js file which is housed in the data/anthologies/{anthID}/site/js folder. By default it is empty. You may add functionality to your site in this file.
Recommended Workflow for JavaScript Customization
The workflow for customizing anthology JS is the same as that for customizing CSS.
We recommend that developers working on JS customization download a local copy of
their anthology website from our Jenkins server, make and test their changes locally,
and then commit their changes to the shared LEMDO repository. You must commit at least
at the end of each work session, though you are welcome to commit more often; frequent
commits make it easier to check for bugs and make necessary fixes.
To follow our recommended workflow:
It will take a few hours for the Jenkins site to rebuild your anthology with your
customizations.
Run
./getSiteFromJenkins.sh {anthId} (replacing {anthId} with your anthology’s ID) from the lemdo directory in your command line. This will download a complete copy of the latest
build of your anthology from our Jenkins server and place it in the products directory inside your local copy of the LEMDO repository.Open your local copy of the main anthology site by navigating into the products/{anthId}/site directory and opening any of the .html files therein.
Make your changes in the data/anthologies/{anthId}/site/js/{anthId}.scss file.
At the command line, test your changes by running
ant -f build_anthology.xml updateAnthology -Danthology.id={anthId}. This will copy all JS, images, and font files over to the local built site, and
run SASS to build the SCSS file to create a CSS file in the css folder.Super reload your local copy of the site to check if your changes did what you need.
Commit your changes, ensuring you
svn add any new images or font files before committing.Release an anthology
Introduction to Anthology Releasesexplains the release process from the point of view of the editor. This document describes the technical process of taking a built anthology edition and posting it on the LEMDO website.
Introduction
The LEMDO project guarantees that all previous editions of an anthology will remain
available permanently, so that any existing citation pointing to an older anthology
can still be verified. For this reason, we do not overwrite previous editions with
new editions. Instead, they exist side by side. Each anthology has a unique lower-case
identifier (douai, classroom, moms, peer-review etc.) which is used in build commands, and is also the name of the directory in data/anthologies which contains the anthology.
Editions are published at the URL: https://lemdo.uvic.ca/[anthology]_editions/[edition_number]. So, for example, you will see:
https://lemdo.uvic.ca/classroom_editions/
https://lemdo.uvic.ca/classroom_editions/0.1/
https://lemdo.uvic.ca/classroom_editions/0.2/
Alongside the _editions folder is a symlink (symbolic link) which is named for the edition (here “classroom”),
and which points to the latest edition:
classroom -> classroom_editions/0.2
So anyone who browses https://lemdo.uvic.ca/classroom will be looking at the latest edition; but anyone who wants to see a specific edition
can browse the url for that edition.
Steps in implementing a release
First, check the edition diagnostics to make sure that all items are showing as OK
(green). The edition diagnostics are found on the Jenkins server at products/[anthology]/anthologyStatus.html. If there are still incomplete items, you cannot release; the editorial team will
have to solve all the remaining problems.
If all the diagnostics items are green, do a thorough check of the anthology build
on Jenkins to make sure the editors have not missed anything.
Decide on the edition number for this edition. Generally this will take the form “x.y”
where x and y are integers. The edition number is stored in the repository file data/anthologies/[anthology]/VERSION. In between editions, this may be set to an intermediate number such as “x.y.z,”
or it might have a suffix “a” (for alpha) or “b” (for beta). You need to change the
VERSION file so that it shows the correct edition number for the new release, without
any alpha or beta or third digit (unless the editors want the third digit). Then commit your change to this file.
Next, you need to create a fresh build for the anthology, which will incorporate the
change to the VERSION file and the correct svn revision for that change. There are
a couple of ways to do this. You could either:
The latter will be quicker. This command, run in the root of the lemdo repository,
will accomplish it (using the example of the peer-review anthology. The first
When this process completes, you will find the following folder: products/peer-review/site.
wait for Jenkins to build all of lemdo-dev and then the anthology; or
build lemdo-dev and the anthology yourself on your local computer.
ant command runs the main build of lemdo-dev, and the second command then constructs the anthology based on the products in the
lemdo-dev build.
ant && ant forceBuildAnthology -Danthology.id=peer-review
However, if you would rather let Jenkins do the build, you can wait for the LEMDO-anthologies job on Jenkins to complete, and then you can go into the Last Successful Artifacts,
then into the folder for the relevant anthology, click on site, then scroll to the bottom and click on “(all files in zip)” to download a zip file
containing the site folder.
Log into the NFS filesystem as the hcmc user, and navigate to the hcmc/www/lemdo folder.
cd into the [anthology]_editions folder (so for the peer-review anthology, the peer-review_editions folder).
Create a new subfolder for the new edition (e.g. 0.3).
Use scp or an sftp tool to upload the contents of the site folder on your local computer into the subfolder you just created.
IMPORTANT: go to the URL for your new edition and test it thoroughly. The URL will
be https://lemdo.uvic.ca/[anthology]/[edition_number]/, so for example https://lemdo.uvic.ca/peer-review_editions/0.3/ Make sure everything you see is correct: the right edition number, date/time and
svn revision in the footer, all pages functioning, and so on.
Finally, when you are happy that the edition has been successfully uploaded, you can
change the symlink to point to your new edition. SSH into the home1t filesystem as
hcmc, navigate to hcmc/www/lemdo, and run the following commands to first delete the existing symlink, and then add
a new symlink. It is advisable to do this in a single command (using the peer-review anthology as an example):
This will create a new symlink which points to the 0.3 edition.
rm peer-review && ln -s peer-review_editions/0.3 peer-review
Test whether the site is working properly at the canonical URL (in other words, the
URL lemdo.uvic.ca/[anthology] is showing the new edition).
Now back up your local copy of this edition of the anthology to Squash. It’s good
to have a copy stashed away.
Finally, edit the VERSION file to set it to the next interim version, and commit to svn.
Page and Document Titles
Here we lay out basic assumptions and encoding guidelines that lie behind what ends
up right at the top of every page: the page title.
Basics
The anthology template files all include an XHTML
<h2> element which appears as the first item in the <article> element. That <h2> is the trigger leading to the insertion of the page title(s).We never take the page title from the content of the TEI
<text>
element. Our basic assumption is that the title appearing at the top of a page on
the site is drawn from the content of the
<titleStmt>
in the
<teiHeader>
, according to these rules:
If there is a single
<title>
element with
@type=main, then the contents of that element are processed into an XHTML <h2> element.If there is no
<title>
with
@type=main, but there is a single
<title>
element with no
@type attribute, then the contents of that element are processed into an XHTML <h2> element.If there is a
<title>
element with
@type=sub, then that element is processed into an XHTML <h3> element.All other
<title>
elements in the header
<titleStmt>
are ignored for the purposes of rendering the main heading on the page. TEI
<front>
Elements
<front>
elements should only be used in primary source documents, and should only contain
genuine transcribed front matter from a primary source document. Any front element
in a primary source document will be processed and rendered following the main page
title created following the rules above.How the Table of Contents is Generated for Semi-Diplomatic Transcriptions
Semi-diplomatic transcriptions vary widely in their original form and in the encoding
practices of their editors, but when a play is rendered for the end-user, a table
of contents needs to be constructed to appear in the slide-out Content tab on the
website. For a non-diplomatic text, the TOC will be constructed using the text node
of the
<head>
element of any
<div>
elements in the text which have a
<head>
, since these are obviously the major divisions in the text (usually act-scene numbers
or scene numbers), but for semi-diplomatic transcriptions, there may well be no such
obvious structure to draw on.Therefore a rather complicated algorithm tries to decide what components of the text
should best be used to create a useful TOC. This is how the process works:
By default,
<pb>
elements having a signature or folio number in their
@n attribute will be used.However, if the text contains 20 or more
<label>
elements, then these are assumed to be more suitable text-division headings, and
will be used instead. (For an example, see the texts in the Douai Shakespeare Manuscript Project.)If 20 or more
<label>
elements have
@n attributes, then only the
<label>
elements having
@n attributes will be used, and the text of the TOC entries will be taken from the
@n attributes.If more than 20
<label>
elements exist, but fewer than 20 have
@n attributes, then all
<label>
elements will be used, but whenever a
<label>
has
@n, its value will be used for the TOC entry text instead of the content of the label.Why so complicated? While a TOC constructed from
<pb>
elements may be very straightforward, it is not very helpful to a general reader
looking for the major sections of the text, and it may end up being extremely long,
so
<label>
is usually a better choice if the text contains headings or similar markers which
can be tagged as labels. However, the text content of a
<label>
element may not be very helpful in itself; it might look like this:
<label>Act<choice>
<abbr>
<g ref="g:us_Eng">ꝯ</g>
</abbr>
<expan>us</expan>
</choice> jmus</label>
which may be puzzling to a reader. In such a case, the encoder can add the <abbr>
<g ref="g:us_Eng">ꝯ</g>
</abbr>
<expan>us</expan>
</choice> jmus</label>
@n attribute to provide a more helpful label for the TOC:
<label n="Actus Primus">Act<choice>
<abbr>
<g ref="g:us_Eng">ꝯ</g>
</abbr>
<expan>us</expan>
</choice> jmus</label>
and this will be used in preference to the textual content. The <abbr>
<g ref="g:us_Eng">ꝯ</g>
</abbr>
<expan>us</expan>
</choice> jmus</label>
@n attribute can be used on all
<label>
s to create an entirely curated TOC if that is preferred.LEMDO’s long-term plan for most texts other than Douai texts is to mobilize the
<milestone>
element in order to note correspondences between places in the semi-diplomatic transcription
and the modernized text. Many semi-diplomatic transcriptions already contain commented-out
<milestone>
elements. When a modernized text is finalized, we will be able to finalize the milestone
elements in the semi-diplomatic transcription by adding a
@corresp attribute with a value of the
@xml:id value of a scene or act
<div>
in the modernized text. We will also add an
@n attribute whose value will be used to generate a TOC of act-scene or scene beginnings.
Ideally, users will be able to toggle between a signature TOC (A1r, A1v, A2r, A2V,
etc) and a milestone TOC.Processing Pointers, Links, and References
Processing of References
LEMDO has thousands of
<ref>
elements that point to editions, anthologies, components therein, and to resources
outside LEMDO. These are all processed into HTML hyperlinks for the static site.Our processing does not do anything with
<ref>
elements in PDFs. Any pointing you do inside a file with the
<ref>
element will result in nothing in a PDF.The
<ref>
and
<ptr>
elements can co-exist because they are pointing to xml:ids, but only the
<ptr>
element can be converted to strings at build time in LaTeX.Processing of Pointers
We would like to have a canonically-structured textual reference in the output. In
the digital edition, we want the A.S.Sp. system (e.g., 5.1.2) plus a precise hyperlink.
In the print edition, we want the A.S.L reference system (e.g., 2.3.101). We do not
want to have the author of the critical text write a literal 2.3.101 into their document,
because lineation may change as the text is edited, but we do want a critical introduction
to be able to contain A.S.L citations when it is printed. The actual text in the parenthetical
citation must be generated at build time.
LEMDO therefore has two different processing chains for pointers: one for the digital
edition and one for the print edition (a camera-ready PDF that can be downloaded or
printed through print-on-demand services).
For online publication, we generate a parenthetical citation that gives LEMDO’s canonical
reference system (A.S.Sp.). Clicking on the citation takes one directly to the part
of the speech being cited.
For the PDF, we generate a parenthetical citation that gives A.S.L (act, scene, line
number) using the line numbers generated for the PDF at the time we make the PDF.
For example, an editor might use a
<ptr>
element in their critical introduction to point to anchors in the middle of a long
speech in their modernized text. In the processing for the PDF, LEMDO will calculate
and supply the A.S.L, so that reader may find the exact line(s) being cited in the
generated parenthetical citation. For the online version, the parenthetical citation
will be A.S.Sp. but the hyperlink on the citation will go directly to the target point
in the speech.Inter-text Links
If editors are writing a critical introduction to Othello, they will naturally want to provide links to other relevant texts in the LEMDO collection.
This is normally done using the
<ref>
element, like this:
<p>
<!-- ... -->
(see <title level="m">
<ref target="doc:emdTitus_M">Titus Andronicus</ref>
</title>) <!-- ... --></p>
This points to the modern edition of Titus by its document id. However, if you want to point to a specific location in that
text, things become more complicated, in the sense that although you may point at
an ID in that text, it’s not clear what textual reference you should provide. For
example, if you call it <!-- ... -->
(see <title level="m">
<ref target="doc:emdTitus_M">Titus Andronicus</ref>
</title>) <!-- ... --></p>
2.5.35(Act 2, Scene 5, Line 35), and then the editor of Titus determines that there are two missing lines at the beginning of the scene, and adds them in, the text inside your
<ref>
element is now misleading. The following sections provide two solutions to this problem,
one used within a specific edition directory
, and one used more generally.Citing Published Texts
One approach to the mutability of online texts produced both within and outside LEMDO
is to choose a specific print edition of source texts (such as the New Oxford Shakespeare) to which all references can point. This has the obvious disadvantage that such a
pointer cannot be made into any kind of link, but links are fragile anyway, and this
approach also fits with the numerous citations of critical print texts which occur
throughout critical material.
Pointing within Edition Directories
We have seen above that certain types of citation between texts are not very robust,
because texts are (for the forseeable future, anyway) steadily evolving, and even
our principles for lineation and our citation styles are not absolutely finalized.
However, when you’re editing critical material that will be bundled with an edition
of a text in (for example) a print volume, you need to be able to point into the text,
just as you need to be able to attach annotations to specific points in the text.
There are two scenarios in which we do this:
Pinning Annotations
Annotations are
<note>
elements (documented in detail in Encode Annotations) which live in separate files outside the plays to which they refer. At build time, annotations may be rendered as links with popups, or as footnotes in a print edition.
Annotations are
pinnedto a location in the text using a system of anchors and pointers which is documented in
Encode Annotations.
Local Pointers
Although we know that pointing between electronic texts which are in constant development
is inherently fragile, there are situations in which we need to be able to create
a canonically-formatted text reference in a critical text to a specific point in the
text which is being discussed. If these texts are in the same edition directory, then
we know they will be built at the same time, and therefore any output created will
be consistent across that build.
This enables us to solve the particular problem noted above, where we would like to
have a canonically-structured textual reference such as
2.3.45appearing in the critical text, and this is particularly important for the print texts that we are going to publish. We don’t want to have the author of the critical text write a literal
2.3.45into their document, because lineation may change as the text is edited, but we do want a critical introduction to be able to contain such text when it is printed; therefore the actual text must be generated at build time. We do this using a
<ptr>
element with
@type=localCit:
<div><!-- In the critical text: -->
<p><!-- ... --> the king addresses the <quote>noble English</quote> (<ptr type="localCit" target="doc:emdH5_FM.xml#emdH5_FM_anc_2000"/>) separately <!-- ... --></p>
<!-- In the play text: -->
<l>Oh, <anchor xml:id="emdH5_FM_anc_2000"/>noble English,</l>
</div>
At build time, this will be expanded to (for example) <p><!-- ... --> the king addresses the <quote>noble English</quote> (<ptr type="localCit" target="doc:emdH5_FM.xml#emdH5_FM_anc_2000"/>) separately <!-- ... --></p>
<!-- In the play text: -->
<l>Oh, <anchor xml:id="emdH5_FM_anc_2000"/>noble English,</l>
</div>
(1.2.111).You will notice that we use the same mechanism for creating a point in the text that can be addressed as we do for annotations: we insert an anchor (see
Encode Annotationsfor instructions on how to do that). To specify a range, include pointers to two anchors with a space between them:
<ptr type="localCit" target="doc:emdH5_FM.xml#emdH5_FM_anc_2000 doc:emdH5_FM.xml#emdH5_FM_anc_2001"/>
If you’re pointing at an entire line, speech, scene or act, then there’s no need to
insert two anchors. You can instead add an
@xml:id to the target element (
<l>
,
<sp>
, or
<div>
, if there isn’t one there already, and point to that instead. To create a new
@xml:id, the simplest way is to insert an anchor element in the usual way, then take its
@xml:id, which is guaranteed to be unique, and use that, discarding the rest of the
<anchor>
.Inline Processing Instructions in LEMDO
This documentation lists and explains a number of different custom processing instructions
used by the LEMDO project to include content from elsewhere, and to trigger the automatic
generation of content.
Processing for these PIs is specified in two places: first in the documentation_inclusion_master.xsl file, which handles the majority of cases since they occur mainly in documentation;
but also in the xml_original_templates.xsl module, to handle any cases in which a PI may be used in a page which is not part
of the documentation. These templates should be updated in a synchronized way.
Simple Inclusions
LEMDO prefers the use of processing instructions for the purposes of inclusion over
other methods such as XInclude because it is more flexible; processing for XPointers
in XInclude instructions is not widely supported, and some processors and validators
may act upon XInclude instructions when they’re not intended to be processed. There
are two PI-based inclusions in LEMDO:
lemdo-include
<?lemdo-include href="doc:learn_encodeLinks_intro"?>This lemdo-include PI is used in the lemdo.odd file to assemble the separate documentation files found in the data/documentation folder into a single structured document before that is processed into the documentation
web pages. This PI should not be used outside of the ODD file. See
Documentation and the ODD Filefor more information.
lemdo-import
<?lemdo-import ref="doc:emdCAMP3_edition"?>This lemdo-import PI is used in an anthology XML file to include an edition in the anthology. See
LEMDO’s Build Processfor more information.
Generating Content
Another set of processing instructions provides a way to generate content in an output
page based on metadata or data elsewhere in the project. These are three examples:
category-listing
<?category-listing ref="emeeTheatre"?>This tells the processor to find the
<category>
element in TAXO1 which whose
@xml:id=emeeTheatre, and then to collect all documents which have
<catRef>
elements whose
@target points at that category or any of its descendant categories. It then creates a list
of links to those documents (a
<list>
element whose
<item>
s contain
<ref>
elements). This makes it possible to include an automatically-generated list of all
the documents in a category wherever you need one.taxonomy-table
<?taxonomy-table ref="emdAudiences"?>This tells the processor to find the
<taxonomy>
element in TAXO1 which whose
@xml:id=emdAudiences, and process it to create a TEI
<table>
element laying out all the categories and their definitions. That table is later
processed into an HTML table in the documentation page for the site.charDecl-table
<?charDecl-table ref="characters"?>This tells the build process to generate a table from from character declarations
(
<charDecl>
elements) in TAXO1.listPrefixDef-table
<?listPrefixDef-table ref="global_listPrefixDef"?>This generates a table from a
<listPrefixDef>
, also in TAXO1.roleList
<?roleList ref="emd1HW_M"?>This generates a copy of any role lists encoded in the header of a text, in the form
of
<listPerson type="castlist"> elements. This can be used to create a separate page which incorporates copies of
any role lists along with an introduction and comments, as a distinct component of
an edition. Role lists are also available in the interface of the text which contains
them, but it is often useful to provide more information as part of an edition.The staticSearch build process in LEMDO
This documentation explains how the staticSearch codebase is stored, updated, and
used in build processes.
Introduction
LEMDO sites are static sites conformant with Endings principles, so they use the Endings-developed staticSearch system to provide search functionality for individual anthologies. Rather than check
out a fresh copy of the staticSearch codebase every time we build something, we store
a static copy of the codebase in our repository in code/search/staticSearch. This should be an up-to-date stable version of the codebase.
How staticSearch is used at build time
When any anthology is built, the staticSearch codebase is copied into a staticSearch
folder in the anthology’s products directory. We could run all our staticSearch build indexing for all anthologies directly
from the code/search/staticSearch folder, but making a copy enables us to do tests with alternative versions of staticSearch
if we need to, using a single anthology.
For details on how staticSearch itself works, see the staticSearch documentation.
Keeping the staticSearch codebase updated
The file build_globals_module.xml contains a property called staticSearchBranch which specifies which branch we want to use for our staticSearch codebase copy. It
should normally be set to a stable release branch, unless we are doing some unusual
testing. Release branches are updated periodically, for bugfixes and minor enhancements,
so there is also an Ant task in the same file called refreshStaticSearchCode, which will update the files in the code/search/staticSearch folder automatically. After running the update (
ant -f build_globals_module.xml refreshStaticSearchCode), check the svn status of the code/search/staticSearch folder to see whether there are any new files that need to be added, or perhaps files
that need to be deleted.Witness List Processing
This documentation describes the process by which witness lists (TEI
<listWit>
and
<witness>
elements) are processed into output.Witness Lists in the Source XML
The encoder documentation provides good info on how witnesses should be encoded. A
<listWit>
appears in the
<sourceDesc>
of a collation file, accompanying the apparatus list which is encoded in the body
of the document. Each
<witness>
element represents a single source text which was used by the editor in creating
the collation.A Schematron rule constrains the
<witness>
element such that it either has
@corresp and is itself empty, or has a tagged prose description of the witness and does not have
@corresp. The first scenario is used when the BIBL1 entry pointed at by
@corresp provides sufficient information and no further explanation is needed. In the second
case, the editor provides a prose description which is more elaborate, but is expected
to link some of the contents of that description to one or more entries in BIBL1.Processing of Witness Lists
Witness lists are part of collations, and stored in collation files, but the build
process that creates a fully-realized text combines the text of the work with the
collations to produce an integrated whole. During the generation of standalone XML,
the
<listWit>
is first copied into the play source file (always a modern edition). At that point,
if a
<witness>
element is empty and it has
@corresp, the target bibl element is copied into the content of the witness (minus its
@xml:id), and the
@corresp attribute is removed.At the HTML stage, the witness list is processed into a sequence of
<div> elements in the appendix of the document, along with the bibliography items, person
elements and so on. These elements are hidden by CSS and shown only in response to
user actions such as clicking on a linked name. Apparatus elements are also part of
the appendix. When a user clicks on a collation icon, the relevant apparatus item
appears in a popup. In that popup, each collation siglum is a link to its witness
element, and clicking on that link causes the JavaScript to retrieve the witness info
and append it to the bottom of the popup. Thus the detailed witness info is always
available from any apparatus popup.Print Editions
LEMDO publishes print editions of some of its modernized texts. This section of the
documentation is intended to cover how those print editions are generated, and is
aimed primarily at programmers, since it’s unlikely that anyone other than programmers
will venture into this part of the codebase.
Requirements for Building Print Editions
The print editions are generated using LaTeX, and specifically the Xelatex compiler,
so anyone wanting to generate a print edition will need to have not only Ant and ant-contrib
but also the (substantial) LaTeX codebase installed. On Linux, we recommend installing
the texlive-full package, which should include everything you need. On Mac, you can use the mactex distro. You can also install texlive on Windows, but we do not expect most of our
build processes to work on Windows for a variety of reasons. *NIX-based OSes are a
much better bet. The distributions are large, so don’t install this stuff just for
fun; only do it if you have a need to build PDFs for print.
The PDF build file includes a quick check for the availability of the Xelatex compiler,
so starting from the repository root, you can do this:
If this works, you’re probably OK, although it’s always possible that a particular
package required by the build process is not installed. If that’s the case, when you
try to run a build, you should see helpful error messages from LaTeX.
Change directories into the PDF build directory:
cd code/pdf
Run the check task:
ant checkForXelatex
All other requirements (specifically, the fonts used to build the PDF) should be in
the repository.
Codebase for Building Print Editions
As you might expect, the codebase for building a print edition lives in code/pdf. It is basically very simple:
build.xml, the Ant build file.
Several XSLT files, in the
xsl directory, of which the root file is latex_master.xsl. These files are inadequately organized at the time of writing, because they have
developed as part of a learning process; when there is time, they will be reorganized.
The content should be well-commented, though.A fonts folder, in which there are two open-source fonts, Vollkorn and Josefin-Sans. These
are configured respectively as the main font and the sans font for the PDF build.
A README file and a TODO file, which are essentially ad-hoc notes.
How to Build a Print Edition
Once you have ensured that your system is set up with all the requirements, and you have set up your TEI print edition document, you’re ready to try a build.
Starting from the LEMDO repository root, this is what you do:
(You can supply multiple IDs, comma-separated, if you want to.)
Change directories into the PDF build directory:
cd code/pdf
Run the build process, supplying the ID of the document you want to build:
ant -DdocsToBuild=emdOth_Print
The build process will create a folder called pdf inside the main folder of the text you are building. In there, a number of files will be saved, including
a log file, the .tex file containing the LaTeX code which is generated and then compiled, and the PDF
file of the print edition. If anything goes wrong, you should see either helpful messages
from our code or mysterious messages from the LaTeX compiler.
During the build process you will see many very puzzling emanations such as the common
Underfull \hbox (badness 1033)message from the compiler. These are mostly informational, warning you when the layout engine has had to stretch or squash a line a little more than it would like to in order to get the justification to work. However, if the build actually fails, you will need to pay attention to whatever message coincides with the termination of the build.
You will notice that the Xelatex compiler is run at least four times on the .tex file. This is because at each run, the layout engine is able to do a slightly better
job of adjusting spacing, pagination and so on, but every time it does this, page
references and similar content which were generated at the time of the previous build
are potentially no longer accurate, so another run is recommended. The number of runs
required to get a final version is not easy to determine, so we run four times by
default, but this may need to be adjusted.
Print Edition XML Files
A LEMDO print edition is established by creating a standard LEMDO TEI file, but with
a filename ending in _Print.xml. This should be created in the main folder of the work itself. So for example, if you’re creating a print edition of
Othello, you would create this file: data/texts/Oth/main/emdOth_Print.xml
This file is like any other TEI text in the project; it has metadata, responsibility
statements and so on. But it will mostly consist of content from other parts of the
edition directory. Primarily, it will include a modern-spelling edition of the play,
but it will also have other components such as critical materials and a bibliography.
The following is a simplified example which will be explained below, and should cover
all the main components.
<TEI version="5.0" xml:id="emdOthX_Print">
<teiHeader> [Normal metadata should appear here...] <textClass>
<catRef scheme="tax:emdDocumentTypes" target="cat:ldtBornDigPrint"/>
</textClass> [More metadata...] </teiHeader>
<text>
<text>
<front>
<linkGrp type="printInclude">
<ptr target="doc:emdOth_TextIntro"/>
</linkGrp>
</front>
<body>
<div>
<linkGrp type="printInclude">
<ptr target="doc:emdOth_M#emdOth_M_castList"/>
<ptr target="doc:emdOth_M"/>
</linkGrp>
</div>
</body>
<back>
<div>
<divGen type="bibliography"/>
<linkGrp type="printInclude">
<ptr target="doc:emdOth_M_annotation"/>
</linkGrp>
</div>
</back>
</text>
</text>
</TEI>
The header is a normal header except for the particular document type specified with
<catRef>
/@target="cat:ldtBornDigPrint".But in
<text>
, the first thing you will notice is that the
<front>
,
<body>
and
<back>
elements do not include any content directly. They can include content if necessary,
and there may well be components that are intended to be used only for one particular
print edition, and therefore belong directly in this file, but most content is in
the form of
<linkGrp>
elements containing pointers. These pointers specify other files in the repository,
or sections of files. They use the doc: prefix to point to the ids of files, and an optional fragment identifier to point
to a specific part of the file. These includes will be processed by the first stage
of the build code to create a complete TEI file incorporating all these components.
That structure will then be processed into the TEI file.Notice the organization: critical materials come in the
<front>
element, the castlist and the play itself come in the
<body>
, and the bibliography (of which more below) appears in the
<back>
. Also in the
<back>
are any annotation files which are needed; these are processed into footnotes at
build time. Only annotations which are actually referenced in the included texts will
be used, and the rest will be discarded.Finally, note the special case of the
<divGen>
element for the bibliography. This is acted on by the build code, which retrieves
from BIBL1.xml all bibliography items which are actually mentioned in the rest of the content, and
generates a bibliography from them automatically. Note that if there is a reference
to an item which does not appear in BIBL1.xml, the PDF build will fail and stop.Prosopography
Illya
Illya has a BA in English and Sociocultural Anthropology and an MA in English. Prior
to joining the HCMC, he was a PhD candidate in English and Book History at the University
of Toronto and worked on Records of Early English Drama and on the Modernist Archives Publishing Project. His work at the HCMC focuses on creating web-based applications for research projects
led by members of the faculty of Humanities at the University of Victoria. This involves
creating schemas for new and existing datasets, writing XSLT and build files to transform
datasets into structured TEI and HTML formats, implementing staticSearch, and ensuring
that new projects are Endings Principles compliant.
Janelle Jenstad
Janelle Jenstad is a Professor of English at the University of Victoria, Director
of The Map of Early Modern London, and Director of Linked Early Modern Drama Online. With Jennifer Roberts-Smith and Mark Beatrice Kaethler, she co-edited Shakespeare’s Language in Digital Media: Old Words, New Tools (Routledge). She has edited John Stow’s A Survey of London (1598 text) for MoEML and is currently editing The Merchant of Venice (with Stephen Wittek) and Heywood’s 2 If You Know Not Me You Know Nobody for DRE. Her articles have appeared in Digital Humanities Quarterly, Elizabethan Theatre, Early Modern Literary Studies, Shakespeare Bulletin, Renaissance and Reformation, and The Journal of Medieval and Early Modern Studies. She contributed chapters to Approaches to Teaching Othello (MLA); Teaching Early Modern Literature from the Archives (MLA); Institutional Culture in Early Modern England (Brill); Shakespeare, Language, and the Stage (Arden); Performing Maternity in Early Modern England (Ashgate); New Directions in the Geohumanities (Routledge); Early Modern Studies and the Digital Turn (Iter); Placing Names: Enriching and Integrating Gazetteers (Indiana); Making Things and Drawing Boundaries (Minnesota); Rethinking Shakespeare Source Study: Audiences, Authors, and Digital Technologies (Routledge); and Civic Performance: Pageantry and Entertainments in Early Modern London (Routledge). For more details, see janellejenstad.com.
Joey Takeda
Joey Takeda is LEMDO’s Consulting Programmer and Designer, a role he assumed in 2020
after three years as the Lead Developer on LEMDO.
Kate LeBere
Project Manager, 2020–2021. Assistant Project Manager, 2019–2020. Textual Remediator
and Encoder, 2019–2021. Kate LeBere completed her BA (Hons.) in History and English
at the University of Victoria in 2020. During her degree she published papers in The Corvette (2018), The Albatross (2019), and PLVS VLTRA (2020) and presented at the English Undergraduate Conference (2019), Qualicum History
Conference (2020), and the Digital Humanities Summer Institute’s Project Management
in the Humanities Conference (2021). While her primary research focus was sixteenth
and seventeenth century England, she completed her honours thesis on Soviet ballet
during the Russian Cultural Revolution. She is currently a student at the University
of British Columbia’s iSchool, working on her masters in library and information science.
Mahayla Galliford
Project Manager, 2025-present; Assistant Project Manager, 2024-2025; Research Assistant,
2021-present. Mahayla Galliford (she/her) graduated from the University of Victoria
with a BA (honours with distinction) in 2024, and an MA English in 2026. Mahayla’s
undergraduate research explored early modern stage directions and civic water pageantry.
Her SSHRC-funded MA thesis project focuses on transcribing, editing, and encoding
early modern girls’ manuscripts, specifically Lady Rachel Fane’s May Masque in collaboration with LEMDO.
Martin Holmes
Martin Holmes has worked as a developer in the UVic’s Humanities Computing and Media
Centre for over two decades, and has been involved with dozens of Digital Humanities
projects. He has served on the TEI Technical Council and as Managing Editor of the
Journal of the TEI. He took over from Joey Takeda as lead developer on LEMDO in 2020.
He is a collaborator on the SSHRC Partnership Grant led by Janelle Jenstad.
Navarra Houldin
Training and Documentation Lead 2025–present. LEMDO project manager 2022–2025. Textual
remediator 2021–present. Navarra Houldin (they/them) completed their BA with a major
in history and minor in Spanish at the University of Victoria in 2022. Their primary
research was on gender and sexuality in early modern Europe and Latin America. They
are continuing their education through an MA program in Gender and Social Justice
Studies at the University of Alberta where they will specialize in Digital Humanities.
Nicole Vatcher
Technical Documentation Writer, 2020–2022. Nicole Vatcher completed her BA (Hons.)
in English at the University of Victoria in 2021. Her primary research focus was women’s
writing in the modernist period.
Patrick Szpak
Patrick Szpak is a Programmer Consultant and Web Designer in the Humanities Computing
and Media Centre at the University of Victoria.
Samuel Seaberg
Samuel Seaberg, a University of Victoria English undergrad, enjoys riding his bike.
During the summer of 2025, he began working with LEMDO as a recipient of the Valerie
Kuehne Undergraduate Research Award (VKURA). Unfortunately, due to his summer being
spent primarily in working to establish an edition of Thomas Heywood’s If You Know Not Me, You Know Nobody, Part 2 and consequently working out how to represent multi-text works in a digital space,
his bike has suffered severely of sheltered seclusion from the sun. Note: Samuel now
works for LEMDO as the Assistant Project Manager, much to his bike’s chagrin.
Sofia Spiteri
Sofia Spiteri is currently completing her Bachelor of Arts in History at the University
of Victoria. During the summer of 2023, she had the opportunity to work with LEMDO
as a recipient of the Valerie Kuehne Undergraduate Research Award (VKURA). Her work
with LEMDO primarily includes semi-diplomatic transcriptions for The Winter’s Tale and Mucedorus.
Tracey El Hajj
Junior Programmer 2019–2020. Research Associate 2020–2021. Tracey received her PhD
from the Department of English at the University of Victoria in the field of Science
and Technology Studies. Her research focuses on the algorhythmics of networked communications. She was a 2019–2020 President’s Fellow in Research-Enriched
Teaching at UVic, where she taught an advanced course on
Artificial Intelligence and Everyday Life.Tracey was also a member of the Map of Early Modern London team, between 2018 and 2021. Between 2020 and 2021, she was a fellow in residence at the Praxis Studio for Comparative Media Studies, where she investigated the relationships between artificial intelligence, creativity, health, and justice. As of July 2021, Tracey has moved into the alt-ac world for a term position, while also teaching in the English Department at the University of Victoria.
Bibliography
OED: The Oxford English Dictionary. 2nd ed. Oxford University Press, 1989.
Metadata
| Authority title | Chapter 24. Programming |
| Type of text | Documentation |
| Publisher | Linked Early Modern Drama |
| Series | |
| Source | |
| Editorial declaration | |
| Edition | |
| Encoding description | |
| Document status | prgGenerated |
| License/availability |