The documentation in this chapter is for editors, encoders, and anthology leads adding
images and videos to their XML files. It will guide you through the process of saving
media to the LEMDO repository or image server and encoding images and videos in your
XML files.
Rationale
Many editors and anthology leads wish to add media to their edition or their anthology
about pages. LEMDO supports the inclusion of images and videos, along with facsimiles
(digital surrogates) of printed books and manuscripts.
We documented how to encode facsimile images in a separate chapter because of our
unique ways of encoding facsimiles and their large size. For information on encoding
facsimiles, see Chapter 11. Facsimiles.
Note that LEMDO is not in the business of creating a library of media. The images
collected by the ISE project, including those in the Shakespeare in Performance (SIP)
database, have been gifted to the University of Victoria and may eventually be made
available in a new resource.
Learning Outcomes
This chapter is designed to support you through choosing, storing, and encoding images
and videos for your edition or anthology about pages. By the time you have worked
through this chapter, you will:
Know which images to include in your edition
Know where to store your images
Be able to add your images and performance videos to XML files
Understand LEMDO’s recommended practices for improving image accessibility
Learn how to add videos of performances to your edition
Choose Image Types and Sizes
Rationale
The type of file and size that your image is impacts how it appears in the final output
of your edition. This documentation explains LEMDO’s practices for encoding images
to ensure high-quality image appearance in both digital and print editions.
Practice: Choose Image Type
LEMDO currently supports image files saved in either .jpg or .png format. Which format
you save your image as will depend on the type of image that you are adding to your
file.
Save images as .jpg files if:
Your image is a facsimile of a source text.
Your image is a photograph, painting, or drawing.
Save images as .png files if:
Your image is a screenshot.
Your image is a digital illustration (e.g., a chart or a graph).
Your image requires transparency (e.g., a logo with no background).
The .jpg format uses a lossy compression algorithm. This means that it uses less data
space but that some detail will be lost in compression. The algorithm will extrapolate
to fill in the missing data in the output of the image.
LEMDO recommends saving images at the highest resolution possible in order to preserve
high quality across images. The resolution is determined in pixels: the greater the
pixel dimensions your image has, the larger the image’s size and the higher its resolution.
When choosing the size of images, we care primarily about image width. Images in LEMDO
sit in a column that has a set width of approximately 500px. Ideally, you will save
your images at a resolution of at least twice that width (1200px1 or larger if possible). LEMDO has processing to fit your image into the set column
width. Do not try to scale images up in size, keep the highest resolution available.
The ideal size for images going into the print publication of your edition is 3000px.
Facsimiles of source texts are a special case and should be saved at a very high resolution
when possible; see Special Case: Facsimile Images.
If you need to scale an image down in size (i.e., if your image is significantly larger
than 3000px), you will require an image editor. There are some freely available online
such as:
There is also a plethora of heavy-duty applications such as Adobe Photoshop, Pixelmator
Pro, and Affinity Photo that you can use if you wish to learn more in this field.
Regardless of which software you use, the basic steps to scale an image are the same:
Open the image.
Determine the image’s current size. You can also do this by right clicking the image
file in your computer’s file manager and selecting Properties.
Maintain the aspect ratio.
If the image is too big, enter the desired width. Because you have selected to maintain
the aspect ratio, the height will be calculated by your software. Remember that the
desired width you enter is to determine the image’s resolution, not how large it appears
in the final HTML or print output of your edition.
If the image is too small, do not try to scale the image.
If you are also changing the format of the image from .png to .jpg, export the image
as a .jpg file. If exporting, your image-editing software will offer you a compression
slider. Select to keep the quality at 100%.
Check the image’s new size.
Special Case: Facsimile Images
Facsimile images should be high resolution, in .jpg format, and at least 2000px in
size. We will link to full-size facsimile images from thumbnails in an edition’s semi-diplomatic
transcription.
Born-digital documents (information pages, documentation, critical paratexts, annotations,
and so on) will often need to link to images of documents, screenshots, icons, and
other graphical components. In documentation, images are often essential and always
clarifying. In editions, images lend visual support to an argument. In anthologies,
images give the anthology a brand identity that reflects its purpose. The first step
to using images is adding them to either the repository (if your edition or anthology
has three or fewer images) or asking the LEMDO team to add them to the centralized
image database (if your edition or anthology has four or more images).
Practice: Name Image Files
All image file names must end with a period followed by the image file extension (i.e.,
.jpg or .png). The file extension must be in lowercase letters only.
LEMDO has specific naming protocol for image files that are saved in anthologies and
image files that are saved in edition directories:
Images for anthologies: File names must be prefixed by the anthology ID and an underscore. For example: qme_welcome.jpg
Images for editions: File names must be prefixed by the edition ID and an underscore. For example: H5_Genealogy.png
Images for documentation: File names should be prefixed by the name of the documentation
file that you will use the image in and an underscore. For example: learn_altText_duckRabbit.jpg
Practice: Image Location
LEMDO saves images in different places depending on context. When an edition or anthology
has three or fewer images, we save them in a location that is proximate to the files
in which they will be used. There are three main locations for images in the repository:
Images for anthologies: data/anthologies/[anthology]/site/images: Use this location for images which are used only in a specific anthology. For example: data/anthologies/qme/site/images/qme_welcome.jpg
Images for an edition: data/texts/[ABBR]/images Use an edition directory location for images which are only used in a specific text or edition. For example: data/texts/H5/images/H5_Genealogy.png
Images for documentation: data/images: Use this location only for images which are likely to be used in multiple different pages, editions, sites
or projects, or in documentation.
When an edition or anthology has four or more images, we save them in centralized
image storage in a folder created for that edition or anthology.
Add Multiple Images to the Repository: Step-by-Step
You will follow the practice outlined in Advanced Subversion Commands to add images. Note that to add files that already exist on your computer to the
repository, you must simply save them in the repo folder that they will be stored
in (i.e., copy the image from your computer’s files to your images folder).
Before you add images to the repository, make sure they are edited and sized appropriately.
Save them as .jpg or .png files. See Choose Image Types and Sizes.
It may sometimes be necessary to add multiple formats of the same file; this is particularly
applicable for image files. Suppose that the following image files exist: moms_hughAlley_mayor.jpg and moms_hughAlley_mayor.png. Follow the steps below to upload both files at the same time:
Change directory (cd) into the images directory using the command line.
Enter moms_hughAlley_mayor.* into the commmand line (The asterix symbol in this command means anything. By replacing the file extension with the asterix symbol, this single command adds
the .jpg file and the .png file together).
Commit the files.
Practice: Send Your Images to be Added to the Centralized Image Storage
If you have more than three images, you must name and save them all on your computer
and then send them to the LEMDO team to be added to our centralized image storage. We recommend that you send them all at once rather than a few at a time.
Good Practice
In theory, there is no limit to the number of images that documentation, anthology
About pages, and editions can include. Good practice, however, is to include only images
that serve a necessary purpose.
LEMDO uses consistent encoding of images. You must encode each image’s type, width
and height, and alternate (alt) text. You also have the option to float your image
and create a visible caption for your images.
Practice: Link to an Image
To link to an image, add a
<figure>
element with a child
<graphic>
element. Put the
@url attribute on
<graphic>
. If your images are saved in the LEMDO repository (i.e., you have three or fewer
images in your edition), the value of
@url must be prefixed by img: followed by the full name of the image file, including the file extension (.jpg or
.png). If your images are saved in the centralized image storage, the value of
@url must be prefixed by edimg: followed by your edition abbreviation (e.g., FV for Famous Victories of Henry V), a slash, and then the full name of the image file, including the file extension.
Do not capitalize the file extension. Note that LEMDO has documented protocols for
how to name files; see Practice: Name Image Files.
You do not need to include the full path of the image location in the
<graphic>
element. The LEMDO build process will find the image and generate the right link
(and, in any case, our build process collects all the images into a single folder
in any output site).
In addition to
@url, there are three attributes that are required on the
<graphic>
element: the
@mimeType,
@width, and
@height attributes. The value of
@mimeType must begin with the prefix image/ followed by the format of the image that you are adding. For example, the
@mimeType value for a .jpg file is image/jpeg and the
@mimeType value for a .png file is image/png.
The value of
@width and
@height attributes provide the intrinsic (actual) size of the image in pixels. To find these
values, find the image in your computer’s file manager. Right click the image and
select Properties in the dropdown menu. Enter the value in digits followed by px. For example, width="300px" height="150px".
To increase accessibility, LEMDO also requires that all images have at least one of
the
<desc>
or
<figDesc>
elements. The content of these elements is used to provide alt text for images. If
there are both
<desc>
and
<figDesc>
elements, the contents of
<desc>
will be used for alt text. If there is no
<desc>
element, the contents of
<figDesc>
will be used for alt text. Note that the contents of
<desc>
will not be visible in the final output of your edition, it is only used to generate
alt text. Read more about the difference between
<desc>
and
<figDesc>
and learn how to write alt text in Write Alternate Text for Images.
Special Case: Encode Images as Thumbnails
LEMDO offers default rendering for image placement in critical paratexts. If an image
is small and/or you want it to be aligned left/right with text flowing around it,
you can indicate that you want the image treated as a thumbnail. If the image is full size and you want it to be centered across the full width of
the text block, you can indicate that you want the image to be given the fullwidth treatment.
With thumbnails, images are floated alternately left and right automatically. You
do not have control over this aspect of the rendering. This layout is consistent and
visually interesting for the user. Note: do not add the
@style attribute.
Add the
@type attribute to the
<figure>
element, with the following values:
Left/right float with text wrapping: thumbnail.
Fullsize, centered, with text above and below: fullsize. Note that this is the default rendering for images.
Note that if you omit the
@type attribute on the
<figure>
element, your image will be automatically displayed fullsize and centered. If this
styling is what you want, you may omit the
@type attribute and the value fullsize.
Practice: Encode Alt Text and Image Captions
To encode alt text, add a
<desc>
element as a child of the
<graphic>
element. Add a
@resp attribute on
<desc>
with the value pers: followed by your xml:id. Type your alt text in the text node of
<desc>
.
To add a caption to the image, add a
<figDesc>
element as a child of
<figure>
and sibling of
<graphic>
. Write the image caption in the text node of the
<figDesc>
element. The contents of
<figDesc>
will be visible in the final output of your edition.
Examples
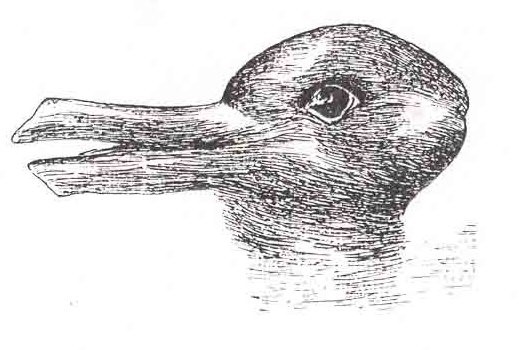
<figure> <graphic url="img:learn_altText_duckRabbit.jpg" mimeType="image/jpeg" width="519px" height="350px"> <desc resp="pers:HOUL3">Sketch of an animal that appears to be a duck from one angle and a rabbit from another.</desc> </graphic> <figDesc>The Rabbit-Duck Optical Illusion, from J. Jastrow, <title level="a">The mind’s eye</title>, <title level="j">Popular Science Monthly</title> 54 (1899), 299–312. Public domain image via Wikimedia.</figDesc> </figure>
The Rabbit-Duck Optical Illusion, from J. Jastrow, The mind’s eye,Popular Science Monthly 54 (1899), 299–312. Public domain image via Wikimedia.
Numbering figures allows you to point to them from other parts of your edition, such
as the critical paratexts and the annotations.
Practice
Once you have included a figure in your critical paratext file, or in an annotation,
add an
@xml:id attribute to the
<figure>
element. The xml:id of the
<figure>
element begins with the xml:id of the file (e.g., emdABBR_introduction) and ends
with the pattern _f1, _f2, and so on (where f1 is figure 1).
Examples
<figure xml:id="emdH5_CriticalSurvey_f1"> <graphic url="img:H5_Duck-Rabbit_illusion.jpg" mimeType="image/jpeg" width="519px" height="350px"> <desc resp="pers:HOUL3">A sketch of an animal that appears to be a duck from one angle and a rabbit from another.</desc> </graphic> <figDesc>The Rabbit-Duck Optical Illusion, from J. Jastrow, <title level="a">The mind’s eye</title>, <title level="j">Popular Science Monthly</title> 54 (1899), 299–312. Public domain image via Wikimedia.</figDesc> </figure>
Write Alternate Text for Images
Alternate (alt) text is text that describes the content of an image. Alt text is helpful
if a user cannot see an image (e.g., the user uses a screen reader2 or the image does not load).
Alt text is different from the image caption that editors may choose to write in the
<figDesc>
element because alt text gives a literal description of what is in the image. An
image caption, on the other hand, may be used to provide an image’s metadata or to
discuss what is depicted in the image. Alt text tends to give a more detailed description
and does not supply information not visible in the image. For information on how to
encode image captions with the
<figDesc>
element and on how to encode alt text with the
<desc>
element, go to Practice: Encode Alt Text and Image Captions.
Rationale
LEMDO adds alt text to improve website accessibility. Including alt text gives people
who use screen readers access to content that would otherwise be inaccessible. This
documentation will guide you through LEMDO’s principles and practice for writing alt
text.
Principles
When writing alt text, LEMDO follows principles of accessibility, honesty, and clarity.
Consider the following questions when you write alt text:
Does my alt text communicate the key components of this image?
Is there anything significant that a viewer of this image would see that a reader
would not get out of my alt text?
Does my alt text truthfully describe what is in the image?
Does my alt text include subjective terms (e.g., describing someone as pretty or happy), or objective ones (e.g., descibing characteristics such as using a wheelchair or smiling)? Replace subjective terms with objective ones.
Is my alt text concise?
Practice: Write Alt Text
Follow these steps to write alt text for the LEMDO project:
Capture important elements of the image: Because alt text is meant to describe an
image to someone who cannot view it, alt text should capture aspects that are important
to the overall meaning of the image for the argument. For LEMDO, this typically includes
the medium (a photograph, a wood engraving, etc.), the main subject of the image,
important imagery, and background.
Include the race of all human main subjects: LEMDO has decided to include the race
of people who are the subject of images, as race will be a point of discussion in
many editions. In practice, capitalize the first letter of Indigenous and Black; do
not capitalize white. Use the most accurate term for a person’s race or ethnicity
that you can (e.g., if you know that an actor in an image is Piikani, describe them
as Piikani rather than the more generic Indigenous). When describing a living or historical
person rather than a character, search to see if there is information available about
how they identify or identified to use the most accurate and respectful language.
Use objective language: Alt text has the goal of describing what is literally in an
image, not the interpretation of a viewer or describer. To fulfill that goal, use
objective language (describing what you see) rather than subjective language (describing
how the image makes you feel or how you interpret it). For example, do say A photo of smiling children rather than A photo of happy children.
Use concise language: Although there are typically no restrictions in the number of
characters that modern screen readers will read, some programs do not continuously
read long strings of alt text. Even with new technology, best practice is to have
relatively short and concise descriptions. If possible, keep descriptions under 125
characters.
Do not use quotation marks: Quotation marks in alt text can cause processing issues.
If quoting text included in an image, write Text reads: or a similar descriptive phrase followed by a transcription of the text.
Transcribe relevant sections of text: If there is text in the image (e.g., a title
or an artist’s signature), transcribe any section that may be relevant or that will
be discussed. If there are glyphs or ligatures (e.g., a long S), normalize the characters.
If the image includes old-spelling text, modernize it in your transcription to make
the screen readers’ output more clear. In cases where you have modernized spelling,
note that in the preferatory clause (i.e., Modernized version of text reads:). Note that alt text for images containing text will typically be necessarily long.
Special case: If an image with text is included for the purpose of demonstrating or
discussing early modern spelling conventions, provide a semi-diplomatic transcription.
Normalize glyphs and ligatures without tagging them, but retain spelling as it appears
in the image. You may also provide a modernized transcription afterwards for clarity—not
all words will be read clearly by screen readers if spelled using early modern spelling
conventions.
Examples
This image:
Is described by this alt text:
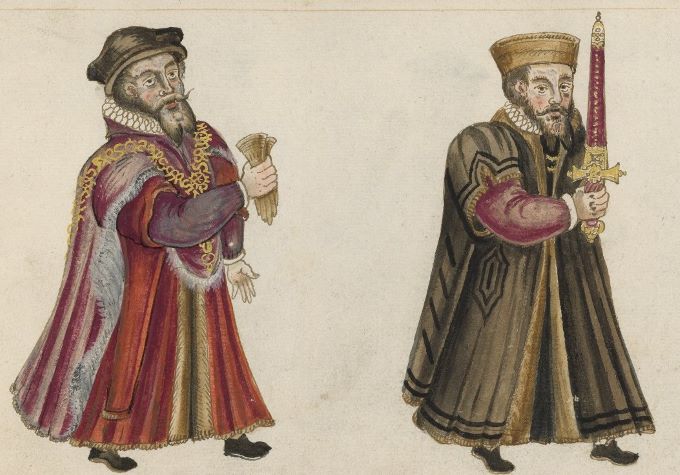
<desc resp="pers:HOUL3">A wood engraving of Henry V gesturing to dismiss Falstaff in front of his entourage
near Westminster Abbey. Henry is a muscular white man on horseback. Falstaff is a
fat, short, and balding white man standing on the ground speaking up to Henry. Text
underneath reads: Drawn by C. Robinson; Engraved by T. Robinson. Description underneath
reads: King Henry V. and Falstaff. Falstaff. My king! my Jove! I speak to thee, my
heart! King. I know thee not, old man: fall to thy prayers. Henry IV., Part II., Act
V., Scene IV.</desc>
This image:
Is described by this alt text:
<desc resp="pers:HOUL3">A sketch of an animal that appears to be a duck from one angle and a rabbit from another.</desc>
This image:
Is described by this alt text:
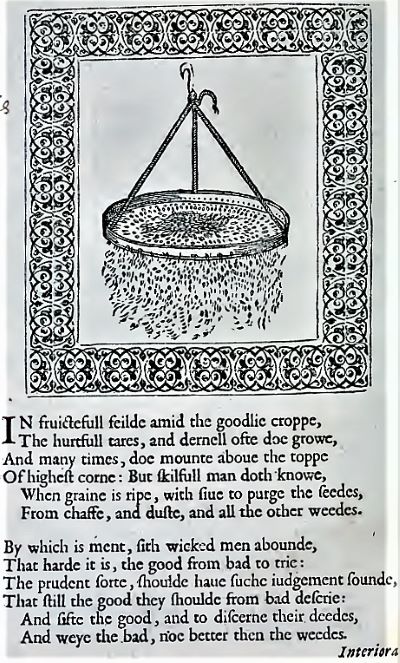
<desc resp="pers:HOUL3">A book page with a sketch of a flour bolt sifting grains out of flour surrounded by
a decorative border. Modernized version of the text below reads: In fruitful field
amid the goodly crop, The hurtful tears, and darnel oft do grow, And many times, do
mount above the top Of highest corn: But skilfull man doth know, When grain is ripe,
with sieve to purge the seeds, From chaff, and dust, and all the other weeds. By which
is meant, sith wicked men abound, That hard it is, the good from bad to try: The prudent
sort, should have such judgement sound, That still the good they should from bad descry:
And sift the good, and to discern their deeds, And weigh the bad, no better than the
weeds.</desc>
This image:
Is described by this alt text:
<desc resp="pers:HOUL3">White text on a black background reads: C:\Users\jenstad\lemdo\data\texts\MV greater-than
angle bracket svn status / M main\emdMV_Q1.xml</desc>
This image:
Relationship of HCMC Server at UVic to Your Local Workstation Is described by this alt text:
<desc resp="pers:HOUL3">A graphic shows a cycle beginning at Subversion Repository (the repo) on HCMC Server
at UVic. An arrow labelled svn up points to Your local workstation. An arrow labelled
svn commit points from your workstation to the subversion repository.</desc>
Editors may choose to include performances of various texts in their editions. By
performance, the LEMDO project refers not to a performance on which the text is based
(i.e., not a recording that subsequently serves as the basis for the encoded text),
but rather a recorded version that in some way derives itself from or comments upon the encoded text. That is, a performance is not subordinate to the
encoded text, but instead can be understood as a form of standoff annotation; it is
a commentary on the text itself.3 While the TEI Guidelines provide instructions for encoding recordings as the source material for an encoded
text, they do not (at the time of writing) offer an explicit set of rules for encoding
performance editions.
Step-by-Step: Workflow for Encoding Performance Files
The following workflow gives an overview of the process of encoding a performance
for your edition. The practice for completing each step is explained further on in
this documentation page.
Name your videos according to LEMDO practice for naming media.
Send your videos to the LEMDO team to be saved on an HCMC server.
Create a perf folder inside of your edition directory.
Create a video landing page using a LEMDO template.
Create a file for each video of your performance (typically one file for each scene).
Link to a video from each file.
Add your commentary (if you wish to comment on the content of the video).
Update navigational links at the end of each file.
Practice: Name and Store Video Files
As with images, LEMDO has a specific naming protocol for naming the video files that
are saved on HCMC’s server. All performance video file names must be prefixed by the
edition ID and an underscore and then followed by the scene number. All video file
names must end with a period followed by the video file extension (i.e., .mp4).
You must add leading zeros to the scene numbers to ensure that the number of digits
is consistent in each file name. For example, in a play with twelve scenes, two digits
are needed for all scene numbers (i.e., 01, 02, 03, … 10, 11, 12).
For example, the video for the first scene of Friar Bacon and Friar Bungay (play ID = FBFB) would be FBFB_01.mp4.
Once you have named all of your image files, you can send them to the LEMDO team to be added to the HCMC server that we use for video storage. Send a zipped folder
of videos or send a link to location from which we can download them (e.g., OneDrive,
GoogleDrive, a university server).
Practice: Create Your Performance Folder
You must have a folder in your edition directory in which you can save performance
pages. To create a new performance folder in your edition directory:
Right click on your edition directory in Oxygen.
Hover over the “New” option in the drop-down menu.
Select “Folder.”
Name the folder perf.
Once you have created the folder in Oxygen, you need to add it to the LEMDO repository.
The practice for doing so is the same as for adding any new file:
In Terminal, run svn status. You will see the added folder listed with a question mark (?) to its left. This
question mark indicates that the file exists in your local copy of the repo, but that
it is not yet queued up to be added to the shared repository.
Navigate into your edition directory using cd plus the path of your edition (e.g., cd data/texts/FBFB).
In most cases, you will want a landing page for your edition’s performances. This
page is typically the one linked from your edition page. The video landing page hosts
your full production video, links out to contextual information about your methodology,
offers information about the performance (or links to information), and links to the
video pages for each individual scene.
To create a video landing page for QME, use the LEMDO template file named qme_videoLandingPage_template. This template will work for editions in other anthologies but check with your anthology
lead to see what information is required for your anthology. LEMDO will make a new
template if necessary. See Use LEMDO’s Oxygen Templates for detailed information about creating a file using a template.
Name the file emdABBR_video.xml (replacing “ABBR” with your edition ID) and save it to your perf folder. Note that you will need to update the file’s xml:id to match the file name.
Once your file is created and saved with the correct name to your local copy of the
repo, follow the commented out instructions in it to update your file’s metadata and
content. You will need to:
Update the title of the file.
Give yourself credit if you have written annotations for the performance.
Give yourself credit as encoder of the file.
Update the xml:id for each div in the file so that it begins with the xml:id of the
file (e.g., emdABBR_video_introduction for the introductory section).
Update the video link for the full production.
Add the name of your play as instructed by the template.
Add links to your edition’s production credits and performance introduction as instructed
by the template.
Update the table with links to each scene’s video page as your create the pages.
Once your file is valid, you can add it to the shared LEMDO repository using svn add in Terminal. See Practice: Add Files to the Repository for detailed instructions.
Practice: Create Files for Scene Videos
You will make an XML file for each scene in the production. For QME, use the template
called qme_videoScene_template to create these files. This template will work to encode videos of scenes for other
anthologies but check with your anthology lead to see what information is required
for your anthology. See Use LEMDO’s Oxygen Templates for more information about using LEMDO templates.
Name each scene video file following the pattern emdABBR, followed by an underscore, video, and the scene number. Add leading zeros to the scene number in the file name so
that there is a consistent number of digits in all of the file names. In most cases,
there will be two digits in your scene numbers (e.g., 01, 02, 03, … 09, 10, 11). Put
together, the basic format for scene video file names is emdABBR_video_01.xml. Save each scene video file to your perf folder. Note that you will also need to change the file’s xml:id to match the file
name.
Once you have named and saved your scene video file to your local copy of the LEMDO
repository, follow the commented out instructions in the file to update it. You will
need to:
Update the title of the file.
Give yourself credit if you have written annotations for the performance.
Give yourself credit as encoder of the file.
Update the xml:id for each div in the file so that it begins with the xml:id of the
file (i.e., emdABBR_video_01_introduction for a section containing introductory text).
Update the link to the scene video in the
<media>
element.
Add commentary about the scene in paragraphs that are children of the
<note>
element.
Update the navigational links at the end of the file.
2.A screen reader is a type of technology that audibly reads the content of a screen.
Screen readers are helpful to people with disabilities such as people who are blind
or have vision impairments.↑
3.See the QME page on Performance as Research for a broader theoretical discussion on the nature of performance editions.↑
Prosopography
Illya
Illya has a BA in English and Sociocultural Anthropology and an MA in English. Prior
to joining the HCMC, he was a PhD candidate in English and Book History at the University
of Toronto and worked on Records of Early English Drama and on the Modernist Archives Publishing Project. His work at the HCMC focuses on creating web-based applications for research projects
led by members of the faculty of Humanities at the University of Victoria. This involves
creating schemas for new and existing datasets, writing XSLT and build files to transform
datasets into structured TEI and HTML formats, implementing staticSearch, and ensuring
that new projects are Endings Principles compliant.
Janelle Jenstad
Janelle Jenstad is a Professor of English at the University of Victoria, Director
of The Map of Early Modern London, and Director of Linked Early Modern Drama Online. With Jennifer Roberts-Smith and Mark Beatrice Kaethler, she co-edited Shakespeare’s Language in Digital Media: Old Words, New Tools (Routledge). She has edited John Stow’s A Survey of London (1598 text) for MoEML and is currently editing The Merchant of Venice (with Stephen Wittek) and Heywood’s 2 If You Know Not Me You Know Nobody for DRE. Her articles have appeared in Digital Humanities Quarterly, Elizabethan Theatre, Early Modern Literary Studies, Shakespeare Bulletin, Renaissance and Reformation, and The Journal of Medieval and Early Modern Studies. She contributed chapters to Approaches to Teaching Othello (MLA); Teaching Early Modern Literature from the Archives (MLA); Institutional Culture in Early Modern England (Brill); Shakespeare, Language, and the Stage (Arden); Performing Maternity in Early Modern England (Ashgate); New Directions in the Geohumanities (Routledge); Early Modern Studies and the Digital Turn (Iter); Placing Names: Enriching and Integrating Gazetteers (Indiana); Making Things and Drawing Boundaries (Minnesota); Rethinking Shakespeare Source Study: Audiences, Authors, and Digital Technologies (Routledge); and Civic Performance: Pageantry and Entertainments in Early Modern London (Routledge). For more details, see janellejenstad.com.
Joey Takeda
Joey Takeda is LEMDO’s Consulting Programmer and Designer, a role he assumed in 2020
after three years as the Lead Developer on LEMDO.
Mahayla Galliford
Project Manager, 2025-present; Assistant Project Manager, 2024-2025; Research Assistant,
2021-present. Mahayla Galliford (she/her) graduated from the University of Victoria
with a BA (honours with distinction) in 2024, and an MA English in 2026. Mahayla’s
undergraduate research explored early modern stage directions and civic water pageantry.
Her SSHRC-funded MA thesis project focuses on transcribing, editing, and encoding
early modern girls’ manuscripts, specifically Lady Rachel Fane’s May Masque in collaboration with LEMDO.
Martin Holmes
Martin Holmes has worked as a developer in the UVic’s Humanities Computing and Media
Centre for over two decades, and has been involved with dozens of Digital Humanities
projects. He has served on the TEI Technical Council and as Managing Editor of the
Journal of the TEI. He took over from Joey Takeda as lead developer on LEMDO in 2020.
He is a collaborator on the SSHRC Partnership Grant led by Janelle Jenstad.
Navarra Houldin
Training and Documentation Lead 2025–present. LEMDO project manager 2022–2025. Textual
remediator 2021–present. Navarra Houldin (they/them) completed their BA with a major
in history and minor in Spanish at the University of Victoria in 2022. Their primary
research was on gender and sexuality in early modern Europe and Latin America. They
are continuing their education through an MA program in Gender and Social Justice
Studies at the University of Alberta where they will specialize in Digital Humanities.
Nicole Vatcher
Technical Documentation Writer, 2020–2022. Nicole Vatcher completed her BA (Hons.)
in English at the University of Victoria in 2021. Her primary research focus was women’s
writing in the modernist period.
Rylyn Christensen
Rylyn Christensen is an English major at the University of Victoria.
Samuel Seaberg
Samuel Seaberg, a University of Victoria English undergrad, enjoys riding his bike.
During the summer of 2025, he began working with LEMDO as a recipient of the Valerie
Kuehne Undergraduate Research Award (VKURA). Unfortunately, due to his summer being
spent primarily in working to establish an edition of Thomas Heywood’s If You Know Not Me, You Know Nobody, Part 2 and consequently working out how to represent multi-text works in a digital space,
his bike has suffered severely of sheltered seclusion from the sun. Note: Samuel now
works for LEMDO as the Assistant Project Manager, much to his bike’s chagrin.
Si Micari-Lawless
Si Micari-Lawless is a research assistant with LEMDO and MoEML, and an incoming fourth-year
English major at the University of Victoria.
Tracey El Hajj
Junior Programmer 2019–2020. Research Associate 2020–2021. Tracey received her PhD
from the Department of English at the University of Victoria in the field of Science
and Technology Studies. Her research focuses on the algorhythmics of networked communications. She was a 2019–2020 President’s Fellow in Research-Enriched
Teaching at UVic, where she taught an advanced course on Artificial Intelligence and Everyday Life. Tracey was also a member of the Map of Early Modern London team, between 2018 and 2021. Between 2020 and 2021, she was a fellow in residence
at the Praxis Studio for Comparative Media Studies, where she investigated the relationships
between artificial intelligence, creativity, health, and justice. As of July 2021,
Tracey has moved into the alt-ac world for a term position, while also teaching in
the English Department at the University of Victoria.